


Privacy is cardinal in this cunning world. If you have stored important documents and files on your computer then you don’t want others to steal your intellectual property.
Therefore, you might have secured your account with the help of a password or a pin. But the problem with this is what if another person wants to use your computer?
So, in that case, you might want to set up a guest account. In this article, we are going to discuss different techniques by which one can easily set up a guest account.
What is a guest account in Windows 10?
A guest account is an account on your operating system which is not for permanent users. It is especially useful when you need to share your computer with someone without them interfering with your files and document.
Why Use a Windows 10 Guest Account
If you’re the only person using your computer, you must be an administrator with the power to do anything.
However, if malware infects your computer, it will also be granted admin powers. An administrator account is a security risk and you should create a second account that’s a standard user account.
It’s more work having two accounts on your home computer, and you might need to switch between them sometimes, but it’s more secure and blocks or limits some types of malware.
How To Enable Windows 10 Guest Account
There are different techniques/methods by virtue of which one can easily enable the guest mode in Windows 10. Let’s look at them:-
1. Use PowerShell/Command Prompt to enable Windows 10 guest account
Command Prompt is like a breath of fresh air amidst the polluted air exhaled by factories. Command Prompt/PowerShell can do a lot of things and creating a guest account is one of them.
To create a guest account with the help of Command Prompt/PowerShell just be obedient to the following steps:-
Note: In this example, I will be using PowerShell but you can perform the same steps in the command prompt as well.
Step 1: Launch PowerShell as an admin by searching it out from the start menu.
Step 2: Select “Yes” from the appeared “User Account Control” dialogue box.
Step 3: Now, write “net user guest/active:yes” on the appeared window.
The creation of the gues account will be confirmed by the statement saying “The command completed successfully”.

2. Use Computer Management to enable the guest account
Computer Management as the name suggests is a portal in your Windows 10 from where you can manage your computer, with the help of the portal one can easily enable or disable the guest account.
To enable a Guest account with the help of Computer Management you need to be obedient to the following steps:-
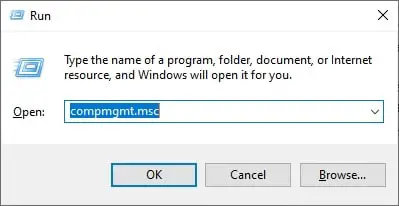
Step 1: Launch Computer Management by either searching it out from the start menu or by the RUN box(Windows + R), type “compmgmt.msc”, and hit enter.
Step 2: Now from the left side of the screen, reach users via Computer Management(Local)>Local Users and Groups>Users.
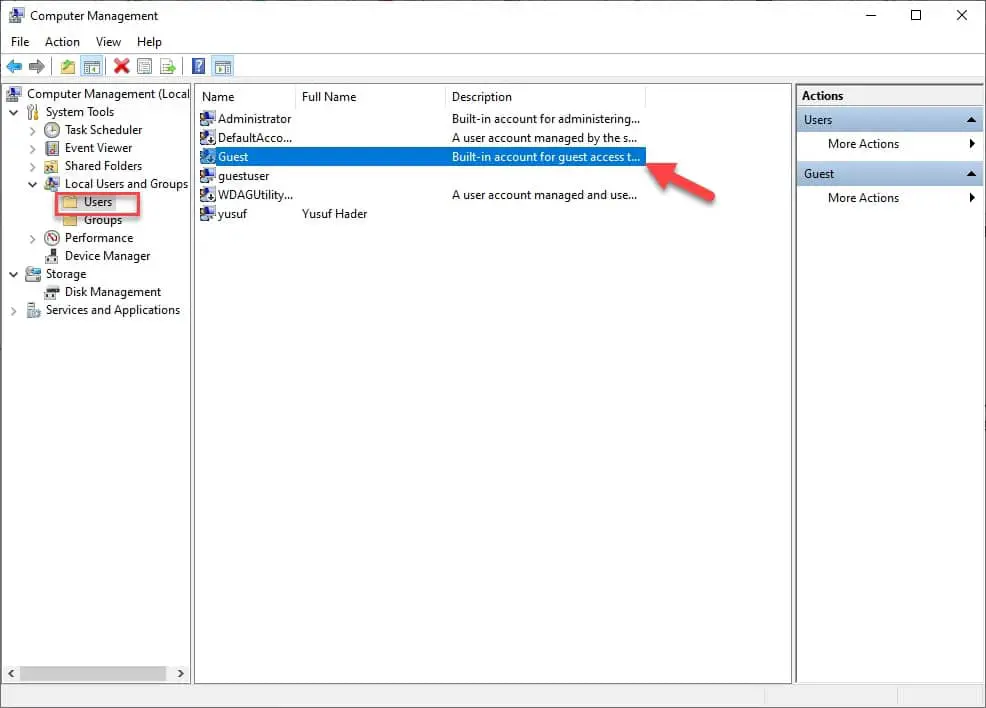
Step 3: Open Users by double-clicking it.
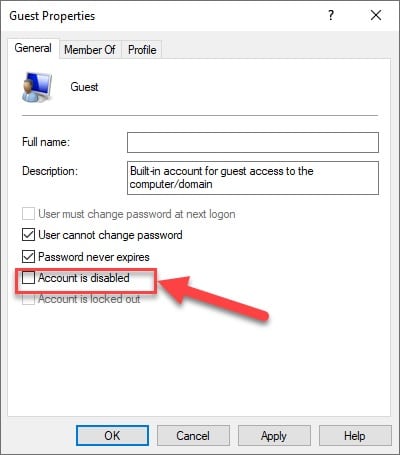
Step 4: From the appeared window untick the “Account is disabled” to enable the guest account and finish the procedure by clicking on OK.
And you are good to go.
3. Use the Local Group Policy Editor to enable the guest account
The local Group Policy Editor is used to manage the policies of the group within the Group Policy Objects(GPO), and we are going to use this editor to create a guest account.
Therefore, to enable the guest account with the help of the local group policy editor be obedient to the prescribed steps.
Step 1: Launch the Local Group Policy Editor by typing “Edit Group Policy” in the start menu.
Step 2: Now you need to reach “Account: Guest account status” via Computer Configuration>Windows Settings>Security Settings>Local Policies>Security Options by clicking on the options placed at the left side of the window.
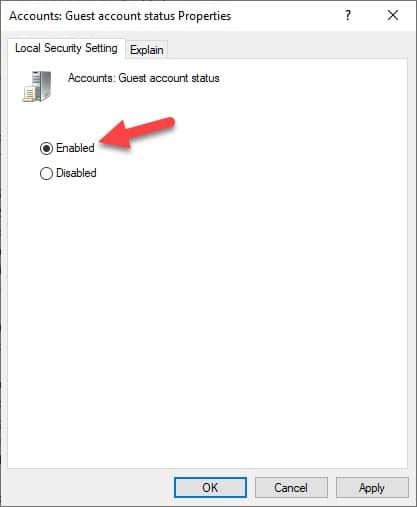
Step 3: Double-clicking Account: Guest account status will open a window where you need to select Enabled to enable the guest account.
And you are good to go.
How To Disable Windows 10 Guest Account
There can be dozens of reasons for you disabling the guest account, but the most prominent and the most common reason is the sluggishness of your PC.
The process of disabling the guest account is similar to that of enabling. We are going to go disable the guest account with the help of the same software that we used to enable it.
To disable the guest account in Windows 10 just be obedient to the following steps:-
1. Use PowerShell/Command Prompt to disable the Windows 10 guest account
To disable the guest account with the help of PowerShell/Command Prompt do the prescribed steps:-
Step 1: Launch PowerShell as an admin by searching it out from the start menu.
Step 2: Select “Yes” from the appeared “User Account Control” dialogue box.
Step 3: Now a command-line interpreter will appear where you need to write “net user guest/active:no”
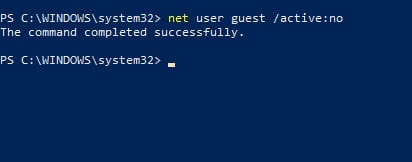
The creation of the guest account will be confirmed by the statement saying “The command completed successfully”.
2. Use Computer Management to enable the Windows 10 guest account
To disable the guest account with the help of the Computer Management interface do the prescribed steps:-
Step 1: Launch Computer Management by either searching it out from the start menu or by the RUN box(Windows + R), type “compmgmt.msc”, and hit enter.
Step 2: On the left side of the screen you will see a list from which you need to reach the “users” option, by navigating through this path, Computer Management(Local)>Local Users and Groups>Users.
Step 3: Open Users by double-clicking it.
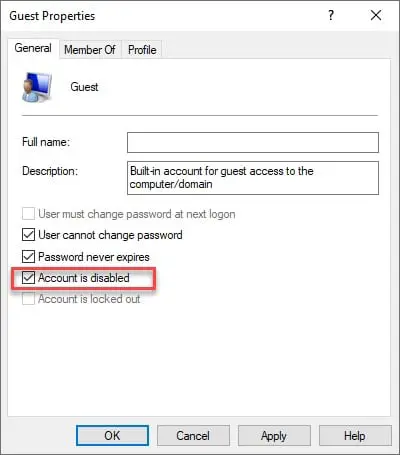
Step 4: From the appeared window tick the “Account is disabled” to disable the guest account and finish the procedure by clicking on OK.
3. Use the Local Group Policy Editor to disable the guest account
To disable the guest account with the help of the Local Group Policy Editor, you need to be obedient to the following steps:-
Step 1: Launch the Local Group Policy Editor by typing “Edit Group Policy” in the start menu.
Step 2: Now you need to reach “Account: Guest account status” via Computer Configuration>Windows Settings>Security Settings>Local Policies>Security Options by clicking on the options placed at the left side of the window.
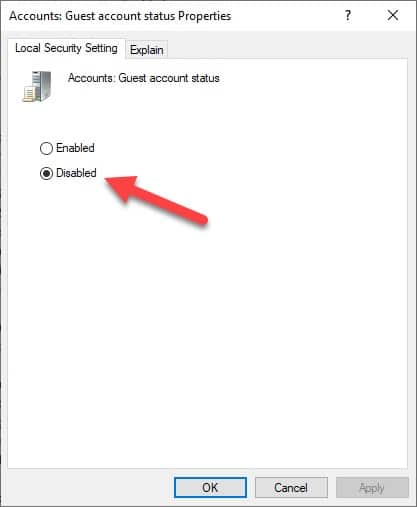
Step 3: Double-clicking Account: Guest account status will open a window where you need to select Disabled to disable the guest account.
How to Set-up a password of Windows 10 Guest User
Even though the guest account is for a temporary user, still one needs to protect it. The best and easiest way to protect an account is by adding a password to it. Here are a few techniques that you can use to set-up or change the password of a guest account.
Use PowerShell/Command Prompt to set-up password:-
As mentioned earlier, PowerShell and Command Prompt, two mighty command line interpreter of Microsoft Windows, we have already seen how to enable and disable the guest account with the help of PowerShell/Command Prompt and now we will be changing the password of the guest account with them.
To do that, you need to be obedient to the following steps:-
Step 1: Launch PowerShell as an admin by searching it out from the start menu.
Step 2: Select “Yes” from the appeared “User Account Control” dialogue box.
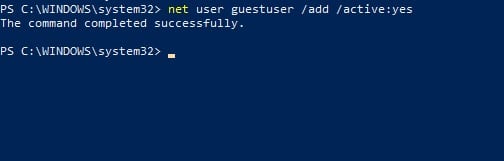
Step 3: Now a command-line interpreter will appear where you need to write net user guestuser *.
Step 4: After typing the command you will see an option where you need to enter the password, and hit enter, which will then ask you to confirm the password by retyping it, so retype the password and hit enter.
You are good to go.
Use Computer Management to set-up password
Computer Management is a portal that helps the user to manage the computer and accounts are no exception.
We have already learned how to enable and disable the guest mode with the help of the “Computer Management” application and now we are going to set-up or change the password of the guest account.
To do that, you need to be obedient to the following steps:-
Step 1: Launch Computer Management by either searching it out from the start menu or by the RUN box(Windows + R), type “compmgmt.msc”, and hit enter.
Step 2: Now from the left side of the screen, reach users via Computer Management(Local)>Local Users and Groups>Users.
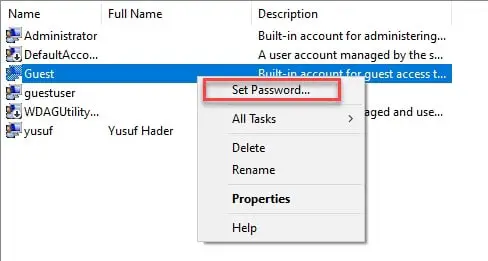
Step 3: Now right-click on the “Guest” option and select “Set Password” from the appeared list.
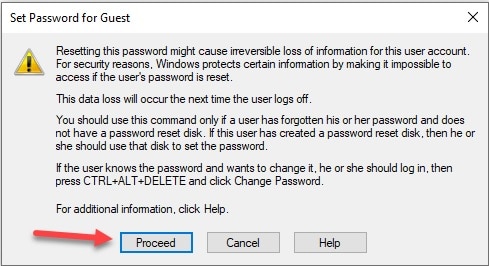
Step 4: A window will appear on your screen, just click on “Proceed” to move to the next step.
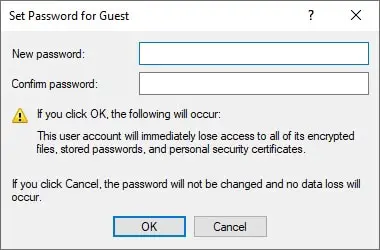
Step 5: A window will appear on your screen, where you need to type the password twice and click “OK” to confirm the proceeding.
Wrap-Up:-
We have seen how to manage the guest account in Windows 10. We have seen, how to enable, disable, and secure the guest account. Before, wrapping the article let’s quickly look at the key points:-
To enable the guest mode in PowerShell/Command Prompt, launch the application as an admin, and then type “net user guest/active:yes”.
To disable the guest mode in PowerShell/Command Prompt, launch the application as an admin, and then type “net user guest/active:no”.
To enable the guest account with Computer Management, launch the application, reach users, via Computer Management(Local)>Local Users and Groups>Users, and then open the option and untick “Account is disabled”.
To disable the guest account with Computer Management, launch the application, reach users, via Computer Management(Local)>Local Users and Groups>Users, and then open the option and tick “Account is disabled”.
To enable the guest account with the Local Group Policy editor, launch the app, reach “Account: Guest account status” via Computer Configuration>Windows Settings>Security Settings>Local Policies>Security Options, open it, and select Enabled.
To disable the guest account with the Local Group Policy editor, launch the app, reach “Account: Guest account status” via Computer Configuration>Windows Settings>Security Settings>Local Policies>Security Options, open it, and select Disabled.
To change the password of the guest mode in PowerShell/Command Prompt, launch the application as an admin, and then type “net user guestuser *” and they type the password twice.
To change the password of the guest account with Computer Management, launch the application, reach users, via Computer Management(Local)>Local Users and Groups>Users, and then right-click on the option and select “Set Password”, enter the password and you are good to go.


