First windows that I started to work with is Windows XP, which was the best operating system developed by Microsoft, but with the release of Windows 10, Microsoft changes or added many features in Windows 10 which many people don’t know about it.
With this Hidden Windows 10 Secret Settings article I am trying to cover out approx 80% windows 10 settings which will help to learn windows 10 settings in a better way.
Hidden Windows 10 Secret Settings
1. CUSTOMIZE “QUICK LINK” MENU
Add your own custom shortcuts to the menu that appears when you right-click the “Start” button. Use the portable Win+X Menu Editor tool (Download Now ) to add programs, control panel applets, and other system shortcuts, plus organize them all into groups.
2. CREATE GODMODE
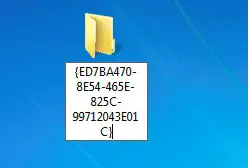
Create a new folder and name it as shown below (you can change the “GodMode” part if you like):
GodMode.{ED7BA470-8E54-465E825C-99712043E01C}
This gives you easy access to every single control panel applet via a convenient list—why not add it to your “Quick Link” menu?
3. VIEW USAGE BY DRIVE
Windows 10 provides you with a handy way of seeing what kind of content is
taking up space on each of your drives.
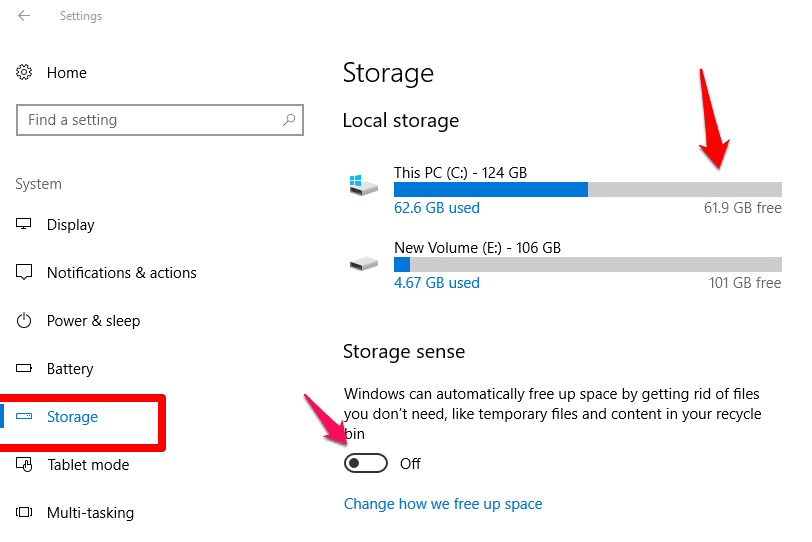
Navigate to “Settings > System > Storage,” and tap a drive to see a breakdown of content by type.
The Creator’s Update also introduces a “Storage Sense” button, which automatically clears temporary files, and files residing in the bin for over 30 days.
Read How to Free Disk Space Automatically with Windows 10 Storage Sense
4. MOVE APPS TO ANOTHER DRIVE
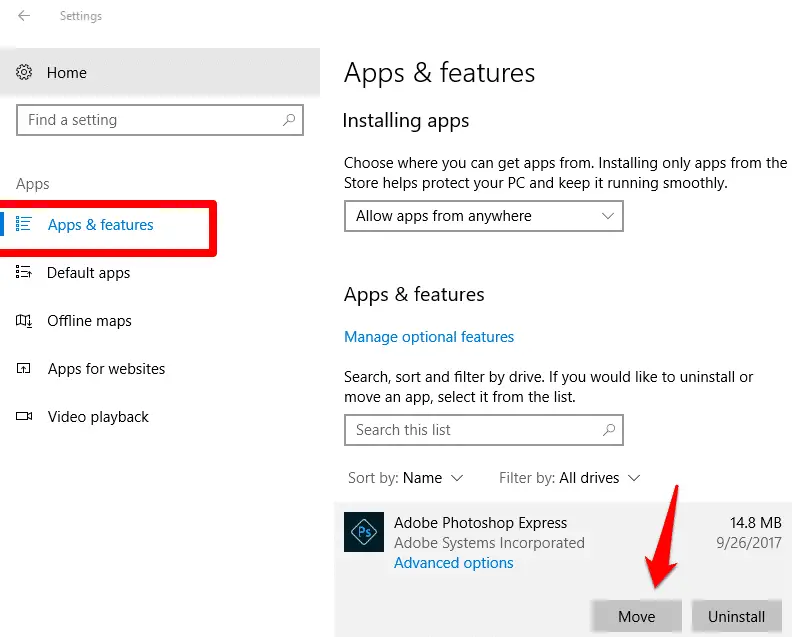
Running out of space on your system drive? Move existing Windows Store apps to another drive or partition via “Settings > Apps”—select the app, and click “Move” to select your target drive.
Force all new apps to install to a specified drive by switching to the “Storage” section, and tapping “Change where new content is saved.”
5. MOVE ANY PROGRAM
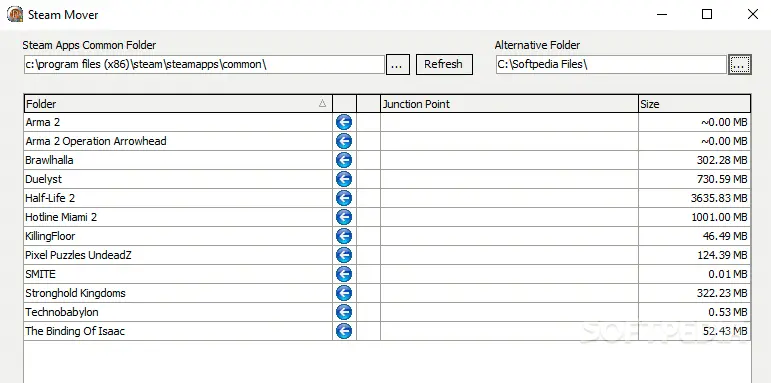
Why stop with Windows Store apps when you can move any installed desktop program? Download Steam Mover , and run it as an administrator. Point “Steam Apps Common Folder” to your Program Files folders, then select an alternative folder on your target drive (which must be formatted NTFS).
Once done, select each program you wish to move, and click the right arrow button to move them across. Clever use of “Junction Points” ensure the programs continue to work even from another drive, and you can always move them back if needed.
6. RESTRICT DRIVE USAGE
Prevent shared users from hogging all available drive space by setting
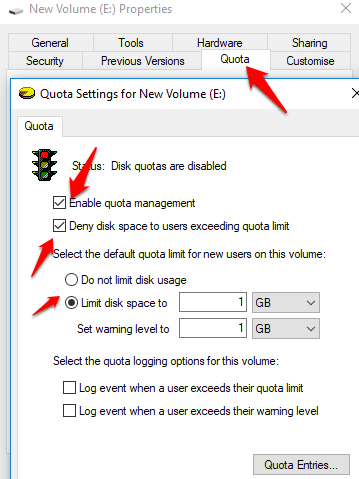
up drive-based quotas (again NTFS-formatted drives only). Open “File Explorer > This PC,” right-click your target drive, and choose the “Properties > Quota” tab.
Click “Show Quota Settings,” and check “Enable quota management,” followed by “Deny disk space to users exceeding quota limit,” and select “Limit disk space to.” Set your limit (probably in GB) and a warning (say 10–20 percent less than the limit), then click “OK.”
7. RESTRICT USAGE ON A PER-USER BASIS
To set limits for individual users, leave “Do not limit disk usage” selected,
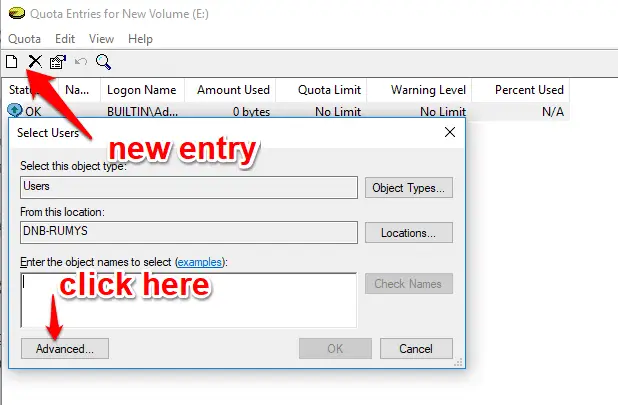
and click “Quota Entries” instead. Select “Quota > New Quota Entry.”
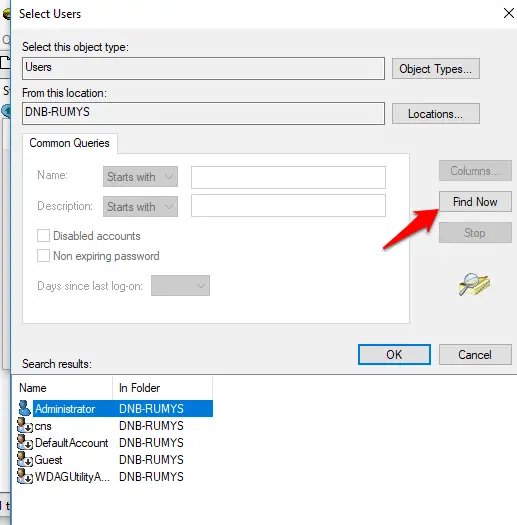
Click “Advanced,” then “Find Now” to list all available users. Select a name from the list, and click “OK” twice.
Set their quota and warning limits, then repeat for other users for whom you wish to apply limits. Once done, close the window, and click “OK” twice.
8. TAKE OWNERSHIP QUICKLY
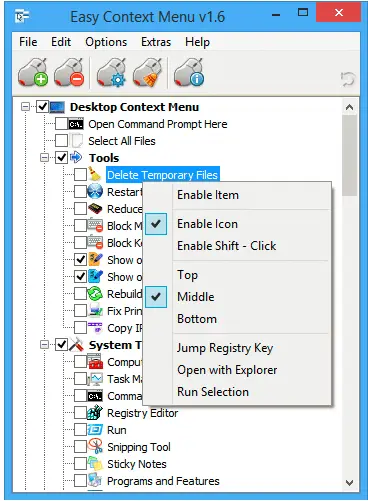
Need to reclaim ownership of a file or folder? Add a convenient shortcut to the right-click menu: download Easy Context Menu and use this program to enable Take ownership in your Windows right-click context menu.
Read A Complete Guide to Edit Windows 10 Right Click Context Menu
9. TASK VIEW SHORTCUTS
Press Win-Tab to trigger Task View, where you can easily move windows between multiple virtual desktops. Press Ctrl-Win-D to quickly create (and switch to) a new virtual desktop, and Ctrl-Win left/right cursor to move between them.
10. GROUP WINDOWS BY TAB
Task View too awkward? Download and install TidyTabs, and you can group multiple windows together in a single tabbed window—just like your browser, except it covers all apps, and you can mix and match different programs, too.
11. SWITCH DEFAULT VIEW
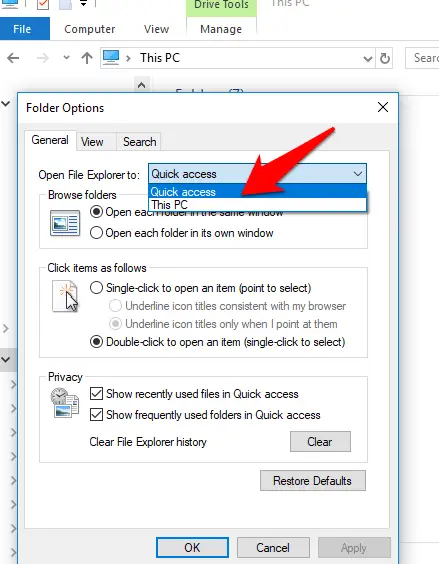
When you open a new File Explorer window, it defaults to the “Quick Access” menu. Change this by going to the “File” tab on the Explorer ribbon, and choosing “Folder & Search Options.” Click “Open File Explorer to…” and choose “This PC” to change the default action to showing your user folders, drives, and network locations.
12. TWEAK “QUICK ACCESS” FOLDER
You can also customize the “Quick Access” folder from here, too, by selectively removing both recently used files and frequently accessed folders from its view if you wish—this leaves only those shortcut folders that you specifically pin to the menu.
13. BACKGROUND SCROLLING
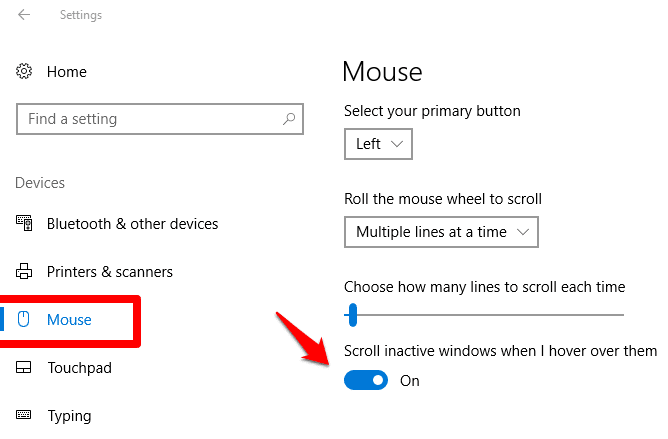
This feature enables you to scroll any program window using your mouse or trackpad, by moving the cursor over it, even when it’s not in focus. Toggle it on and off via the “Scroll inactive windows when I hover over them” switch under “Settings > Devices
Mouse and Touchpad.”
14. CONTROL FROM TASKBAR
The Aero Peek feature provides you with a convenient way to preview open app and program windows, without bringing them into focus, but it can provide other shortcuts, too. Take the Groove Music app, for example—roll your mouse over its Taskbar icon, and the Aero Peek preview contains playback controls you can use without bringing the main
program into focus.
15. SNAP APP WINDOWS
Snap Assist makes it even easier to snap multiple windows in place. Snap your first window in place by dragging it to the edge or corner of the screen, at which point all other windows appear as they do when in Task View. You can then drag these into place, bring them into focus, or even close them quickly and easily.
16. MORE COLOR CHOICES
The Creator’s Update gives you more control over your color scheme when tweaking your desktop. Go to “Settings > Personalization > Colors,” and click “Custom Color.” Use the color picker to choose your color, then adjust it with the help of a slider and preview (complete with a warning, should the colors be difficult to read).
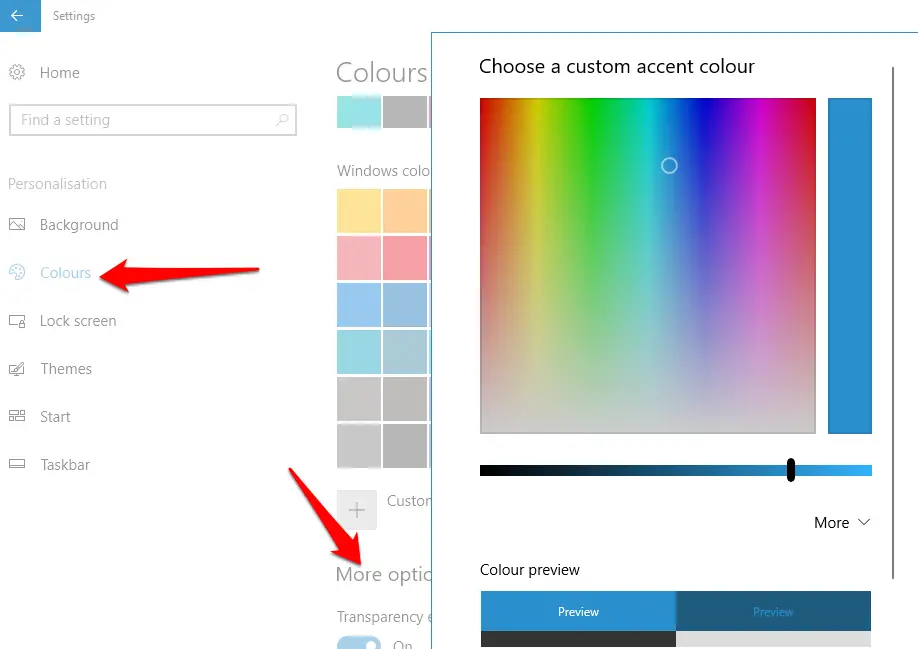
custom color scheme with the Creator’s Update.
17. TWEAK NOTIFICATION SETTINGS
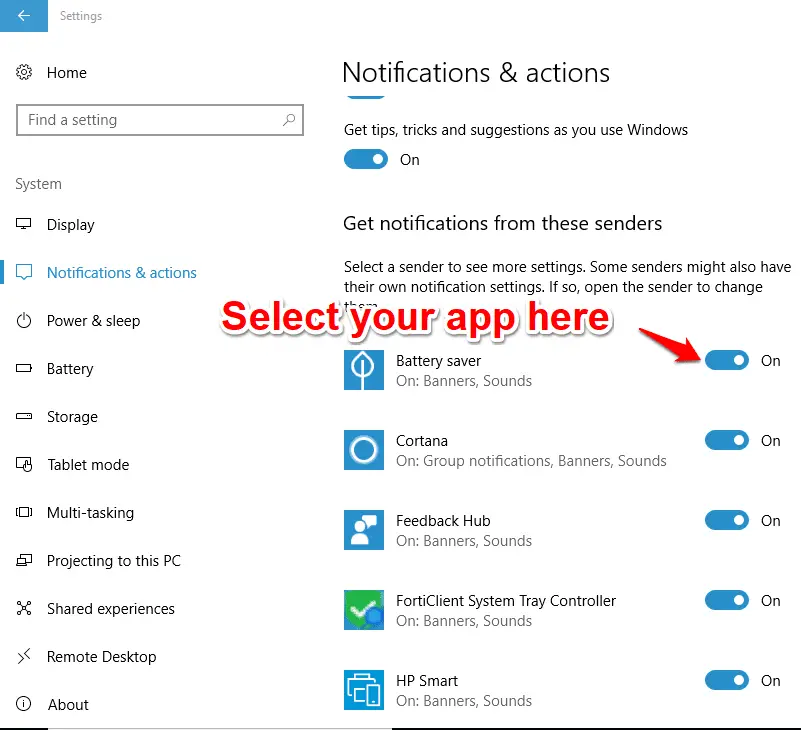
Fed up with certain apps constantly badgering you with notifications through the Action Center? Go to “Settings > System > Notifications & actions,” then scroll down to pick and choose exactly what apps and services get to notify you.
18. REMEMBER, REMEMBER
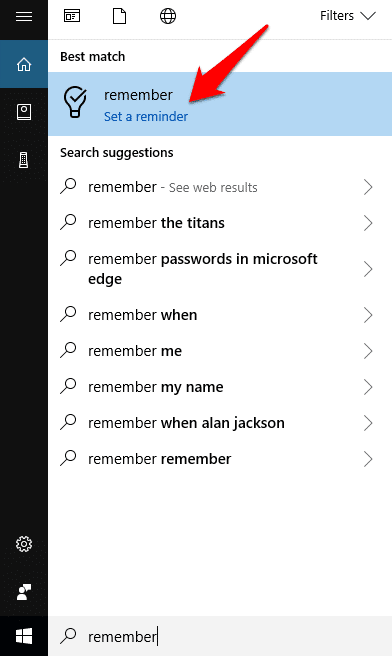
If you frequently forget something within moments of thinking it, Cortana could prove to be your lifesaver. Simply type (or speak) “remember” to set up a reminder from scratch, or try something such as “remember to get milk tomorrow after work” to include additional details.
19. DISABLE CORTANA
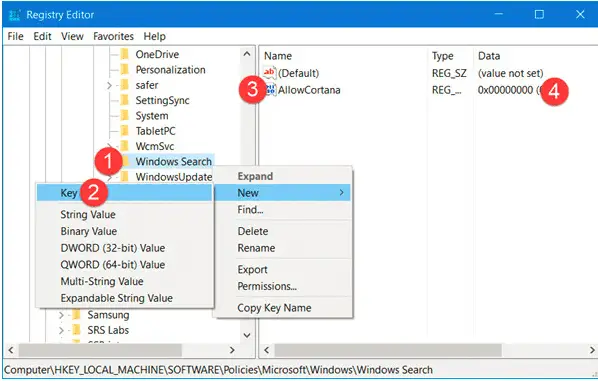
The quickest way to disable Cortana (although the process itself still runs in the background) is via a security policy setting—open Registry Editor,
browse to HKEY_LOCAL_MACHINE\SOFTWARE\Policies\Microsoft\Windows\WindowsSearch, and create a new DWORD value named “AllowCortana.”
Leave it set to 0, restart Windows Explorer via Task Manager, and it’s disabled.
21. YOUR NEW SEARCH BOX
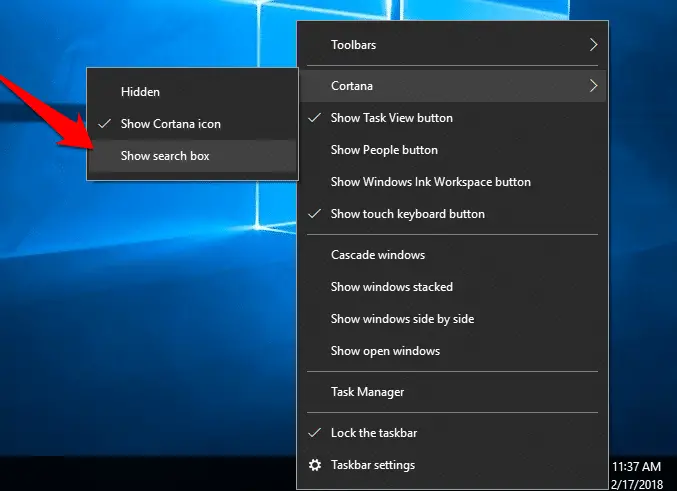
Once Cortana is disabled, the Search box displays “Search Windows,” and you can continue to use it to find apps, settings, and files on your PC—tap “Filters” to choose specific things to search for, such as folders, documents, or music. (While we’re on the
subject, right-click the Taskbar, and choose “Search > Show search icon” to replace the Search box with a simple search button.)
21. MASTER FILE ASSOCIATIONS
The quickest way to change a single file type’s association is to right-click a file in File Explorer, then choose “Open With > Choose another app.” Be sure to select “Always use this app to open…” before going through the list to find your chosen app (if it’s not
displayed, click “More apps,” then scroll down to the bottom, and click “Look for another app on this PC”).
22. SWITCH DEFAULT PROGRAMS
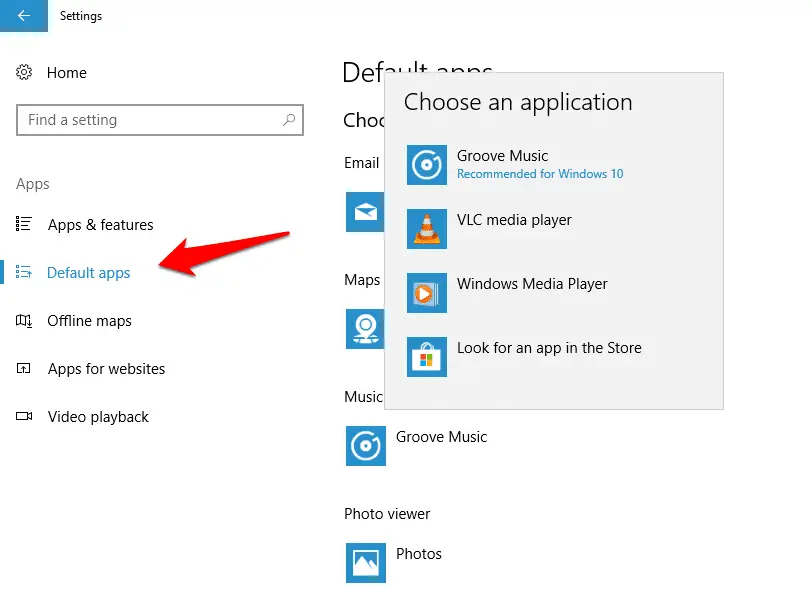
There’s little choice to be had at “Settings > Apps > Default apps,” but scroll down and you can choose “Set defaults by app” to gain access to a much wider range of apps. Select one to quickly assign multiple file types to it via “Choose defaults for this program.”
23. SAVE BANDWIDTH
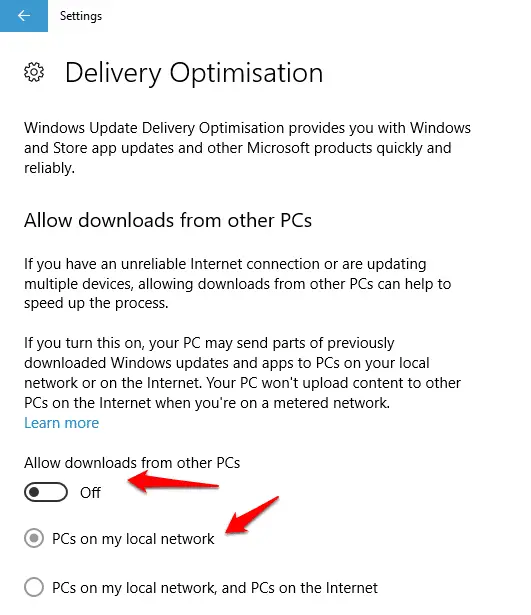
There are many ways in which you can stop Windows from wasting precious bandwidth when connected to a metered network, all accessible via Settings. First, go to “Update & Security > Windows Update > Advanced options > Choose how updates are delivered,” and change it to “PCs on my local network,” or even flick the switch off.
24. REDUCE DATA USAGE
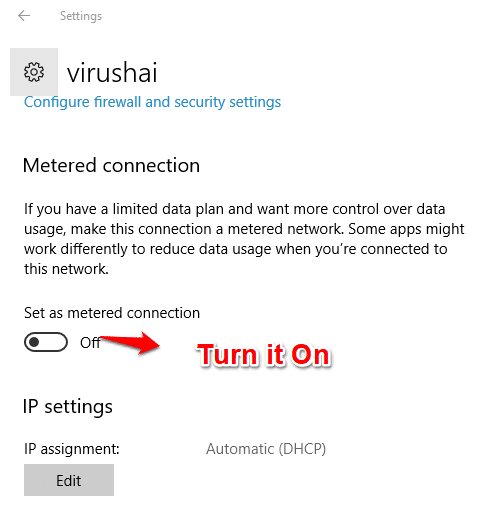
Go to “Network & Internet > Wi-Fi,” and click “Manage known networks.”
Choose a network with bandwidth limits, and click “Properties.” Flick “Set as metered connection” to “On,”
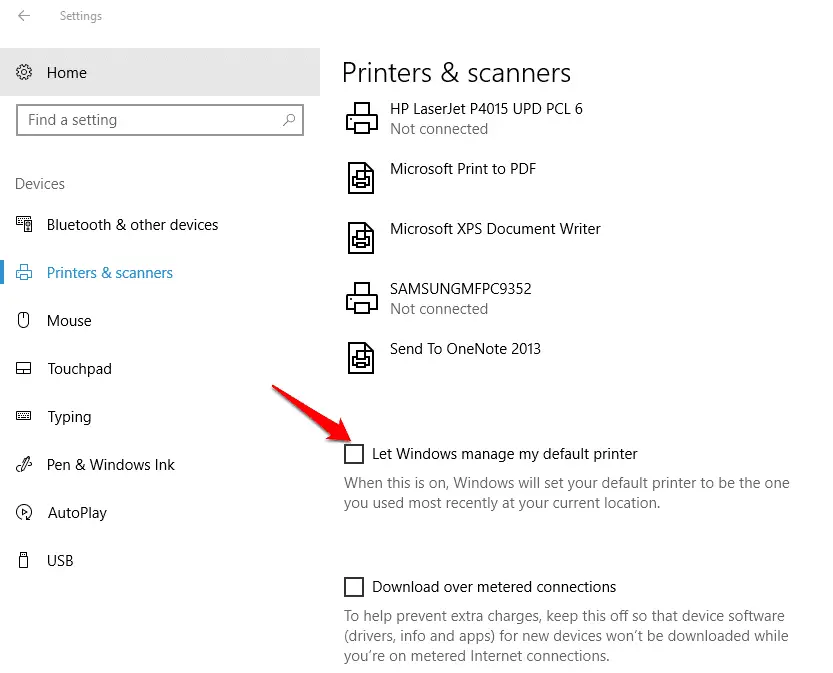
then go to “Devices,” to ensure “Download over metered connections” is “Off” under “Printers & Scanners” and “Connected devices.”
25. CHANGE PRINTER DEFAULT
If you’ve got two or more printers, go to “Settings > Devices > Printers & scanners,” and flick the “Let Windows manage my default printer” switch to “On” if you want the printer to always default to the last one you used.
26. PROJECT YOUR PC
Project your display from one wireless PC or tablet to another—both need
to support Miracast. Go to “Settings > System > Projecting on this PC” to verify this, then select “Available everywhere on secure networks.”
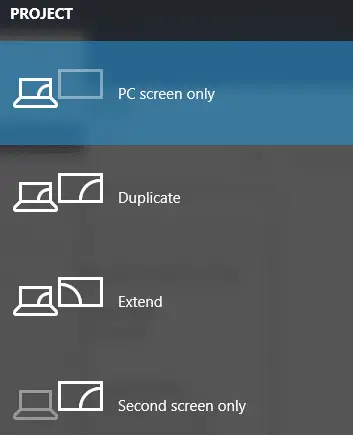
Now press Win-P on the device you want to extend, and click “Project to a second screen.” Select ‘“Connect to a wireless display,” select your target PC, and wait for the connection to be made, at which point your display can be duplicated or extended.
27. CAST VIDEO FROM EDGE
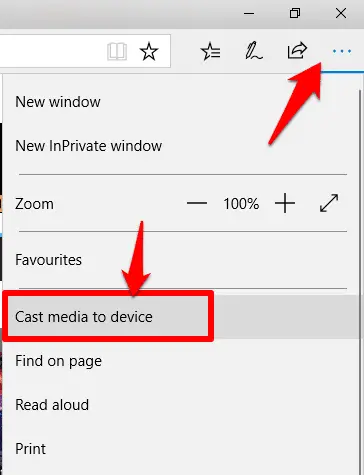
If you have a device capable of receiving Miracast or DLNA streams, you can cast media content such as YouTube video direct from Edge— navigate to the page containing your media, then click “…” and choose “Cast to Device.” Wait for it to appear, then select it to switch output to that device.
28.TAME WINDOWS UPDATE
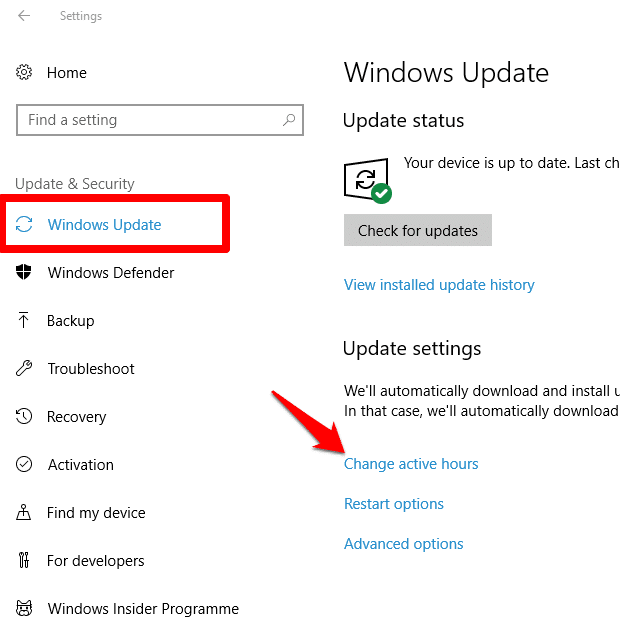
Make sure Windows Update doesn’t suddenly reboot your PC without your permission. Go to “Settings > Update & security,” and click “Change active hours” under “Windows Update” to set the time of day you’re active on your PC.
Updates will be scheduled to reboot outside this period only if you’re not using your computer.
29. MORE UPDATE OPTIONS
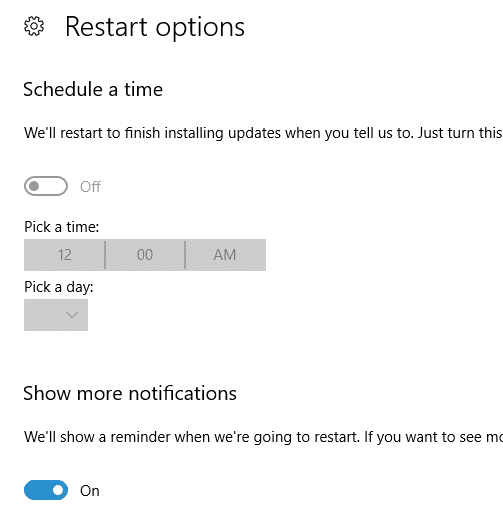
The Creator’s Update introduces two new update options: click “Restart options” to pick an exact time of day for Windows Update to complete updates. Also, flick the “Show more notifications” switch to “On,” and you’ll be able to snooze updates for up to three days at a time.
30. ACTIVATION TROUBLESHOOTER
Here’s some good news—if you took advantage of the free Windows 10 upgrade, then signed in with your Microsoft Account, your Windows license is linked to the account (do this manually via “Settings > Update & security > Activation > Add an account”).
You can now perform major hardware surgery—including swapping out the motherboard—
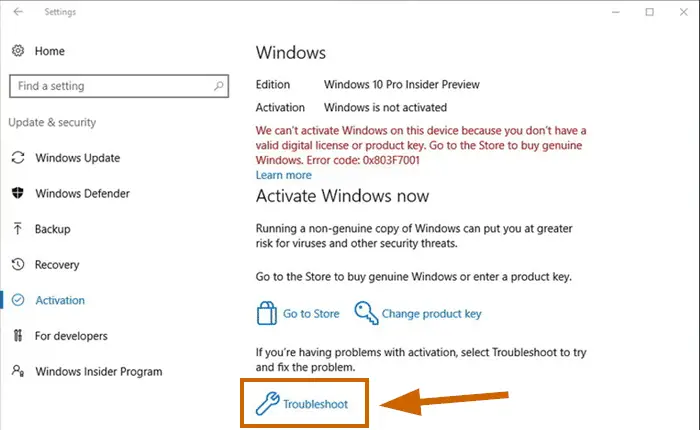
without losing your copy of Windows. If you run into problems with reactivation, click “Troubleshoot” on the “Activation” page, and select “I changed hardware
on this device recently” to resolve them.
31. CUSTOMIZE COMMAND PROMPT
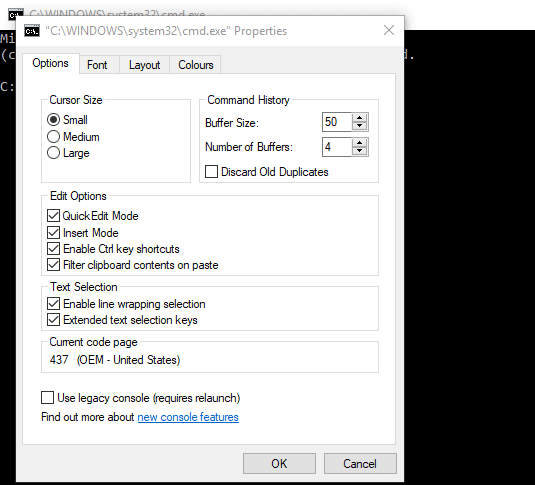
Windows 10 revamps the Command Prompt to provide lots of extra functionality, such as support for clipboard keyboard shortcuts and text wrapping. Configure these by right-clicking the Command Prompt menu bar and choosing “Properties.” While you’re here, customize the size, color scheme, and fonts, too.
32. ACCESS DEVELOPER TOOLS
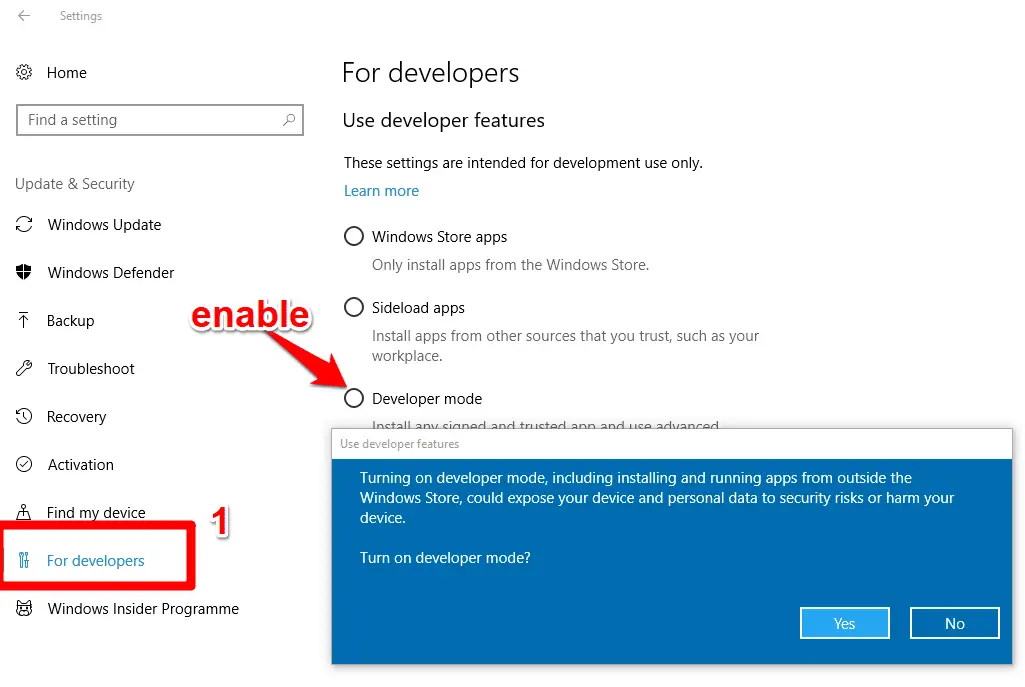
Go to “Settings > Update & Security > For Developers,” and select “Developer Mode” under “Use developer features.” Tweaks include “developer-friendly” options for Windows Explorer, such as showing full directory paths in the title bar.
33. RUN BASH COMMANDS
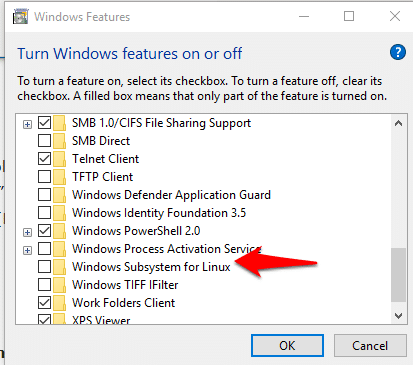
You can run Linux commands in Windows when Developer Mode is enabled via the Bash UNIX Shell— right-click “Start,” and choose “Programs and Features,” then click “Turn Windows features on or off.” Select “Windows Subsystem for Linux (Beta).” Click “OK,” and reboot when prompted.
34. BASH LIMITATIONS
Once enabled, press Win-R, type “bash,” and hit Enter to install Ubuntu on Windows. You can then run command-line Linux apps and Bash commands via the Bash on Ubuntu on Windows app, or by invoking Bash from the Command Prompt, like so:
$ bash ls -l
35. IMPROVE BATTERY LIFE
Make your laptop or tablet run further between charges by going to “Settings > System > Battery,” and switching on Battery Saver. Push the slider up to 70 or even 80 percent, then tap “Battery usage by app” to see which apps require most power.
Consider replacing them with more power-efficient alternatives (such as the Opera web browser instead of Edge, for example).
Read How to Maximize Battery Life on Windows 10 PC
36. LOCKDOWN WI-FI
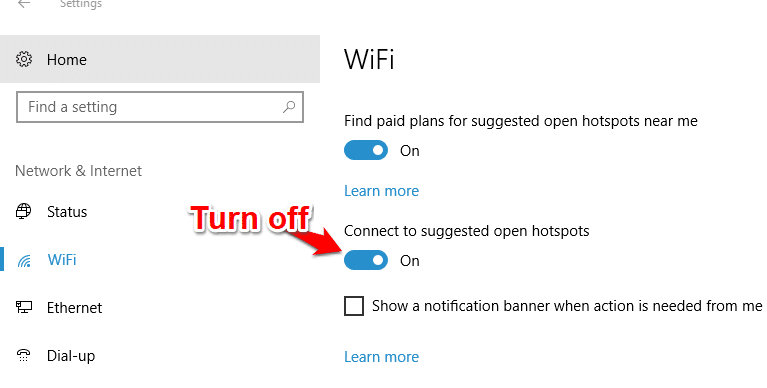
Make sure you’re not exposed to insecure wireless networks: go to
“Settings > Network & Internet > Wi-Fi.” Make sure “Connect to suggested open hotspots” is disabled if you don’t connect through a VPN.
37. RUN A PRIVACY SWEEP
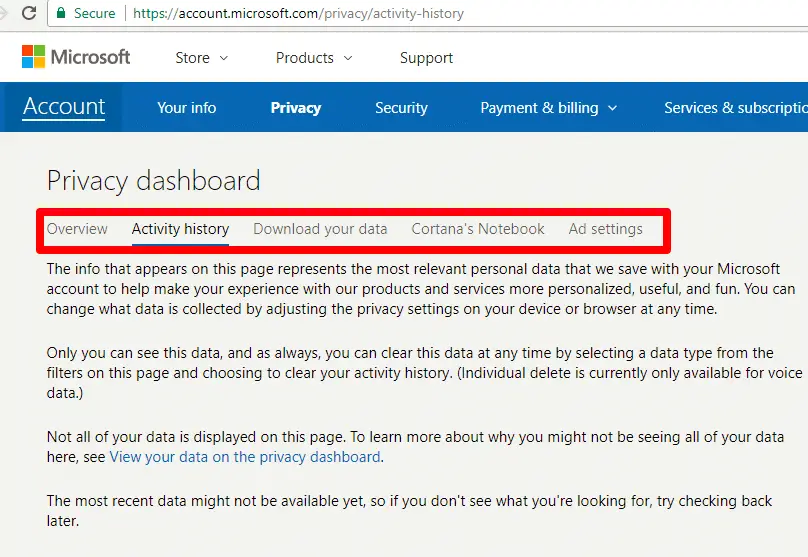
Go to https://account.microsoft.com/privacy, where you’ll find a web dashboard providing convenient shortcuts to reviewing and clearing personal data stored in the cloud, including Cortana Notebook.
You can also perform a local audit via “Settings > Privacy,” but if this is all too confusing, run the portable O&O ShutUp 10 tool (www.oosoftware.com/en/shutup10) for a one-click solution.
38. OPTIMIZE ONEDRIVE
Right-click the OneDrive Taskbar Notification area icon, and choose “Settings.” Click “Choose folders” under “Account” to sync selective content to your PC, and set bandwidth limits under the “Network” tab if you think OneDrive is adversely affecting your Internet connection.
Go to the “Office” tab and deselect both boxes if you find Office defaulting to your online file copies instead of those stored locally.
39. RECORD VIDEO FROM ANY APP
The Game DVR function exists to allow you to record your gaming exploits, but
you can use it on any app you install from the Windows Store. Simply open
the app, press Win-G, and check “Yes, this is a game” when prompted to open it.
40. DITCH OFFICE INSTALL PROMPT
Fed up with being constantly reminded to install Office? Open the “Start” menu, locate the “Get Office” shortcut in the “All apps” menu, then right-click it, and choose “Uninstall” to remove both the prompt and the underlying application.
You will learn a lot about Windows 10 with my these Youtube Video Tutorials.
Conclusion
With this Hidden Windows 10 Secret Settings guide, You are easily able to learn approx 80% settings about windows 10.


