


The copy-and-paste feature lets you quickly and easily move text from one window or app to another. Sometimes, you want to capture all the elements on a page, so a screenshot will be necessary.
This guide on how to take a screenshot on Asus laptops will show Asus users just how it is done.
There are different methods and shortcuts for taking screenshots on your Asus laptop. The methods you use will depend on what kind of screenshot you want to take and your preference.
I will show you almost all the ways to take a screenshot on Asus laptops.
Some of these methods are shortcuts requiring just one click, while others are long processes.
You can practice each of these methods to see which you prefer as you read about how to take screenshots on Asus laptops.
How To Take A Screenshot On Asus Laptop Using The Print Screen Key
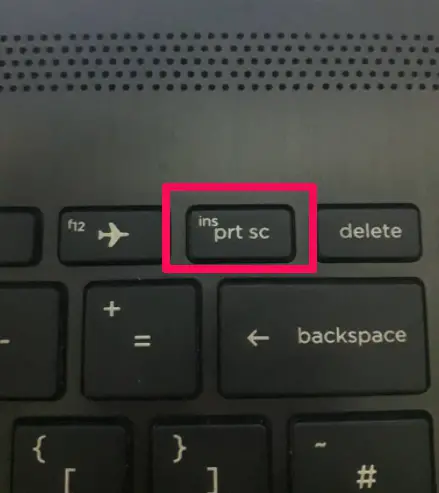
The Print Screen key is a shortcut for taking screenshots on Asus laptops. Note that this method only takes the screenshot but doesn’t automatically save it.
When you press the Print Screen key on the keyboard, the full window screens will be automatically copied to the clipboard.
To take a screenshot on an Asus laptop using the print screen button, follow these steps:
Press prt sc (print screen) button to take a screenshot
 Open Paint on Windows or any other photo editing software like Photoshop
Paste the screenshot (press ctrl + V) or “paste” in the upper right corner of Paint
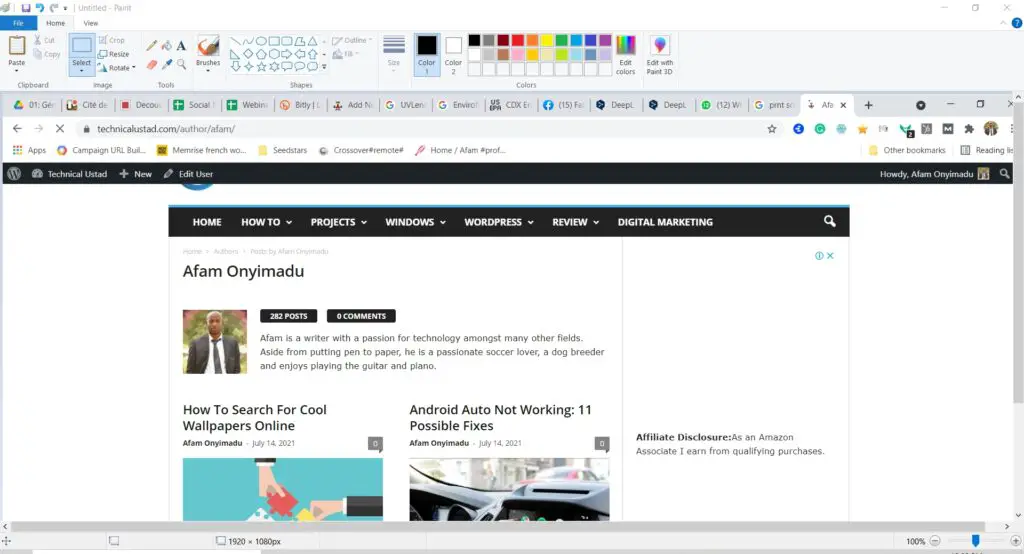 Edit the screenshot if you want to
Save the screenshot. Press Ctrl + A
In the popup that appears, enter the name of the screenshot and click on save.
How To Take A Screenshot On Asus Laptop Using Windows And Print Screen Keys
This method is the easiest and quickest way to take screenshots on Asus laptops. Using the Windows key and Print Screen, key ensures that your screenshot is saved without opening any photo editing software.
To capture the screenshot press Windows key + prt sc. The screenshot will be automatically saved.
To locate your screenshot, open the file explorer and click Pictures. Finally, click on Screenshots. Here you will find the screenshots you have taken.
![How To Take A Screenshot On Asus Laptops [Step-By-Step]](https://technicalustad.com/wp-content/uploads/2021/07/pics-1024x619.jpg)
How To Take A Screenshot On Asus Laptop Using Windows + H
Using the Windows key + H allows you to take a screenshot of the active window and share it immediately. To use this shortcut for direct sharing without saving, follow these steps:
Open the window you want to screenshot
Press Windows key + H
![How To Take A Screenshot On Asus Laptops [Step-By-Step]](https://technicalustad.com/wp-content/uploads/2021/07/wh.jpg) A window will open for you to share. The window will contain all the available share options for your PC. Click on the option you want to use in sharing and follow the prompts to share.
A window will open for you to share. The window will contain all the available share options for your PC. Click on the option you want to use in sharing and follow the prompts to share.
Using Alt + Print Screen To Take Screenshots On Asus Laptop
Now I will show you how to take a screenshot on Asus laptops using the Alt + Print Screen. This shortcut takes a screenshot of the active window and copies it to the clipboard. It can then be saved in photo editing software.
To do this on your Asus Windows laptop, follow these steps:
- Open the window you want to take the screenshot of
- Press Alt + prt sc, and the screenshot will be taken and copied to the clipboard
![How To Take A Screenshot On Asus Laptops [Step-By-Step]](https://technicalustad.com/wp-content/uploads/2021/07/altp-rotated.jpg)
- Open a photo editors software like Paint or Photoshop
- Paste (press ctrl + V) on the photo editor software
- Edit the screenshot if you want to
- Save (Ctrl + S)
Using Ctrl + Print Screen To Take Screenshot On Asus Laptop
This is another way of capturing the entire screen in a screenshot. If the method mentioned earlier of using the Alt + print screen does not work, then you can try this as an alternative.
Pressing Ctrl + prt sc simultaneously copies the screenshot of the screen to the clipboard. Follow these steps:
- Open the window you want to capture
- Press Ctrl + prt sc simultaneously
- Open a photo editor software like Paint or Paint 3D
- Press Ctrl + V to paste the screenshot
- Edit the screenshot if you want to
- Press Ctrl + S to save the screenshot.
How To Take A Screenshot On Asus Laptop Using Fn Key + Print Screen
So far, I have shown you how to take a screenshot of the whole screen using both alt + prt sc and ctrl + prt sc. This is another key combination that does the same work. The steps are identical to that of the last two methods discussed:
- Press fn + prt sc
- Open a photo editor software, and paste the screenshot by pressing ctrl + V
- Edit the screenshot
- Save the screenshot by pressing Ctrl + A
How To Take A Screenshot On Asus Laptop With Visible Mouse Cursor
You can also take a screenshot on your Asus laptop with the mouse cursor visible. To do this, you will use a tool available on Windows called Steps Recorder.
To take a screenshot with a visible mouse cursor, follow these steps:-
Press the Windows key
Search for Steps recorder and click on it
![How To Take A Screenshot On Asus Laptops [Step-By-Step]](https://technicalustad.com/wp-content/uploads/2021/07/steps.jpg)
- A short window will appear on your screen. Click on start record
![How To Take A Screenshot On Asus Laptops [Step-By-Step]](data:image/svg+xml,%3Csvg%20xmlns='http://www.w3.org/2000/svg'%20viewBox='0%200%20443%2074'%3E%3C/svg%3E)
- After that, wherever you click on your screen captures a screenshot with the cursor visible
- After taking the screenshots, click on stop record
- After clicking on stop record, you will be shown all the screenshots you took
- Click on save to save them
![How To Take A Screenshot On Asus Laptops [Step-By-Step]](https://technicalustad.com/wp-content/uploads/2021/07/stepss.jpg)
Taking Screenshots On Asus Laptops Using Windows + Shift + S
If you want to take screenshots of only a portion of the screen this is the go-to method. Press Windows key, Shift, and S simultaneously. This is available only on Windows 10. Follow these directions:
- Press Windows key + Shift + S
- Click and drag your mouse to select a certain portion of the screen
- Release the mouse button to capture the screenshot
- Go to Paint 3D or any photo editor software and paste (ctrl + V)
- Edit your screenshot
- Save the screenshot (Ctrl + S)
Using The Windows Snipping Tool To Take Screenshots On Asus Laptops
The Snipping tool is one of the best for taking screenshots on your Asus laptop. You can take screenshots of the entire screen or portions of it. You can also crop the screenshots immediately after taking them with this tool.
To begin using it, press the Windows key and search for the Snipping Tool.
After clicking on it, a window will appear with different screenshot options such as free form, rectangular, window, and full screen. Choose your preferred option.
![How To Take A Screenshot On Asus Laptops [Step-By-Step]](https://technicalustad.com/wp-content/uploads/2021/07/snip.jpg)
Another feature that makes the Snipping tool stand out is the delayed response feature that allows the screenshot to be delayed for 1-5 seconds after clicking.
Other interesting features include scrolling screenshot, creating GIFs, and the option to save to the library.
Using Browser Extensions To Take Screenshots
The next important aspect of taking a screenshot on Asus laptops is using browser extensions to capture screenshots.
You can use extensions if you want to capture screenshots while using your browser. This is especially important when you have several screenshots to capture within the browser environment.
There are a good number of extensions you can use, such as:
Using Third-Party Software To Take Screenshots
There are limitations to what the Windows tools discussed so far can do. If you are looking for some niche functionality or you take screenshots often, third-party software will make your takes easier and quicker.
A good screenshot software should:
- Be able to capture a specific region or the whole screen
- Include annotating options
- Be flexible with how images are saved. Either to the hard drive or gallery
- Allow for easy sharing
With that said, here are a few good third-party software for taking screenshots on your Asus laptop.
Snagit
Snagit possesses the features mentioned above, and then some. Using its click-and-drag feature, you can take screenshots of any portion of the screen. Editing can be done quickly and easily. Not only can you take screenshots, but you can also do screen recording with Snagit.
This snagit/greenshot comparison may come in handy.
Screen Rec
This lightweight app makes screen capture on your Asus laptop easy. You can edit and make annotations. After saving your image, an automatic link for sharing is created and copied to your clipboard.
📗FAQ’s
If your Asus laptop doesn’t have a Print Screen button, you can take screenshots using the Windows Snipping Tool.
To access the Snipping Tool, open the app and type “Snipping Tool” in the Windows search bar. From there, you can select the screenshot you want to take and save it to your computer.
How do I capture a screenshot on a laptop?
To capture a screenshot on a laptop, you can press the Print Screen button (often abbreviated as “PrtScn”), which captures an image of the entire screen.
Alternatively, depending on your laptop model, you can use a combination of keys, such as Fn + Print Screen or Windows key + Print Screen. You can also use third-party software or the built-in Snipping Tool on Windows to capture screenshots.
How do you screenshot on an Asus Chrome laptop?
To take a screenshot on an Asus Chrome laptop, simultaneously press the Ctrl + Show windows keys. The Show Windows key is usually located in the top row of the keyboard and looks like a rectangle with two lines on the right side.
Where is PrtScn key on Asus?
The PrtScn key is usually located in the top row of the keyboard, often next to the F12 key, on an Asus laptop. It may also be labeled as “Print Screen” or “PrtSc” and may require the use of the “Fn” key to activate it.
How do I take a screenshot on my laptop when PrtSc is not working?
If your PrtSc key is not working, use the Windows Snipping Tool or a third-party screenshot tool. You can also try using a combination of keys, such as Fn + Windows key + Print Screen, to capture a screenshot.
How do I take a screenshot on my laptop if my PrtSc is not working?
If your PrtSc key is not working, use the Windows Snipping Tool or a third-party screenshot tool. You can also try using a combination of keys, such as Fn + Windows key + Print Screen, to capture a screenshot.
How do I take a screenshot on my laptop with Shift key?
To take a screenshot on your laptop using the Shift key, you can press the Windows key + Shift + S. This will bring up the Snipping Tool, which allows you to capture screenshots of specific areas on your screen.
What are 3 ways to take a screenshot on a PC?
There are several ways to take a screenshot on a PC, including using the Print Screen button, a combination of keys such as Windows key + Print Screen, or the Snipping Tool. You can also use third-party software to capture screenshots.
The F12 key is often used as a shortcut to take a screenshot on a PC. However, this may vary depending on the laptop model and configuration.
How do I capture a screenshot?
To capture a screenshot on a PC, you can use the Print Screen button, a combination of keys, such as Windows key + Print Screen, or the Snipping Tool. You can also use third-party software to capture screenshots.
How do I take a screenshot of F12 Chrome?
To take a screenshot of F12 in Chrome, you can use the Print Screen button or a combination of keys such as Ctrl + Shift + F12 to capture a screenshot.
How do you screenshot on an Asus laptop with Windows 11?
To take a screenshot on an Asus laptop running Windows 11, you can use the Windows key + Shift + S combination to bring up the Snipping Tool, which allows you to capture screenshots of specific areas on your screen.
Where does F12 Print Screen go?
When you press the F12 key to take a screenshot, it is saved to the clipboard, a temporary storage area in your computer’s memory. You can then paste the screenshot into a program such as Paint or Word to edit and save it as an image file.
How do I take a screenshot on my laptop, Windows 10?
To take a screenshot on a Windows 10 laptop, you can press the Print Screen button to capture an entire screen image.
Alternatively, depending on your laptop model, you can use a combination of keys, such as Windows key + Print Screen or Fn + Print Screen. You can also use the Snipping Tool or third-party software to capture screenshots.
How do I take a screenshot if my PrtSc is on shift?
If your PrtSc key is on the Shift key, you can use the Windows key + Shift + S combination to bring up the Snipping Tool, which allows you to capture screenshots of specific areas on your screen. Alternatively, you can use a third-party screenshot tool or software.
Why is PrtSc, not Screenshotting?
If your PrtSc key is not working, it may be due to a hardware issue, a driver problem, or a conflict with other software on your computer.
You can try restarting your computer or updating your drivers to resolve the issue. Alternatively, you can use a combination of keys, such as Windows key + Print Screen or a third-party screenshot tool to capture screenshots.
What if my PrtSc is not working?
If your PrtSc key is not working, you can try using a combination of keys, such as Fn + Print Screen or Windows key + Print Screen, to capture screenshots. You can also use the Snipping Tool or third-party software to capture screenshots.
How do I take a screenshot without Print Screen or FN?
If your laptop doesn’t have a Print Screen or Fn key, you can use the Windows Snipping Tool or a third-party screenshot tool to capture screenshots.
Some laptops also have alternative key combinations, such as Windows key + Home or Windows key + Insert, to capture screenshots.
How do you screenshot on Ctrl and Shift?
To take a screenshot on Ctrl and Shift, you can use the Windows key + Shift + S combination to bring up the Snipping Tool, which allows you to capture screenshots of specific areas on your screen.
What does Ctrl Shift +T do?
The Ctrl Shift + T shortcut is used to reopen the last closed tab in a web browser.
Where do I find a screenshot on my computer?
Screenshots are typically saved to the clipboard or a designated folder on your computer, depending on the software or tool used to capture the screenshot. You can also search for the file name in the Windows search bar or navigate to the folder where the screenshots are saved.
How do I take a screenshot of a whole page in Chrome on my laptop?
To take a screenshot of a whole page in Chrome on your laptop, you can use the Chrome browser’s built-in screenshot tool. Press Ctrl + Shift + P to open the Print dialog box, then select “Save as PDF” and choose the “All pages” option.
Where is F11 screenshot?
The F11 key is typically used to toggle full-screen mode in web browsers and other applications. It is not generally used to take screenshots, but you can use a third-party screenshot tool to capture a screenshot of the full screen.
What is the shortcut to take a screenshot in browser?
The shortcut to take a screenshot in a browser depends on your browser and operating system. In Google Chrome, you can use the Ctrl + Shift + P shortcut to open the Print dialog box, then select “Save as PDF.
How do you screenshot on an ASUS tablet?
To take a screenshot on an ASUS tablet, press and hold the Power and Volume Down buttons simultaneously until you hear a camera shutter sound. The screenshot will be saved in the Screenshots folder in the Photos app.
Why is my F12 Print Screen not working?
If your F12 key is not working to take a screenshot, it may be due to a hardware issue, a driver problem, or a conflict with other software on your computer. You can try restarting your computer or updating your drivers to resolve the issue.
Alternatively, you can use a combination of keys, such as Windows key + Print Screen or a third-party screenshot tool to capture screenshots.
The F11 key is typically used to toggle full-screen mode in web browsers and other applications. It is not generally used as a Print Screen button. The Print Screen button is usually located in the top row of the keyboard, often next to the F12 key, and may be labeled as “PrtSc” or “Print Scr”.
How do you screenshot on a Windows 11 laptop?
To take a screenshot on a Windows 11 laptop, you can use the Windows key + Shift + S combination to bring up the Snipping Tool, which allows you to capture screenshots of specific areas on your screen.
Alternatively, you can use a combination of keys, such as Windows key + Print Screen or a third-party screenshot tool to capture screenshots.
Final Thoughts
You will often need to take a screenshot of your screen. Knowing how to take screenshots on Asus laptops will come in handy, whether it is because you want to capture a beautiful picture or quote or save something you are reading for future reference in a pictorial form.
In this article, I showed you the various shortcuts you can use in capturing your screenshots. I also introduced you to the Snipping tool on Windows and to various browser extensions for taking screenshots. Finally, I talked about the use of third-party software.
The option you use will depend on what your needs are. Now you know how to take screenshots on Asus laptops.


