If your computer is not sleeping, one of the main reasons behind this is the Mouse Core Worker process or mousecoreworker.exe.
In this article, we are going to talk about the mousecoreworker.exe, reason why it constantly wakes your computer, and then methods to fix it.
What is Mousecoreworker.exe?
If your system gets constant updates then it is because of the Windows Update AutoUpdate Client or the Mousecoreworker.exe.
It checks for updates in the background not only for your Operating System but also for all the other connected devices.
Mousecoreworker.exe doesn’t let my computer sleep:-
If your computer does not sleep after a specific time or keeps waking from sleep again and again then this can be because of a corrupted Mousecoreworker process or some wrongful setting twitches.
We have listed all the possible solution in this section, to solve mousecoreworker.exe doesn’t let my computer to sleep.
1. Delete conflicting programs:-
If you back up or sync your data then there is a chance that this because of it running in the background. Most of the applications work seamlessly in the background but because of some bug, they can wake your computer from sleep.
Therefore, you should either update them to their latest version or just uninstall the application. The application which was found guilty of this bug is “GoodSync”.
In the following steps, we will see how to GoodSync application in Windows 10:-
Step 1: Launch Settings by searching it out of the start menu or by Win + X > Settings.
Step 2: Click the Apps button from the settings window.
Step 3: Now, scroll down a bit under the Apps & Features section to reach GoodSync, click on it, and then select Uninstall.
After uninstalling the application, restart your computer, and hopefully, the sleep problem due to mousocoreworker.exe will be solved.
2. Disable “Allow wake timers”:-
This problem may not because of mousecoreworker instead it is because of wrongful setting twitches. Therefore, in this section, we are going to disable the wake timer so that your computer will be able to perform the wake operation.
To do that, you need to be obedient to the prescribed steps:-
Step 1: Launch the Control Panel by either search it out of the start menu or by RUN(Win + X), type “control”, and hit enter.
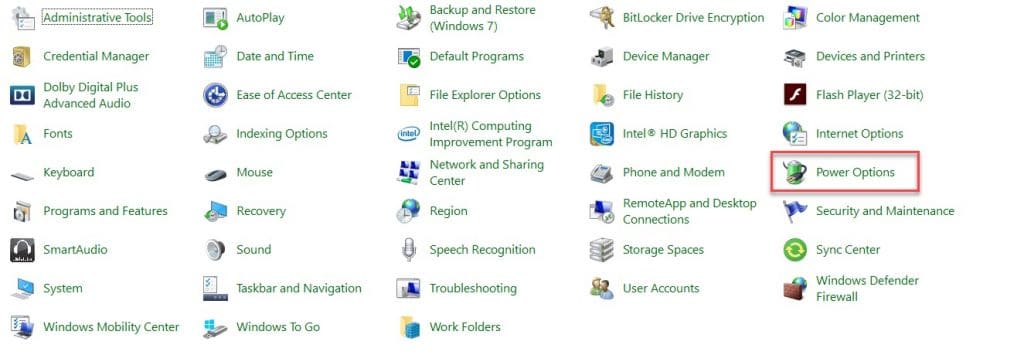
Step 2: Now, make sure that your View by is set to Large Icon or Small Icons, now click on the Power Options button.
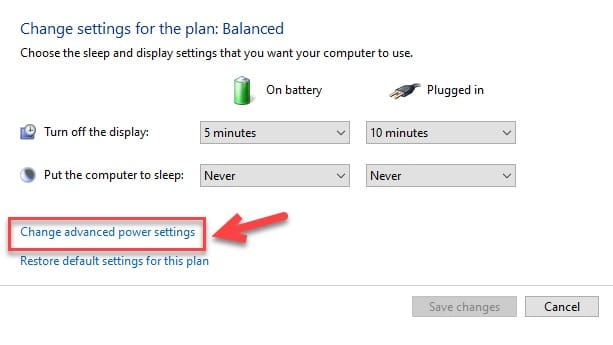
Step 3: Now, click on the Change plan setting option for your current power profile.
Step 4: Now, click on Change advanced power setting option.
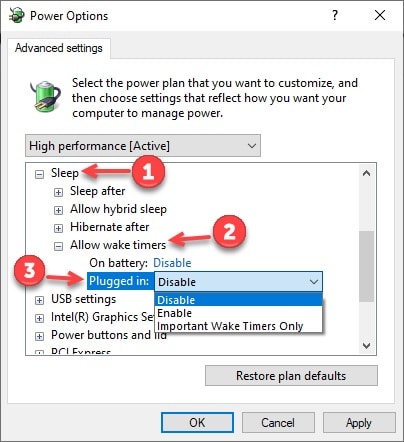
Step 5: You will be redirected to the Power Options Properties window, scroll down a bit and expand Sleep> Allow wake timers, and then disable it for both plugged in and on battery. Afterward, click on Apply and Ok.
After changing the setting, restart your computer, and hopefully, the sleep problem due to mousocoreworker.exe will be solved.
3. Restart Update Orchestrator Service:-
Mousecoreworker.exe process has many services complementing it and Update Orchastor Service is one of them. Therefore, restarting it can help.
To restart the update orchestrator service or UOS you need to follow the prescribed steps:-
Step 1: Launch Services by either searching it out of the start menu or RUN(Win + R), type “services.msc”, and hit enter.
Step 2: Now, search for Update Orchestrator Service, right-click on it, and select Properties.
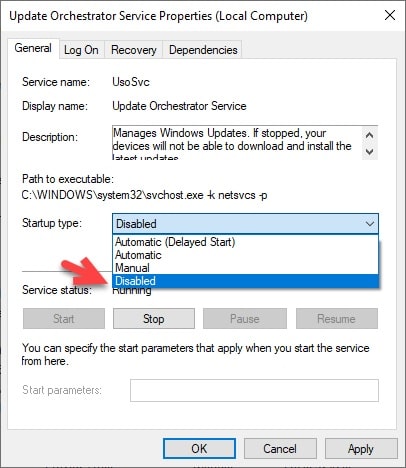
Step 3: This will redirect you to the Update Orchestrator Service properties window, go to the general tab, set the Startup type to Disabled, and click Apply and OK.
After setting this up, restart your computer to get things right. Hopefully, the sleep problem due to mousocoreworker.exe will be solved.
4. Update your computer:-
Most of the problems in any operating system are temporary and can be fixed with updates. Keeping this concept w can say that, the sleep problem can be because of a bug that will be fixed with an update.
Therefore, in this solution, we are going to update your computer to fix this problem. To do that, you need to follow the prescribed steps:-
Step 1: Launch Settings by either searching it out of the start menu or by Win + X > Settings.
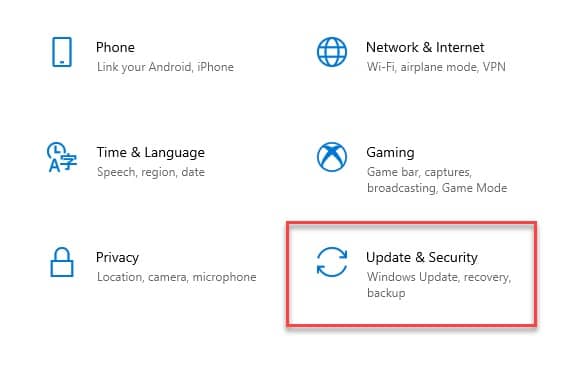
Step 2: From the appeared settings window, click on the Updates & Security option.
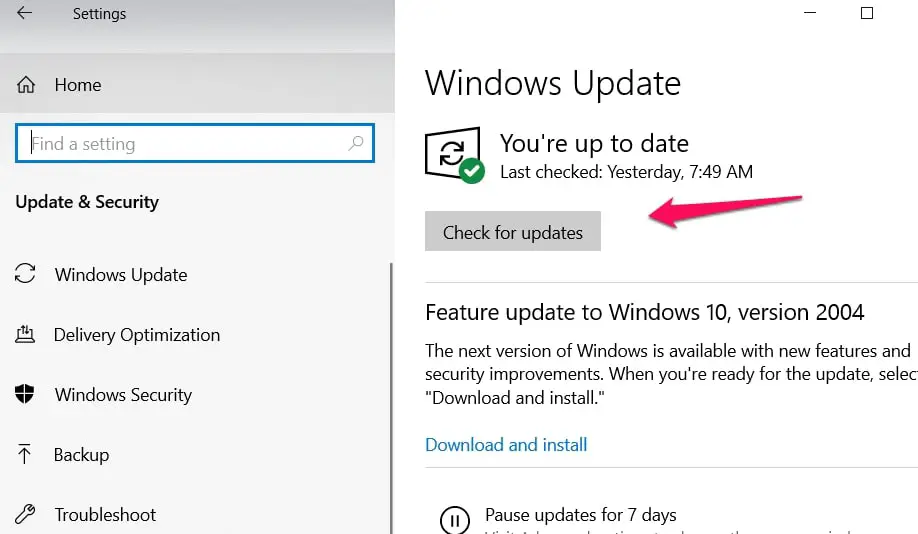
Step 3: Now, make sure that you are on the Windows Update tab, then click Check for Updates.
It will check the server for any updates, and download it. After this, you will be asked to restart your computer to install this update. To do that to eliminate the sleep issue caused due to mousocoreworker.exe.
5. Make “Windows Update” Automatic:-
Windows Update service is set to automatic by default but due to some wrongful setting twitches, it can be switched to manual. Because your system thinks that mousecoreworker is still working, therefore, your computer fails to sleep.
Therefore, in this solution, we are going to solve this issue by changing the “Windows Update” startup to Automatic. To do that, you need to follow the prescribed steps:-
Step 1: Launch Services by either searching it out of the start menu or RUN(Win + R), type “services.msc”, and hit enter.
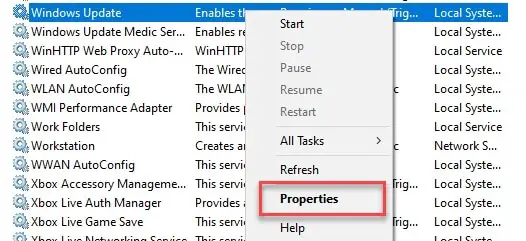
Step 2: Now, search for Windows Update, right-click on it, and select Properties.
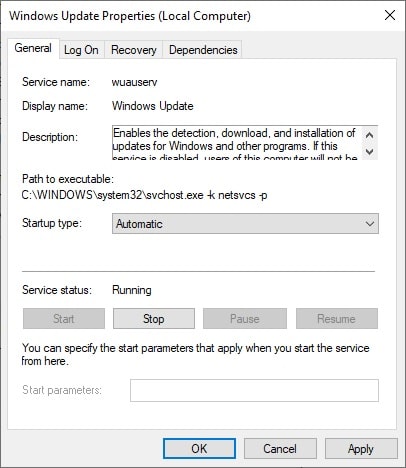
Step 3: This will redirect you to the Windows Update Properties window, go to the general tab, set the Startup type to Automatic, and click Apply and OK.
After completion just restart your computer and your computer will sleep when needed.
6. Restart Windows Update:-
As mentioned in the previous solution, the Windows Update service is very important for your computer’s sleep cycle, and therefore, restarting it can help in fixing the sleep-related problem. Therefore, to do that, you need to follow the prescribed steps:-
Step 1: Launch Services by either searching it out of the start menu or RUN(Win + R), type “services.msc”, and hit enter.
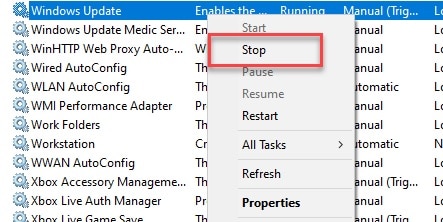
Step 2: Now, search for Windows Update, right-click on it, and select Stop.
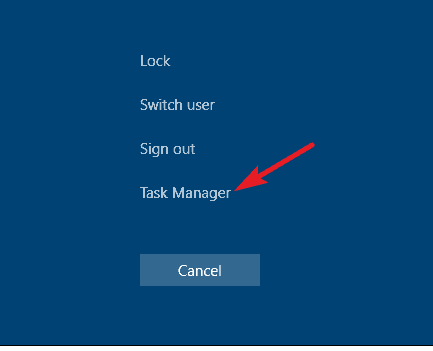
Step 3: Launch the task manager, by right-clicking on the taskbar and selecting “Task Manager” from the appeared list or by hit Ctrl + Alt + Delete and select Task Manager.
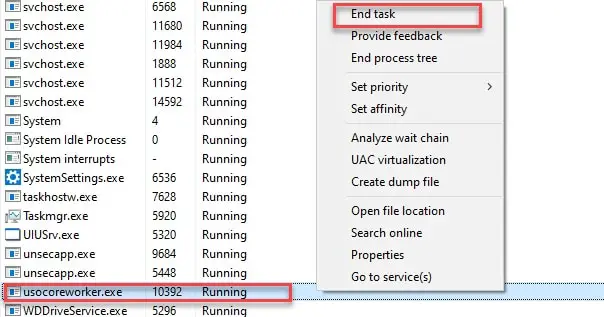
Step 4: Click on the Details tab, search for Mousecoreworker.exe or Usocoreworker.exe, right-click on it, and then click end task.
Step 5: Again go to services, search for windows update, right-click on it, and then select Start.
Restart your computer to fix the sleep problem.
7. Restart services:-
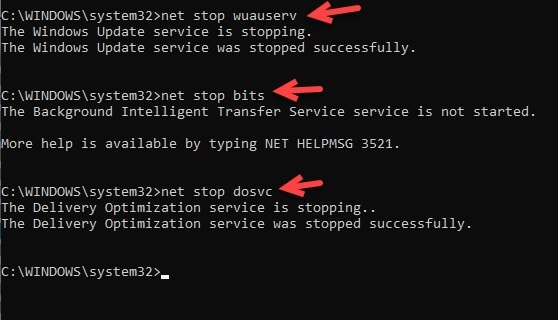
If for some reason you are not able to restart the services then in this section we are going to use the Command Prompt.
The following are the steps that you need to follow to stop these services.
Step 1: Launch the Command Prompt as an admin by either searching it out of the start menu or hit Win + X, and then click Command Prompt(Admin).
Step 2: Type the following commands one-by-one and hit enter simultaneously.
net stop wuauserv
net stop bits
net stop doscv
net start wuauserv
net start bits
net start dosvc
After restarting all the services, restart your computer once to fix your computer’s sleep problem.
8. Troubleshoot Windows Update and Power:-
Microsoft has built a troubleshooting system that can help you with some minor problems; sometimes that is what you need.
Therefore, in this section, we are going to troubleshoot both Windows Update and Power, probably two of the most important ingredient for this problem.
To do that, you need to follow the prescribed steps:-
Step 1: Launch Settings by searching it out of the start menu or by Win + X > Settings.
Step 2: From the appeared settings window, click on the Updates & Security option.
Step 3: Now go to the Troubleshoot tab from the left panel of the window, and then from the right panel scroll down to Windows Update> Troubleshoot.
After this follow the on-screen instruction to troubleshoot the Windows Update mechanism.
After troubleshooting the update mechanism, let’s troubleshoot Power.
To do that, follow the prescribed steps:-
Step 4: Repeat Steps 1 & 2, go to the troubleshoot tab, and click on Power> Troubleshoot.
After this follow the on-screen instruction to troubleshoot Power.
9. Remove or Disable external Hardware:-
External Hardware can cause your computer to not sleep because mouscoreworker.exe, the service responsible for your computer sleep cycle also manages the power management, therefore, connecting external hardware can put pressure on it and increase its workload.
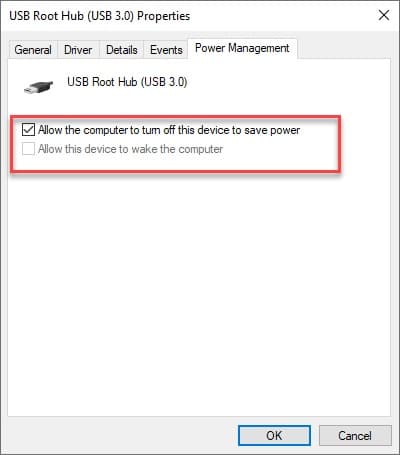
Therefore, in this section, we will enable the “Allow the computer to turn off this device to save power”. To do that, follow the prescribed steps:-
Before moving further let’s see what are devices that your computer is considering external, it is specifically useful for desktops.
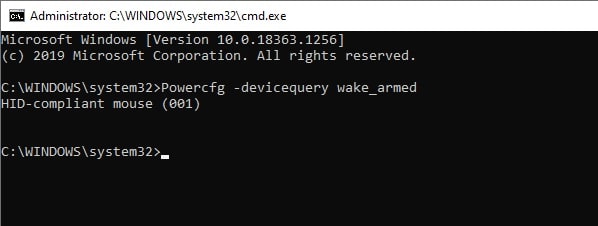
Step 1: To do that, launch the Command Prompt as an admin by either searching it out of the start menu or hit Win + X, and then click Command Prompt(Admin).
Step 2: Type the following command and hit enter.
Powercfg -devicequery wake_armed
This command will list all the external devices. Now, we need to enable the “Allow the computer to turn off this device to save power” for all of them.
Step 3: Launch the device manager by either searching it out of the start menu or by Win + X> Device Manager.
Step 4: Scroll down a bit, expand Universal Serial Bus Controller, right-click on the USB device, and select Properties.
Step 5: From the appeared properties, go to the Power Management tab and then tick “Allow the computer to turn off this device to save power”.
Repeat this for all the connected devices.
10. Restore your System:-
This should be your last step if nothing works then you should try this. It can remove the bugs that are caused due to updates. Therefore, restoring your OS to a point when it was bug-free can help.
To do that, you need to follow the prescribed steps:-
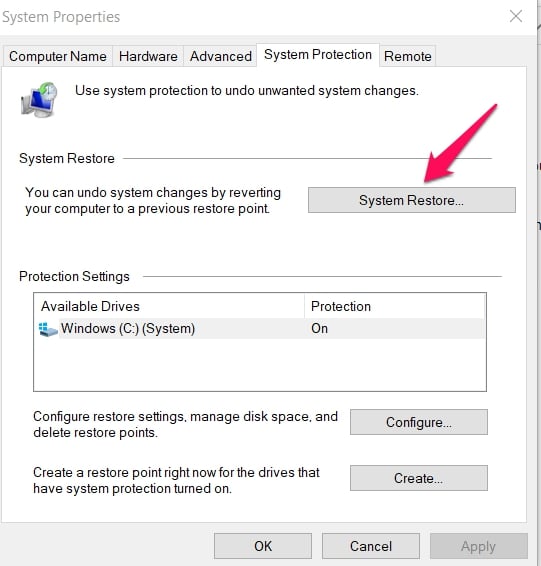
Step 1: Hit Win + S, now type “System Restore”, and hit enter.
Step 2: From the appeared system restore window, click on the System Restore button.
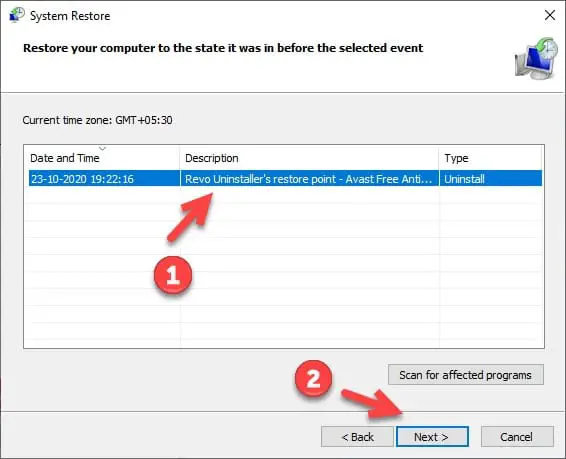
Step 3: Now, select a restore point and click Next.
Now, follow the on-screen instructions to restore your operating system.
Hopefully, this will eliminate the sleep issues that your computer is going through.
📗FAQ
What is MoUsoCoreWorker exe on Windows 10?
MoUsoCoreWorker.exe is a process that runs in the background on Windows 10. It is associated with the Windows Update service and is responsible for downloading and installing updates for the operating system and other Microsoft products.
What does MoUSO core worker process do?
The MoUSO Core Worker process is responsible for managing the installation and updating of various Microsoft products and services on your computer. It helps ensure that your system is up-to-date with the latest security patches and other important updates.
Is MoUSO core worker safe?
Yes, the MoUSO Core Worker process is safe to run on your computer. It is a legitimate component of the Windows operating system and is used to help keep your system secure and up-to-date.
Where is MoUsoCoreWorker exe in Windows 11?
MoUsoCoreWorker.exe can be found in the same location on Windows 11 as it is on Windows 10. To find the file, you can navigate to the following directory: C:\Windows\System32.
Can I disable Mouso core worker?
While it is possible to disable the MoUSO Core Worker process, it is generally not recommended. Doing so could prevent important updates and security patches from being installed on your system, which could leave it vulnerable to security threats.
Is it OK to disable Windows Modules installer Worker?
Disabling the Windows Modules Installer Worker process is generally not recommended. This process is responsible for installing updates and making changes to your system’s configuration, so disabling it could prevent important updates from being installed and could lead to instability or security issues.
Can I end USO core worker process?
While it is possible to end the USO Core Worker process, doing so could prevent important updates and security patches from being installed on your system.
It is generally not recommended to end this process unless you are experiencing issues with it or are working with a trained IT professional who has recommended doing so for a specific reason.
Wrap-up:-
In this article, we have seen what mousecoreworker.exe is. It is a process that at its core aims to manage the windows update system and its power.
We have also seen 10 methods to fix the no sleep issue that your computer may face. Hopefully, this article has helped you in fixing the issue.


