iphlpsvc stands for Internet Protocol Help Services is a program that is ingrained in your Microsoft Windows 10 Operating System. They are there to examine the process of communication between your installed programs and the connected peripheral devices.
They are the one examing their interaction with the Windows features and the external environment via the Internet.
The Iphlsvs or the Internet Protocol Help Services is present in all the Windows 10, in order to see that, you need to go to the task manager and see a process named iphlpsvc.dll.
A lot of users think of it as some kind of virus or malware, but it is not. It is just there to help you to create a communication medium between the gadgets and the software and then the software and the internet. So, you know that it is safe.
In this article, we are going to learn more about the Iphlpsvc service in Windows 10.
What is Iphlpsv.dll?
We are going to divide this into two separate entities, Iphlpsv, and dll.
The Internet Protocol Helper Service or the Iphlpsv was introduced in the Windows OS in order to allow the users to know more about the network that they are working on and at the same time alter the given network with the help of some coding.
This is not a very visible or hefty service that can cause damage to your system or can use a high CPU, it is there to serve a purpose and do not cause trouble.
Therefore, most of us don’t need to know much about this Iphlpsv feature. But if you are a software developer or a network manager dealing with the Internet protocol version 6 connections, then you might have read this article thoroughly.
The .ddl is an abbreviation of Dynamic Link Library. In this file type, a Windows Program file’s function’s library’s information is accessed. The required functions and the user data are stored in this module.
As mentioned earlier, if you are a normal Windows user then you don’t really need to know much about the Iphlpsvc.dll. But if you are a web developer then you must know about them.
Should we Remove Iphlpsvc?
Knowing that there is a task running on your computer via Task Manager can cause a state of panic in your head and because of this you can conclude different things such as “is my computer infected?” or “is my RAM malfunctioned?”.
But one thing you should know that it is completely normal for a service named iphlpsvc.dll consuming some percentage of your disk and there is no need for you to disable it.
Having said that, according to many users, Iphlpsvc was caught consuming more than enough of your CPU. If you are one of them, then you should consider disabling it.
Restart Iphlpsvc service to fix High CPU usage:-
If you are experiencing a high CPU consumption by the IP Helper service then before completely removing it you should consider restarting the service, and see whether the problem is resolved or not.
In order to restart the iphlpsvc service, we are going to use the Services application. To do that, you need to follow the following steps:-
Step 1: Launch the Services application, either by searching it out from the start menu or by RUN(Win + R), type “services.msc”, and hit enter.
Step 2: From the appeared search for the IP Helper, right-click on it, and then click on Properties from the appears list.
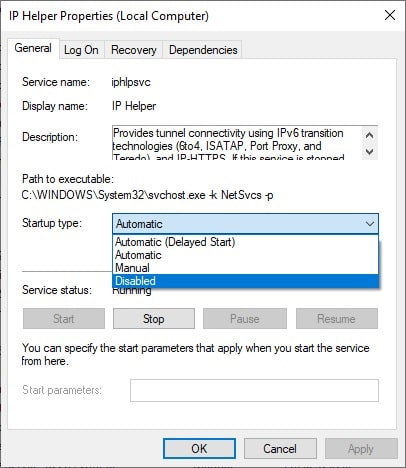
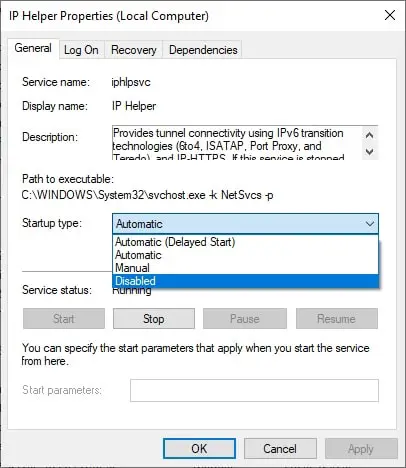
Step 3: Then click will redirect you to the IP Helper Properties, from the drop-down box in front of Startup type select disable> OK
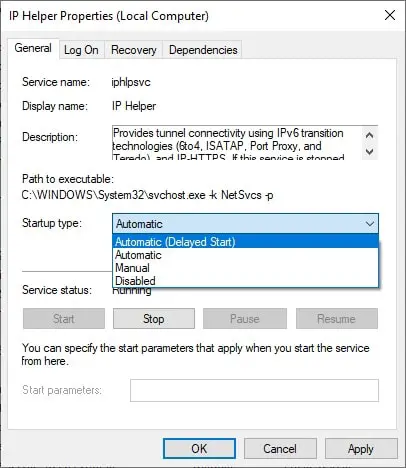
After that, you need to restart your computer and then again go to the Services application. And select Automatic from the appeared list and click OK.
Note: You can even choose Automatic(delayed start) as it will start the IP Helper service after a minute or two.
Finally, restart your computer one more time. Then go to the task manager and see whether the problem is still there or not. Hopefully, Iphlpsvc’s high CPU usage problem will be redirected from your computer.
How to Remove Iphlpsvc?
If after restarting the service you are still dealing with Iphlpsvc.dll causing high CPU usage then the best option for you would be to remove the service.
We have three methods to do that.
1. Use the Command Prompt to disable Iphlpsvc:-
In the first method, we are going to use the Command Prompt which is a command-line interpreter. To do that, you need to follow the prescribed steps:-
Step 1: Launch the Command Prompt as an admin either by searching it out from the start menu or by RUN(Win + R), type “cmd”, and hit Ctrl + Shift + Enter.
Step 2: Type the following command and hit enter.
net stop iphlpsvc
Note: You may be asked for confirmation, so, type “y” and hit enter.
This way you will be able to disable the Iphlpsvc service.
When you enter the above command, you will be greeted with a warning saying that it will affect other services as well.
You can even permanently disable the IP Helper with the help of the following command.
REG add “HKLM\SYSTEM\CurrentControlSet\services\iphlpsvc” /v Start /t REG_DWORD /d 4 /f
But if after permanently disabling the IP Helper you are facing any problem then you should use the following command to enable it.
REG add “HKLM\SYSTEM\CurrentControlSet\services\iphlpsvc” /v Start /t REG_DWORD /d 2 /f
You can even use this method to restart the service and hopefully, Iphlpsvc.dll high CPU usage will be resolved.
2. Use Registry Editor to disable the Iphlpsvc
To disable the IP Helper with the help of Registry Editor you need to follow the prescribed steps:-
Step 1: Launch the Registry Editor by searching it out from the start menu or from the RUN(Win + R), type “regedit”, and hit enter.
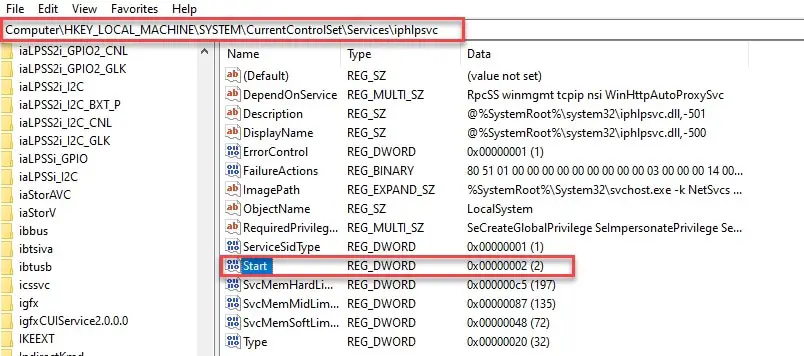
Step 2: Now from the appeared menu you need to navigate to the following path or you can just copy and paste it in the search bar.
HKEY_LOCAL_MACHINE\SYSTEM\CurrentControlSet\Services\iphlpsvc
Step 3: This will redirect you to the IP Helper registry option, there you need to launch the Start option by double-clicking on it.
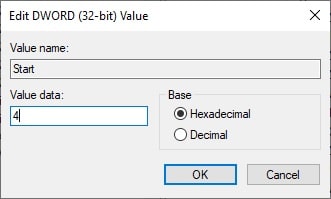
Step 4: From the appeared menu, you need to change the value to 4 and then press OK to end the proceeding.
This will disable the IP Helper Service.
If you want to again enable it, then you need to head to the same location in the registry app and change the value to 2.
Hopefully, this will resolve the problem of Iphlpsvc.dll consuming high CPU.
3. Use Services to disable the Iphlpsvc
To disable the IP Helper with the help of Services you need to follow the prescribed steps:-
Step 1: Launch the Services application, either by searching it out from the start menu or by RUN(Win + R), type “services.msc”, and hit enter.
Step 2: From the appeared search for the IP Helper, right-click on it, and then click on Properties from the appears list.
Step 3: Then click will redirect you to the IP Helper Properties, from the drop-down box in front of Startup type select disable> OK.
This will disable the IP helper service. If you want to restart the IP Helper using services then you should look above for more details.
Other methods to resolve high CPU consumption
Apart from the above-mentioned methods involving the IP Helper to camouflage the high CPU usage by the Iphlpsvc, there are some miscellaneous things affecting the CPU usage by any services. In this section, we are going to cover all of them.
1. Solve Iphlpsvc high CPU usage by updating the Windows
To solve the IP Helper causing high CPU usage by updating the Windows, you need to follow the prescribed steps:-
Step 1: Launch the setting by either searching it out from the start menu or by right-clicking the start menu and then select “Settings’ from the appeared list.
Step 2: From the appeared Window, click on the Update & Security option.
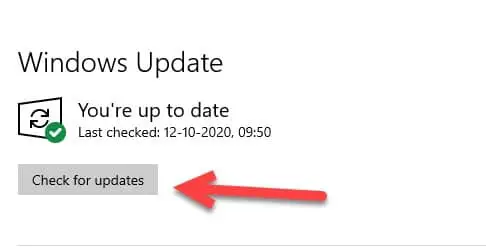
Step 3: Make sure that you are on the Windows Update tab and then click the Check for updates button.
This will update your Window after undergoing a restart and hopefully, it will resolve your problem.
2. Solve Iphlpsvc high CPU usage by Scanning your computer
For this, you can use different antiviruses and antimalware but Microsoft has also provided its user with an option to scan the computer with the help of an in-built Windows Defender tool.
To do that, you need to follow the following steps:-
Step 1: Launch the setting by either searching it out from the start menu or by right-clicking the start menu and then select “Settings’ from the appeared list.
Step 2: From the appeared Window, click on the Update & Security option.
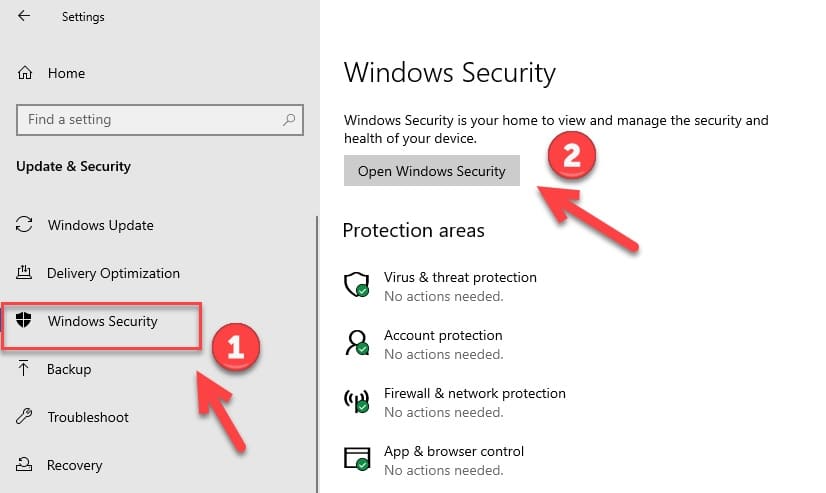
Step 3: Now, go to the Windows Security tab and then click on the Open Windows Security option.
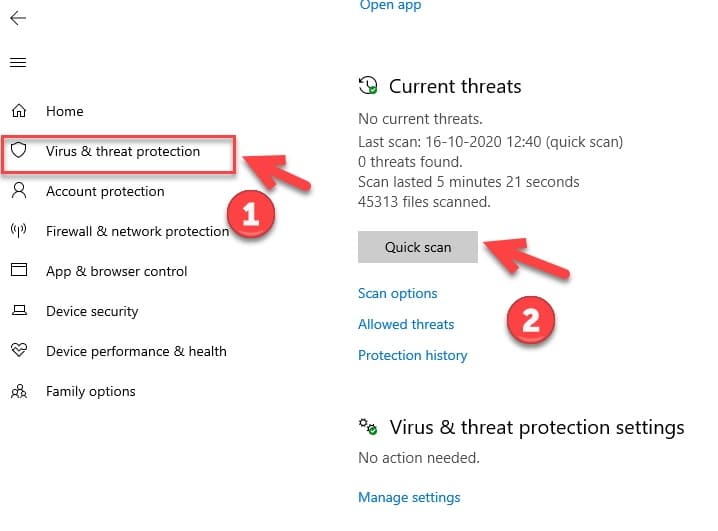
Step 4: You will be redirected to the Windows Defender, there you need to choose Virus & Threat Protection from the left panel and then click on the Scan Now option.
This will scan your computer and eliminate all the malicious files that are causing trouble and hopefully, eliminate the iphlpsv high CPU usage.
3. Solve Iphlpsvc high CPU usage by fixing the hard disk
A malfunctioned hard disk can also cause high CPU usage, therefore, in this section, we are going to fix it. To do that you need to follow the prescribed steps:-
Step 1: Launch the Command Prompt as an admin either by searching it out from the start menu or by RUN(Win + R), type “cmd”, and hit Ctrl + Shift + Enter.
Step 2: Type the following command and hit enter.
chkdsk C: /f
This will scan and repair your hard disk.
If this doesn’t work then you should consult an expert or get a new hard disk.
4. Solve Iphlpsvc high CPU usage by fixing the RAM
RAMs are not something that can be malfunctioned easily but it can happen. So, if you are experiencing high CPU usage then you should scan your RAM as well.
To scan memory with the help of the command prompt, you need to follow the prescribed steps:-
Step 1: Launch the Command Prompt as an admin either by searching it out from the start menu or by RUN(Win + R), type “cmd”, and hit Ctrl + Shift + Enter.
Step 2: Type the following command and hit enter.
sfc/scannow
Note: This will take some time, so, wait for it to complete.
This will scan and tell whether you have malfunctioned memory or not.
Wrap-up
In this article, we have discussed the iphlpsvc.dll services running on your Windows. A lot of users might get confused about it being a virus but we have concluded that it is an essential feature.
We have also discussed, what to do it if it’s consuming a high CPU, in which we have discussed ways to remove the IP Helper and some miscellaneous fixes as well.


