Windows 10 is one of the most famous and at the same time the most user-friendly interface out there in the market. But as we all know, that nothing is perfect in this world and Windows OS is no exception to this rule.
Explorer.exe class not registers is one of the errors that many users have experienced. In this article, we will be going to rectify that error and discuss various ways to fix it.
Windows Explorer is a file management system in Microsoft Windows. They are a portal to different files and folders in Windows and they are there to make your user’s interaction with the OS better and easier.
What is the meaning of class not registered?
If you are receiving Explorer.exe “Class not registered…” error then you should be beware as it can affect some of your high-profile and expensive software bu, not panic as in most cases it can be solved with few modifications.
They are usually caused due to the DDL files being not registered. Therefore, the problem can be resolved by a little re-registering task.
Most of the users have reported this error while opening or using Google Chrome but its effect doesn’t limit chrome only as any software on your computer can suffer from this problem. Let’s see the effect it can cause on your system.
- Now allowing your photos or videos to open: There are instances when some of the users tried opening a saved photo or video but it didn’t open rather an error box, stating “Class not registered error…”, appeared. In this section, we will be aiming to solve this issue as well.
- Not opening photos application in windows 10: This is slightly different from the former one as, in this case, you are not able to open a saved the Photo app but are able to open your images with the help of a different application. There are instances when some of the users have experienced this particular issue.
- Not allowing one to open Excell, Explorer.exe, Taskbar, uTorrent, etc: This is the most common and the one Windows users are most concerned about. Many users have experienced this issue as when they were launching the application they were greeted with this error.
- Not allowing one to open PDF: There are instances when some of the users tried opening a PDF but it didn’t open rather an error box, stating “Class not registered error…”.
Now, with further ado let’s solve this error.
Resolve Class not registered Issue in Windows 10
As mentioned before, there are some easy fixes to this problem and in this section, we will discussing them all. Here we go!
1. Fix class not registered in Windows 10 by disabling the iCloud
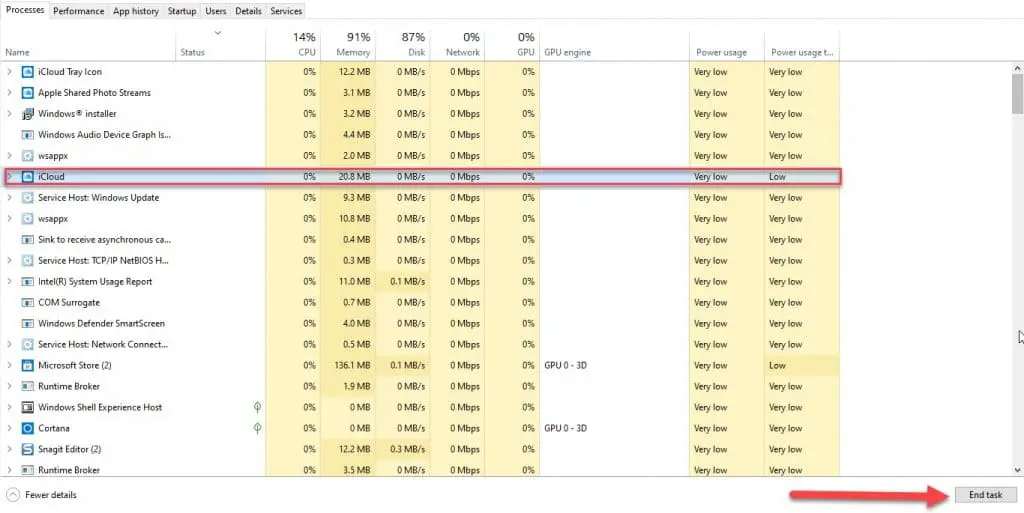
iCloud are notorious for causing the Class not registered issue. Therefore, the first fix would be to stop its functioning. We are going to do that with the help of the Task Manager.
To disable iCloud from the task manager you need to follow the prescribed steps:-
Step 1: Launch the Task Manager by either right-clicking on the taskbar and then select “Task Manager” from the appeared list or by keyboard shortcut(Ctrl + Alt + Del) and then selecting it from the appeared list.
Step 2: Now, under the precesses tab, search for “iCloud”, select it, and then click on the End Task button placed at the bottom-right corner of the screen.
2. Fix class not registered in Windows 10 by re-registering ExplorerFrame.dil file
To reregister ExplorerFrame.dil file we are going to use the Command Prompt.
To do this, you just need to be obedient to the following steps:-
Step 1: Launch the command prompt as an administrator by either searching it out from the start menu or RUN(Win + R), type “cmd”, hit Ctrl + Shift + enter.
Step 2: Type “regsvr32 ExplorerFrame.dll” and hit enter
This will re-register you to the ExplorerFram.dil and will eventually solve the fix the class not registered in Windows 10.
Note: You need to restart your computer once after the completion of the process in order for it to work.
3. Fix class not registered in Windows 10 with the help of component services
The run-time infrastructure of management is deployed and distributed with the help of the Component services. In this section, we are going to use it in order to fix your class not registered issue.
To do that, we are going to use the following steps:-
Step 1: Launch the Component services window by either searching it out from the start menu or from the RUN box(Win + R), type “dcomcnfg and hit enter.
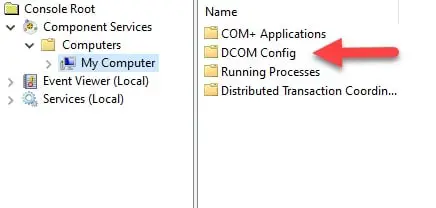
Step 2: Now, you will be redirected to the Component Service window, where you need to reach DCOM config via Component services>Computers>My computer.
Step 3: Double-click on the DCOM Config.
You might receive a few warning notifications, just go through them by clicking “YES”. Finally, after the completion of the task, you need to restart the computer and hopefully, your problem will be resolved.
4. Fiz class not registered in Windows 10 by creating a new Microsoft Account
This should be your last option, therefore, you should only apply it if all the mentioned methods fail.
To create a new Microsoft Account you need to follow the following steps:-
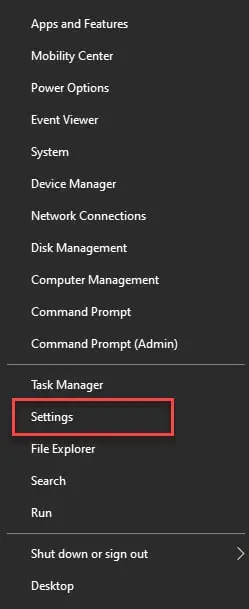
Step 1: Launch Settings by either searching it out from the start menu or by just right-clicking on the start menu and choosing it from the appeared list or from the Key, Win + I.
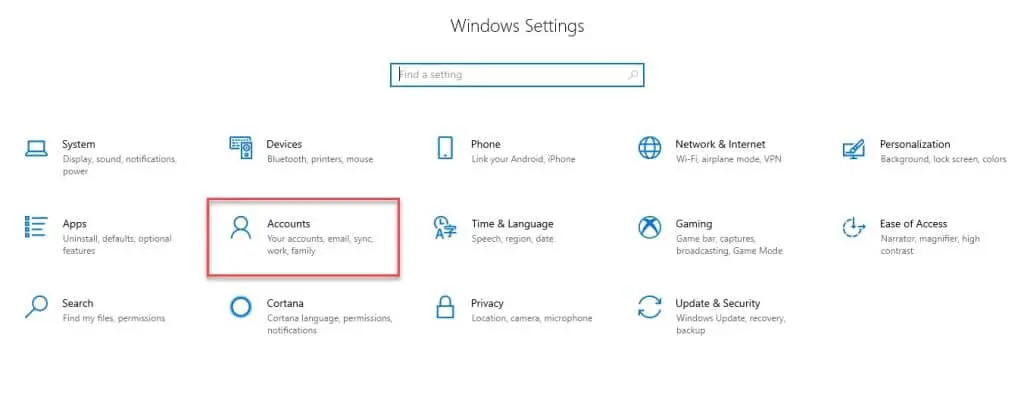
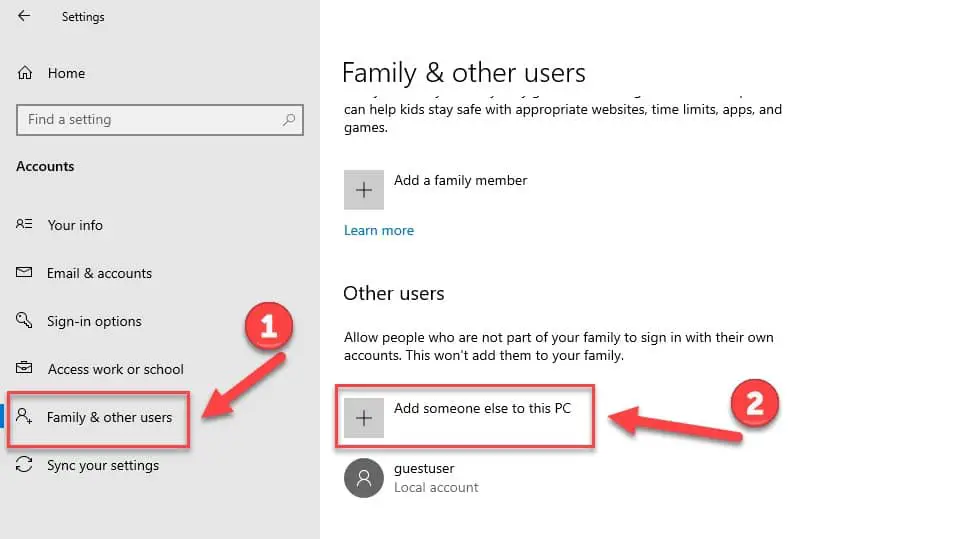
Step 2: From the settings window you need to enter the Account section by clicking on it.
Step 3: After entering the Account section, you need to select Family and Others from the list placed at the left side of the screen and then click on the “Add someone else to this PC” button.
You will be redirected to the Microsoft Login panel, where you need to insert your Microsoft account and then click Next.
Finally, log-out from your current account and log-in to your new one and you are good to go.
One thing that you need to make sure is that you are logged in to the local account.
To log in as a local account you need to follow the prescribed steps:-
Step 1: Launch Settings by either searching it out from the start menu or by just right-clicking on the start menu and choosing it from the appeared list or from the Key, Win + I.
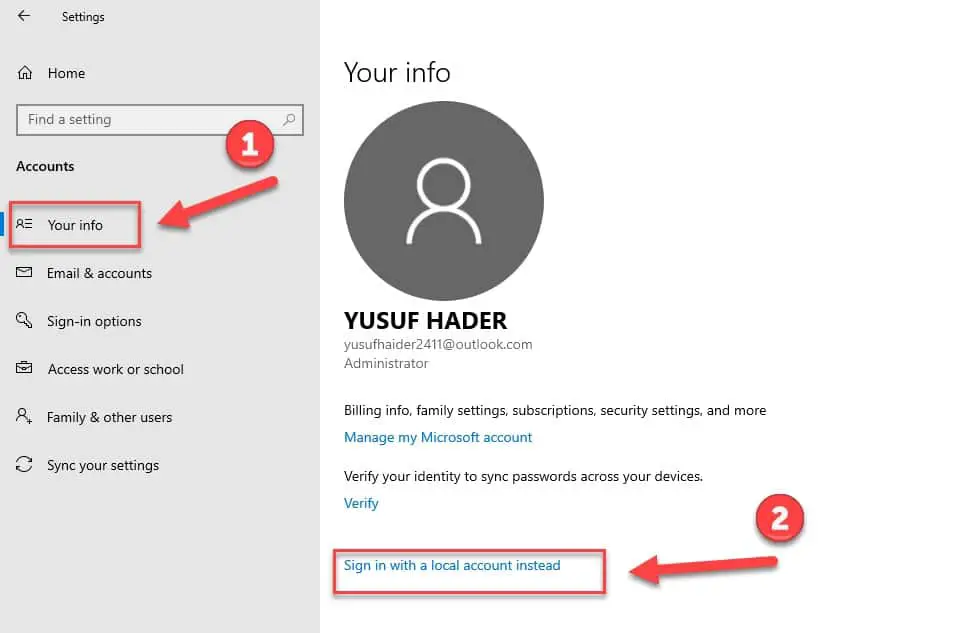
Step 2: From the settings window you need to enter the Account section by clicking on it.
Step 3: Now, click on the button “Sign in with a local account instead” button and then type the required password.
Step 4: Finally, you will be asked to enter your local account’s username and password.
Step 5: Now you need to sing out from your current account by clicking the “Sign out and finish” button.
Note: This step is only valid if you have not registered with your local account.
After completion of this step, you need to can go through the step mentioned above of creating a new account and you are good to go.
5. Fix class not registered in Windows 10 by fixing the hard drive
Even though it is not normal for a Class not registered error to be caused due to a malfunctioning hard drive. But in extraordinary circumstances, it can happen. Therefore, it is worth checking the disk’s health.
To do that you just need to be obedient to the following steps:-
Step 1: Launch the Command prompt as an admin either by searching it out from the start menu or from the RUN box(Win + R), type “cmd” and hit Ctrl + Shift + Enter.
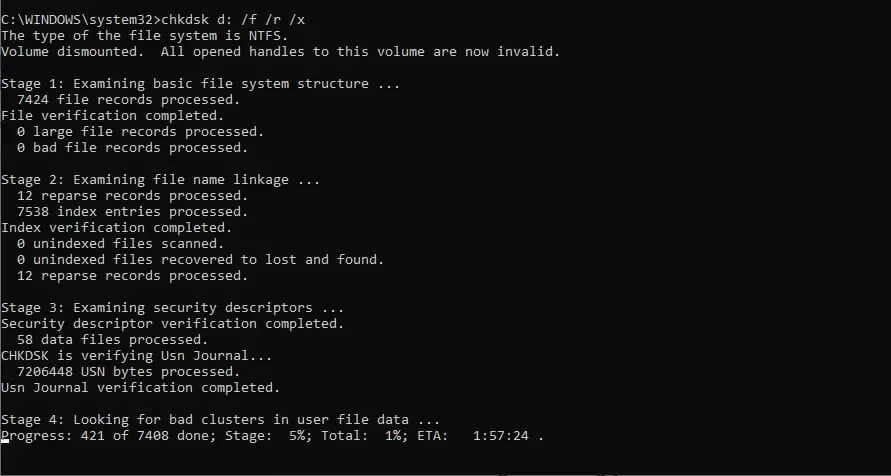
Step 2: On the appeared screen type “chkdsk d: /f /r /x” and hit enter
Note: you need to replace “d” with the disk you want to check the health of.
If you found that your hard disk is faulty then you might have to replace it or consult an expert.
Resolve Class not registered on Microsoft Edge:-
If you are receiving class not registered while launching the Microsoft Edge then you can do two things to resolve it, they are:-
Set your default browser:-
A lot of us were not into Internet Explorer but the latest update and the move to bring Edge in the new windows 10 has worked for Microsoft as more and more people are switching to the Edge but they don’t set it as their default browser.
To set Microsoft Edge as your default browser you need to be obedient to the prescribed steps:-
Step 1:Launch the Control Panel by either searching it out from the start menu or from RUN(Win + R), type “control” and hit enter.
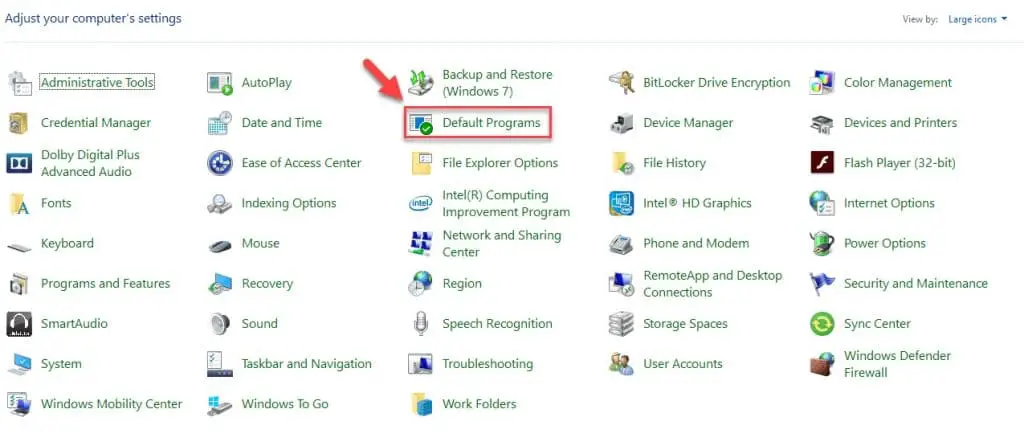
Step 2: From the appeared menu, click on Default Program.
Step 3: You will enter the default program portal, there you need to click on the “Set your default programs” button.
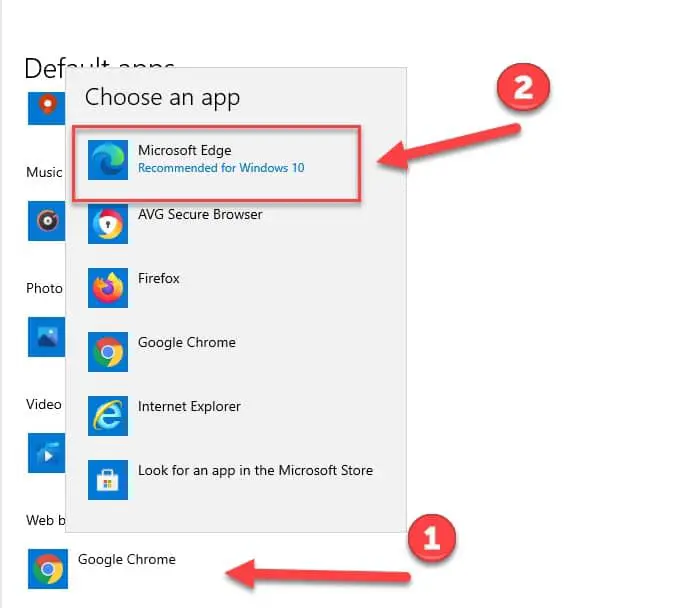
Step 4: Now you will be redirected to the Windows settings. By making sure that you have selected the Default Program tab, click on Web Browser, and select Microsoft Edge from the appeared list.
Disable and then Enable the Windows Explorer:-
Even though the reason is vague in this case but still it works. The easiest way to resolve the Internet Explorer crashing and showing class not registered is to restart the Windows Explorer.
To restart the Window Explorer you need to follow the prescribed steps:-
Step 1: Launch the Task Manager by either right-clicking on the taskbar and then select “Task Manager” from the appeared list or by keyboard shortcut(Ctrl + Alt + Del) and then selecting it from the appeared list.
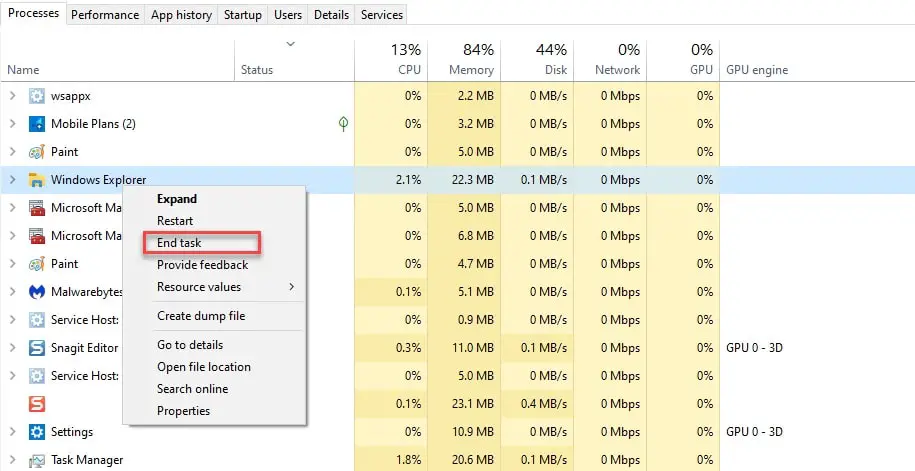
Step 2: Search for explorer.exe, right-click on it, and then select End task from the appeared list.
Now, you have finished the task that Window Explorer was undergoing. Therefore, in the upcoming steps, we will be going through the enabling process.
Step 3: Click on the file button, placed at the top-left corner of the screen, and select the “Run new task” option.
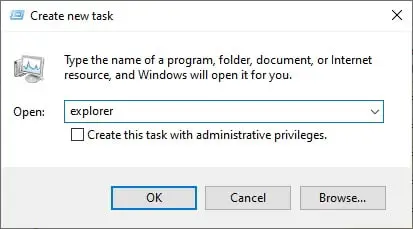
Step 4: A create new task box will appear, there you need to type explorer, and hit enter.
Now, restart the computer and hopefully, your problem will be resolved.
Resolve Class not registered with JPG files:-
If you are experiencing a class not registered problem while opening a JPG file then the problem is pretty simple and the fix is easy as well, you just need to open the file with Windows Photo Viewer. These are the methods that you should perform.
Make it Photos a default app from the file itself:-
This will allow you to be flexible with the application that you choose to view an image. To do that, you need to follow the following steps:-
Step 1: Go to any image, right-click on it, and then from the appeared list, go to Open With>Choose another app(if Windows Photo Viewer is not there).
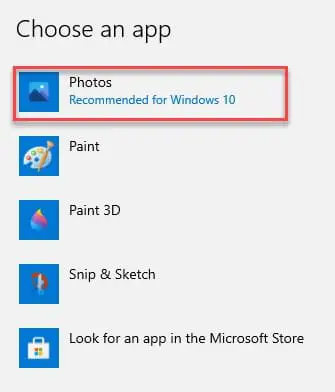
Step 2: Now, you will be redirected to the portal with a different application, select Photos, tick “Always use the app to open .jpg files”
Now, you are good to go as the next time when you open an image it will be launched with the Photos application, and the problem will not come.
Make it Photos a default app from the Settings:-
To do this you need to follow the prescribed steps:-
Step 1:Launch the Control Panel by either searching it out from the start menu or from RUN(Win + R), type “control” and hit enter.
Step 2: From the appeared menu, click on Default Program.
Step 3: You will enter the default program portal, there you need to click on the “Set your default programs” button.
Step 4: Now you will be redirected to the Windows settings. By making sure that you have selected the Default Program tab, click on Photos and then from the appeared list select window Photos.
Conclusion:-
In this article, we have seen different method by which one can easily solve the Class not registered error which is very notorious for crashing the application. But no more as you know how it can be solved.


