So, when you are plugging an ethernet cable to your device, it’s displaying an error. It is showing “Ethernet doesn’t have a valid IP address”. The new laptop or desktops are the most vulnerable to it which makes it even more irritating.
Since you are here which means you are looking for a fix. Luckily the fix is just some setting twitches that you can do to resolve the issue.
Your computer has its dynamic configuration enabled by default. Therefore, there is no need for users to configure settings manually in order to connect the DHCP server.
But sometimes DHCP didn’t get the valid IP address from the Network Interface Card(NIC) due to which an error “Ethernet doesn’t have a valid IP Configuration” pops up.
Fix Ethernet doesn’t have a valid IP configuration
If you are reading this article then it means that you are here to seek a solution and not just to know the reason behind the error.
So, we are going to lay the solution to this problem and methods to fix “Ethernet doesn’t have a valid IP configuration” error.
1. Examine the Ethernet Cable
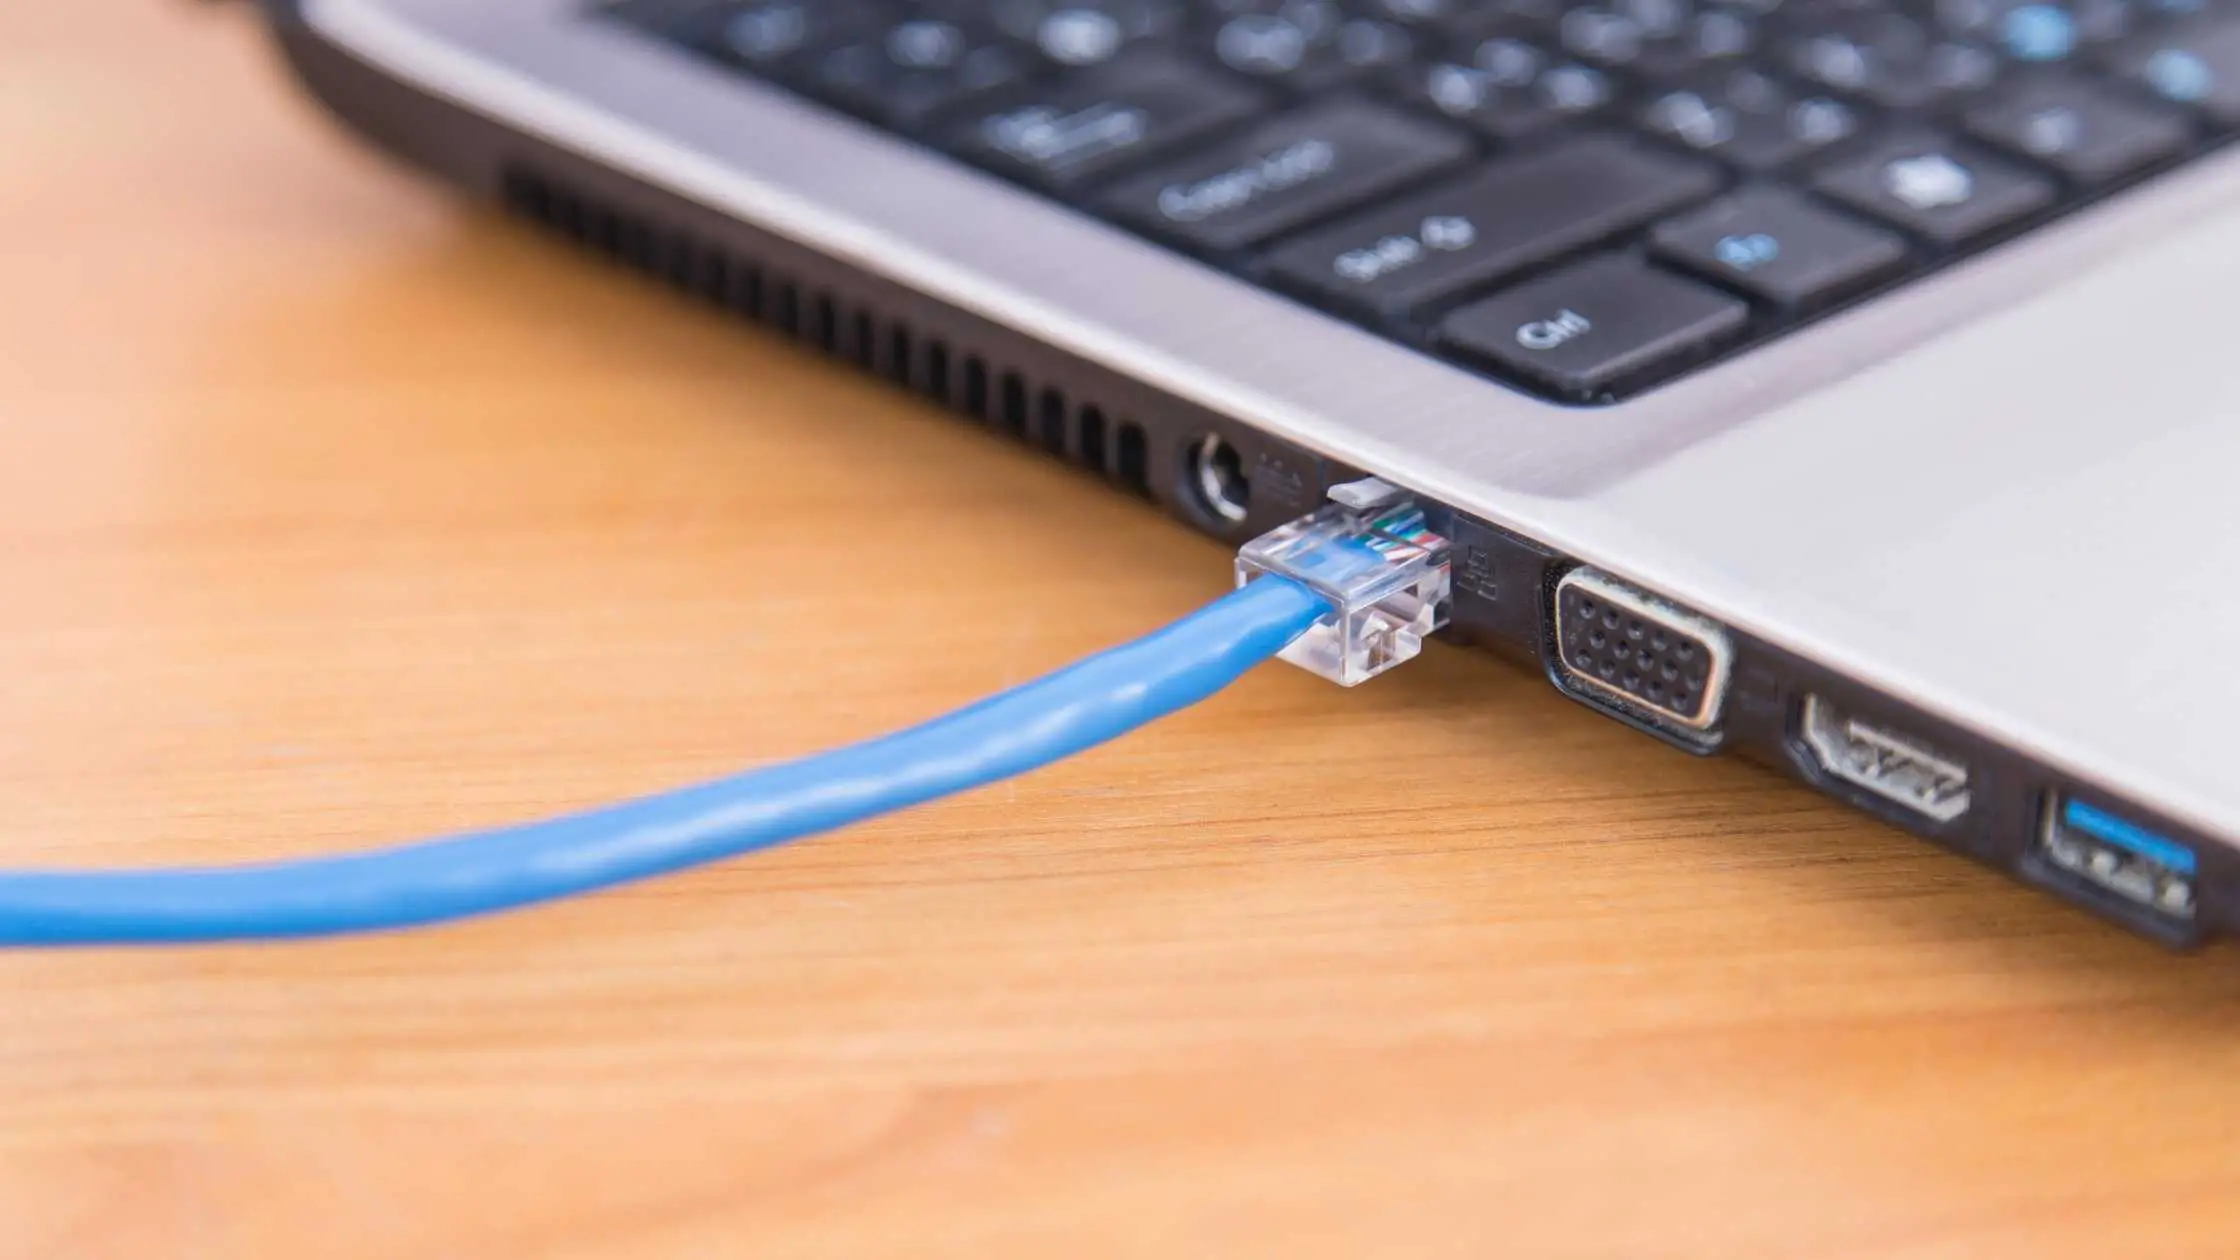
The most obvious reason why you are facing this problem, that you also have thought at some point is checking your Ethernet Cable.
Cables are very delicately made and are very prone to damage, so make sure that yours is safe. Another thing that you can do is restart your PC, sometimes that helps as well.
2. Examine the Network Adapter settings
As mentioned earlier, even though, routers and cables are capable to extract IP addresses automatically but sometimes the network adapter is not able to grab the DNS server and IP Address automatically.
Therefore, it is better to check this through network adapter settings. To do that just be obedient to the following steps and you will be able to this problem:-
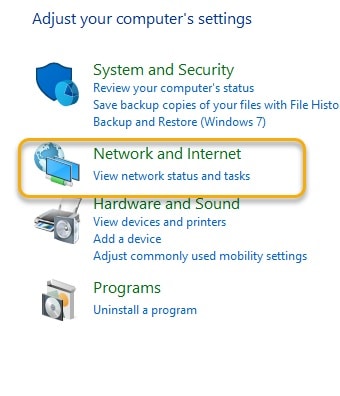
Step 1: Launch Network connections setting by either going to Control Panel>Network and Internet>Network Connections or launch it via RUN by typing “ncpa.cpl” and hitting enter.
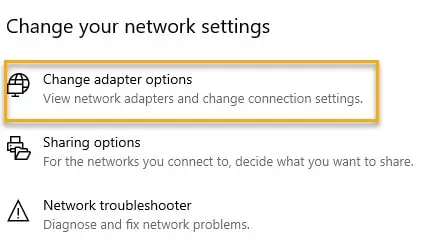
Step 2: Now go to Network Sharing>Change adapter settings.
Step 3: Right-click on the ethernet adapter and select the properties option.
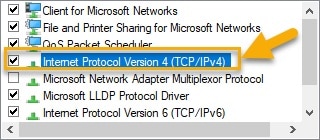
Here look for the “Internet Protocol version 4” and double click on it.
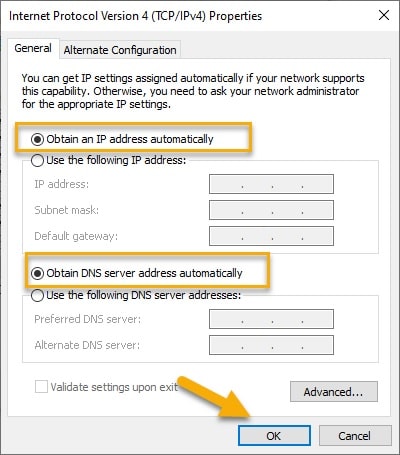
Step 4: Now under the General tab, make sure “Obtain an IP address automatically” is selected instead of the “Use the following address”.
Note:- With obtaining an IP address automatically your system is going to check and get the IP-address for your DHCP server.
DHCP Stands for Dynamic host configuration protocol that is used to assign the IP-address to multiple connected PCs or any network devices. If you are using your laptop or PC in-home network then your modem or router is acting as a DHCP server for you.
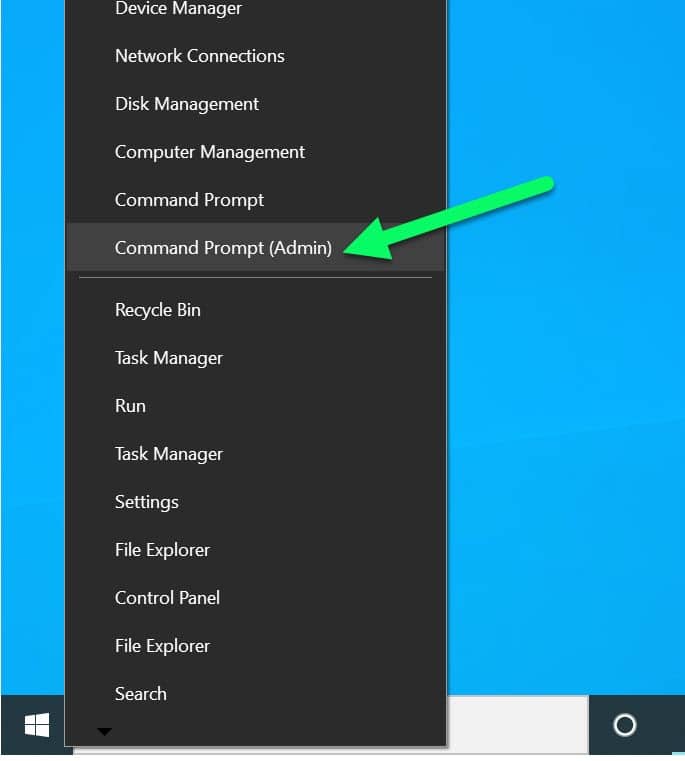
it’s recommended to restart your PC after performing these steps or open the command prompt in your PC by right-clicking on the Start menu and select the Command Prompt (admin) option.
and enter the ipconfig /release command that will release the current IP-address from your system.
then after entering the ipconfig /renew command that will ask your DHCP server to renew a new IP-address for your PC that will fix your Ethernet doesn’t have a valid IP configuration issue.
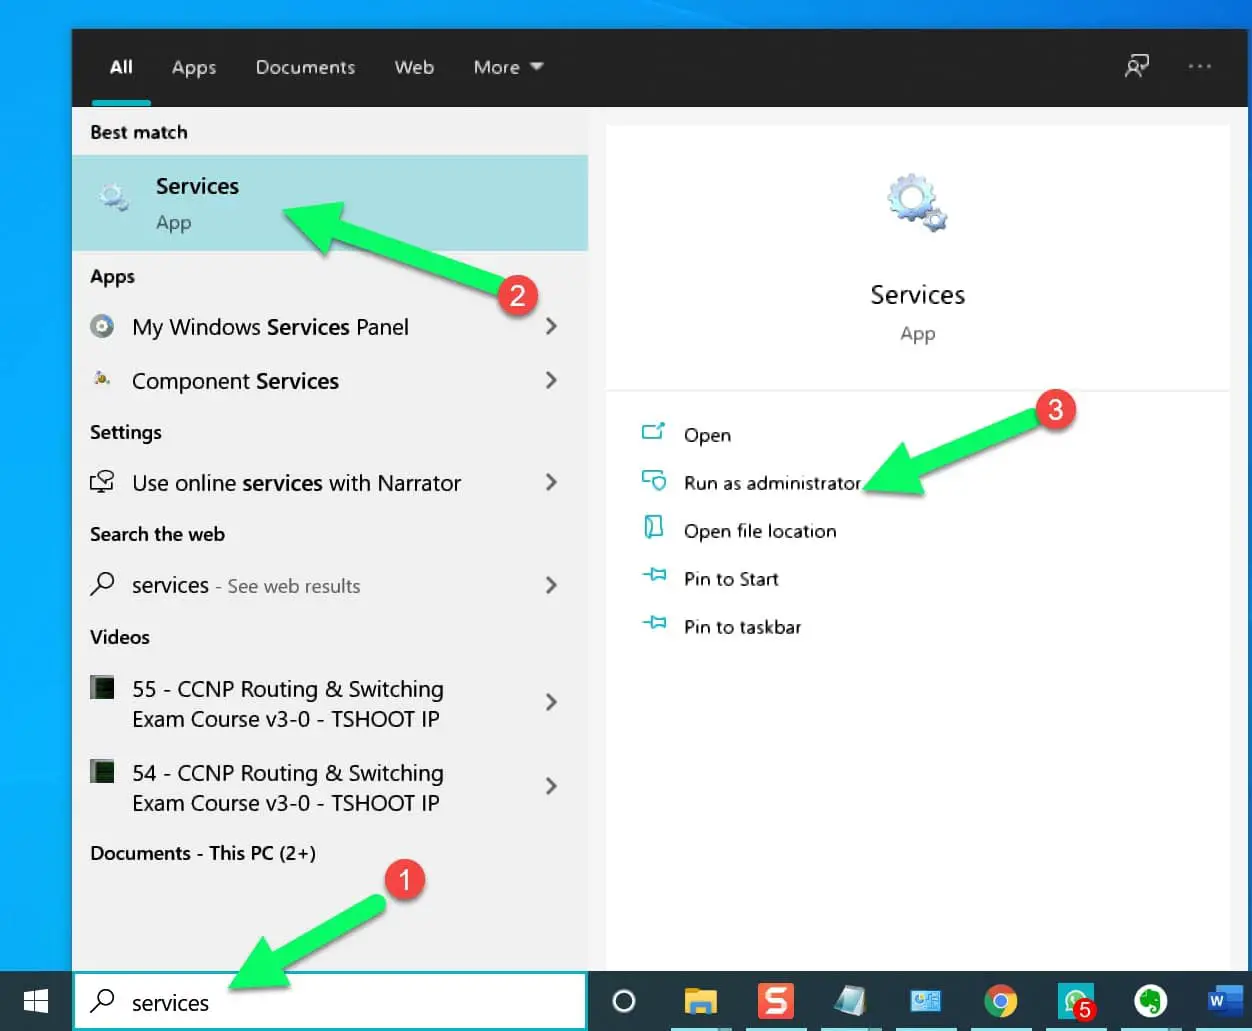
also, make sure DHCP client services are running in your PC, type the “services” in the start menu, and select the “Run as administrator” option or run the “services.msc” command under the run menu.
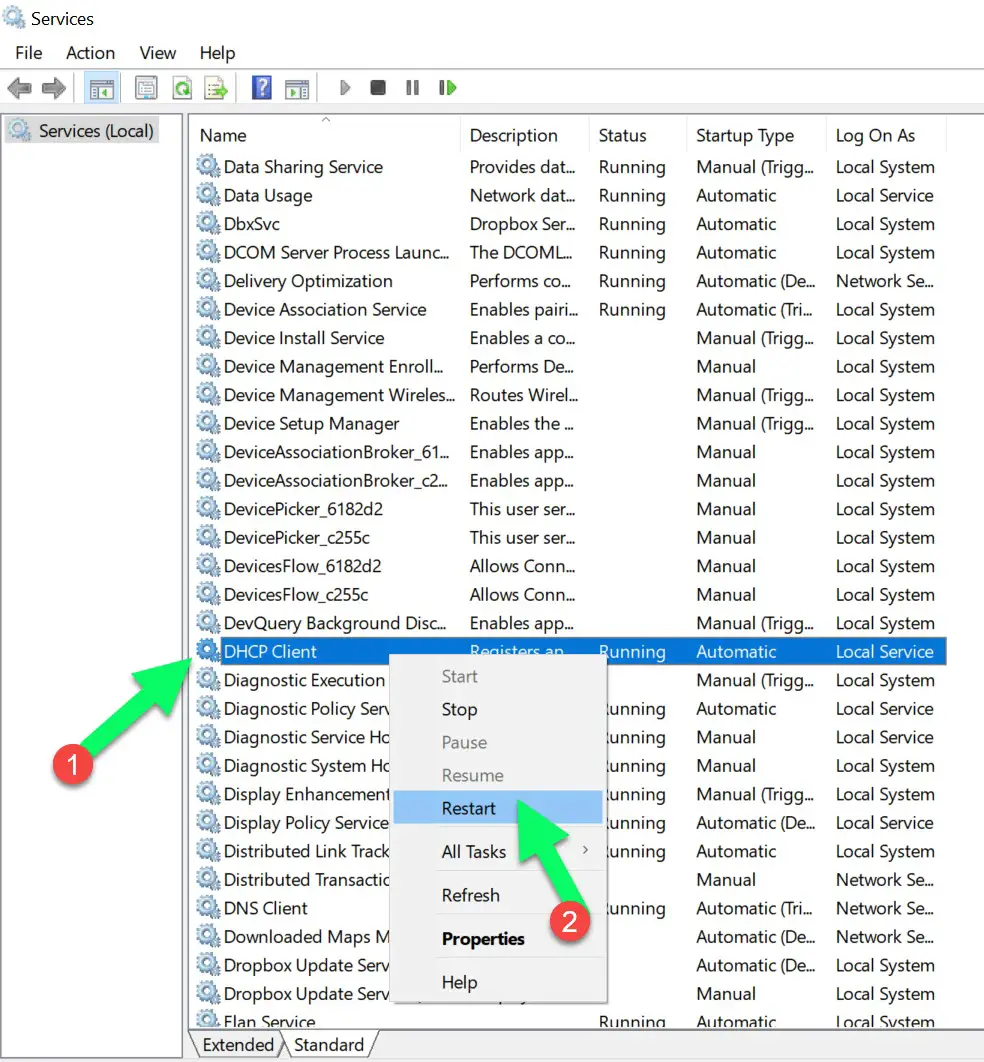
and search for the DHCP client services, make sure this service is running, if it’s stopped right-click on it and click on the Start option or select the Restart option to restart the DHCP client services in your PC.
3. By Disabling the fast startup
The fast startup helps the computer to start faster after being shutdown. This feature is enabled by default in Windows 10. Even though this was designed to help the users but sometimes it does some evil things as well.
In this case, it is better for users to disable the fast startup. Do the following steps to disable fast startup.
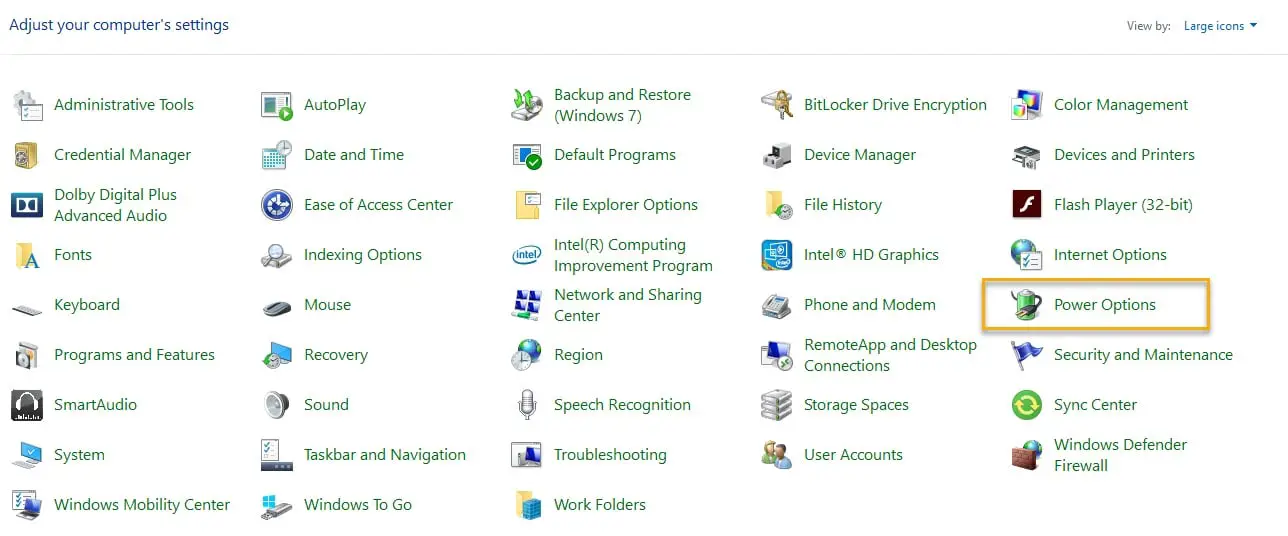
Step 1: Launch Control Panel from either searching it out from the start menu or from RUN(Windows + R) and type control and look for the Power Option and click on it to open.
Note: If you view by category, then it is better to select either view by “large icon” or “small icon”.
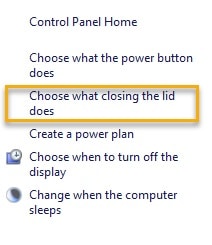
Step 2: In the Righ-pane side select the “Choose what closing the lid does” option.
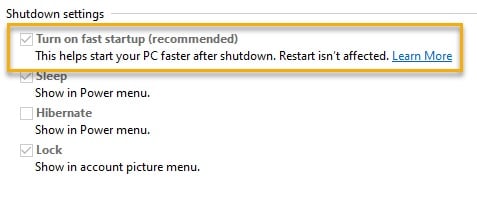
Step 3: As you can see the option to turn off fast startup. Just untick that and you are good to go.
After applying changes restart your computer, in most cases it’s fixing the Ethernet doesn’t have a valid IP configuration error.
4. By Command Prompt
The Command Prompt has always been the best friend of Windows users. And it got you covered this time as well.
So, use the following steps to eradicate “Ethernet doesn’t have a valid IP configuration” error.
Step 1: Launch command prompt in administrator mode by either searching it out from the start menu or from RUN(Windows + R), type cmd and press Ctrl + Shift + Enter,
Step 2: Now write
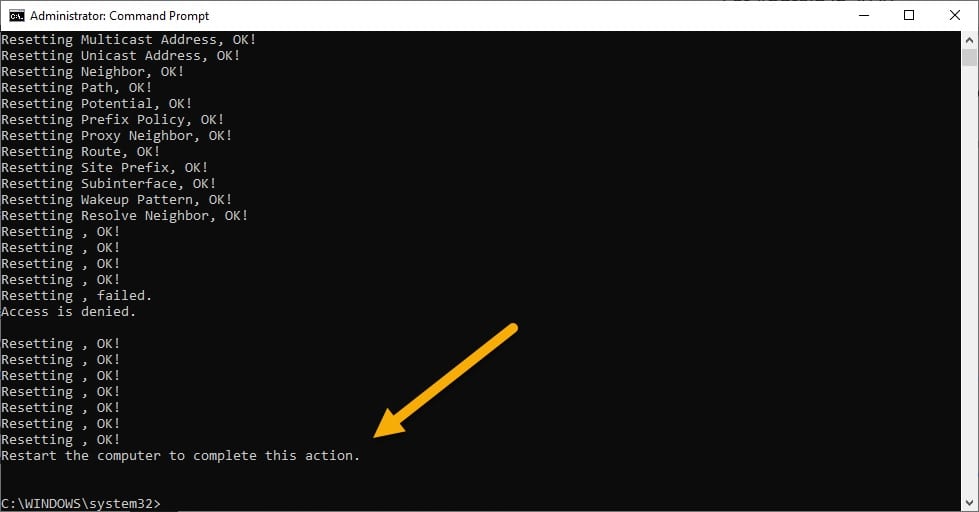
netsh winsock reset and hit enter
Step 3: Type “netsh int IP reset” and hit enter. In both cases, you will see that the command prompt is requesting you to restart the computer to save the changes.
Hopefully, these commands will solve your problem.
5. By disabling IPv6
IPv6 or Internet Protocol Version 6 is the latest advancement in the field of communication technology. With the help of IPv6 more TCP/IP address identifiers to be created.
Even though IPv6 has many advantages but sometimes it acts like a hurdle in your network experience. So, in order to heal “Ethernet doesn’t have a valid IP configuration” error we are going to disable IPv6. To do that just be obedient to the following steps:-
Step 1: Launch Network connections setting by either going to Control Panel>Network and Internet>Network Connections or launch it via RUN by typing “ncpa.cpl” and hitting enter.
Step 2: Click on the “network and sharing” from the appeared screen.
Step 3: Click on “Change adapter settings” from the list, placed on the left side of your screen.
Step 4: Now, Right-click on the ethernet and go to properties.
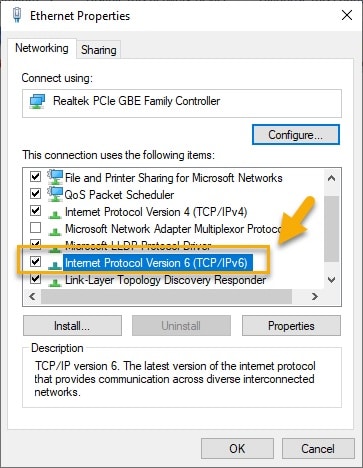
Step 5: afterward, untick Internet Protocol Version 6(IPv6) from the list.
Finally, restart your computer and you have fixed “Ethernet doesn’t have a valid IP configuration” error.
6. By Reinstalling TCP/IP
TCP and IP are two of the most important network protocol and there lacking can be the reason behind ‘Ethernet doesn’t have a valid IP configuration” error.
So, let’s install TCP and IP one more time and see if we can fix that error.
To do that follow the following steps:-
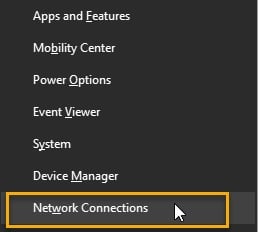
Step 1: Hit Windows + X and from the appeared list click on “Network connection”.
Step 2: From the list titled “Change your Network setting” click on change adapter option.
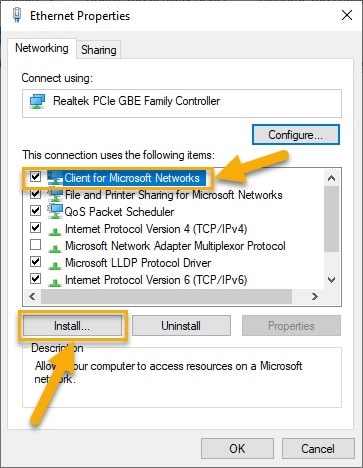
Step 3: Right-click on the ethernet and click Properties.
Step 4: Click on Install.
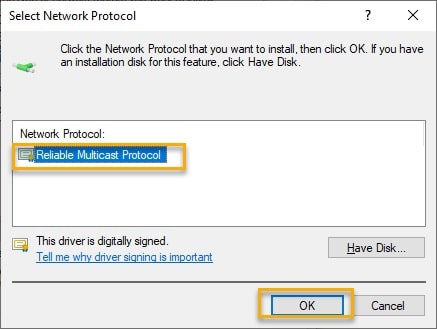
Step 5: then select Protocol and click Add from the next window
Step 6: Finally, click OK after selecting “Reliable Multicast Protocol” option.
Now restart your computer after saying goodbye to“Ethernet doesn’t have a valid IP configuration” error.
7. By reinstalling Network Adapter Drivers:-
You need to make sure your network adapter is properly installed in your PC that you can check under device manager.
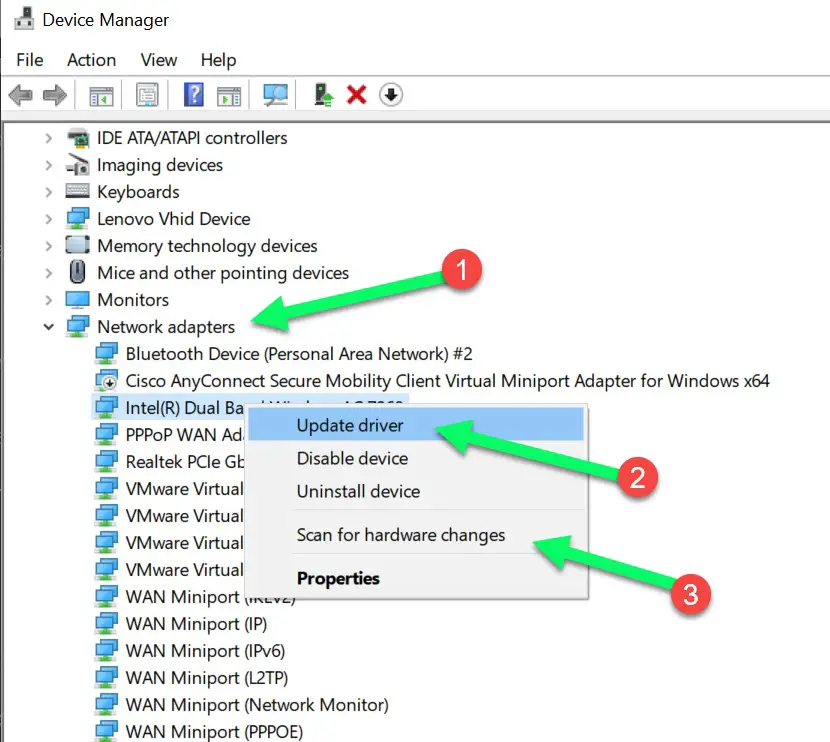
To access the device manager, right-click the Start menu and select the “Device Manager” option or Open the run menu by pressing windows key + R and enter the “devmgmt.msc” command.
Look for the “Network Adapters” option and select your network adapter, if it’s disabled then enable it. if it’s not detecting a click on the “Scan for hardware Changes” option to scan your PC.
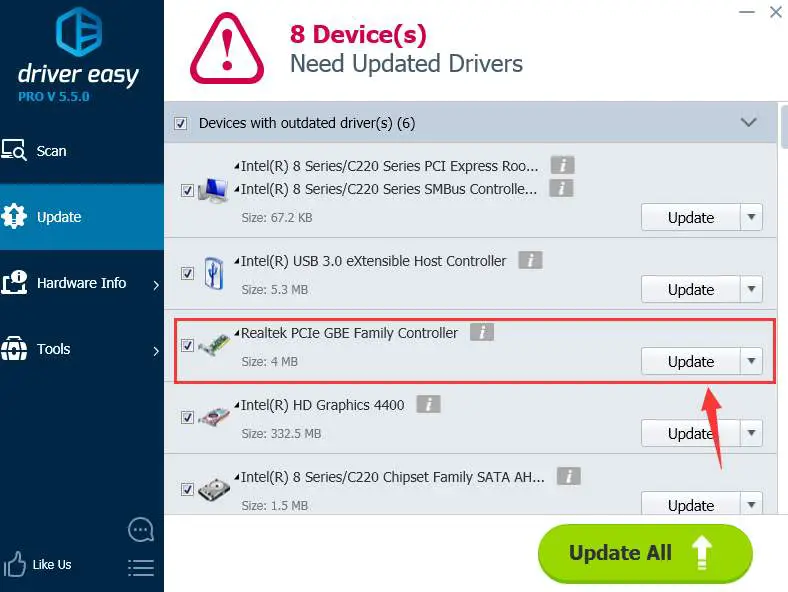
If everything fails to work, then there is a chance that your Adapter’s Driver is not installed. For that we recommend you to use Driver Easy (Download Here).
Driver Easy is an application that was made to automatically check your ethernet driver. It will do everything for you, you don’t need any manual configuration.
Just be obedient to the following steps and you are good to go.
Step 1: Launch the app after installing
Step 2: Do a quick scan by which you will be able to see the drivers that you need to install.
Step 3: Click on Update all or a specific driver that you need to install.
After this restart your computer and eradicate “Ethernet doesn’t have a valid IP configuration” error.
8. Use In-Built Internet Connection Troubleshooter
Windows 10 is pre-built with lots of utility that a normal user don’t know about this, To fix the Internet connection issues in windows come with Internet connection troubleshooter that you can access under settings.
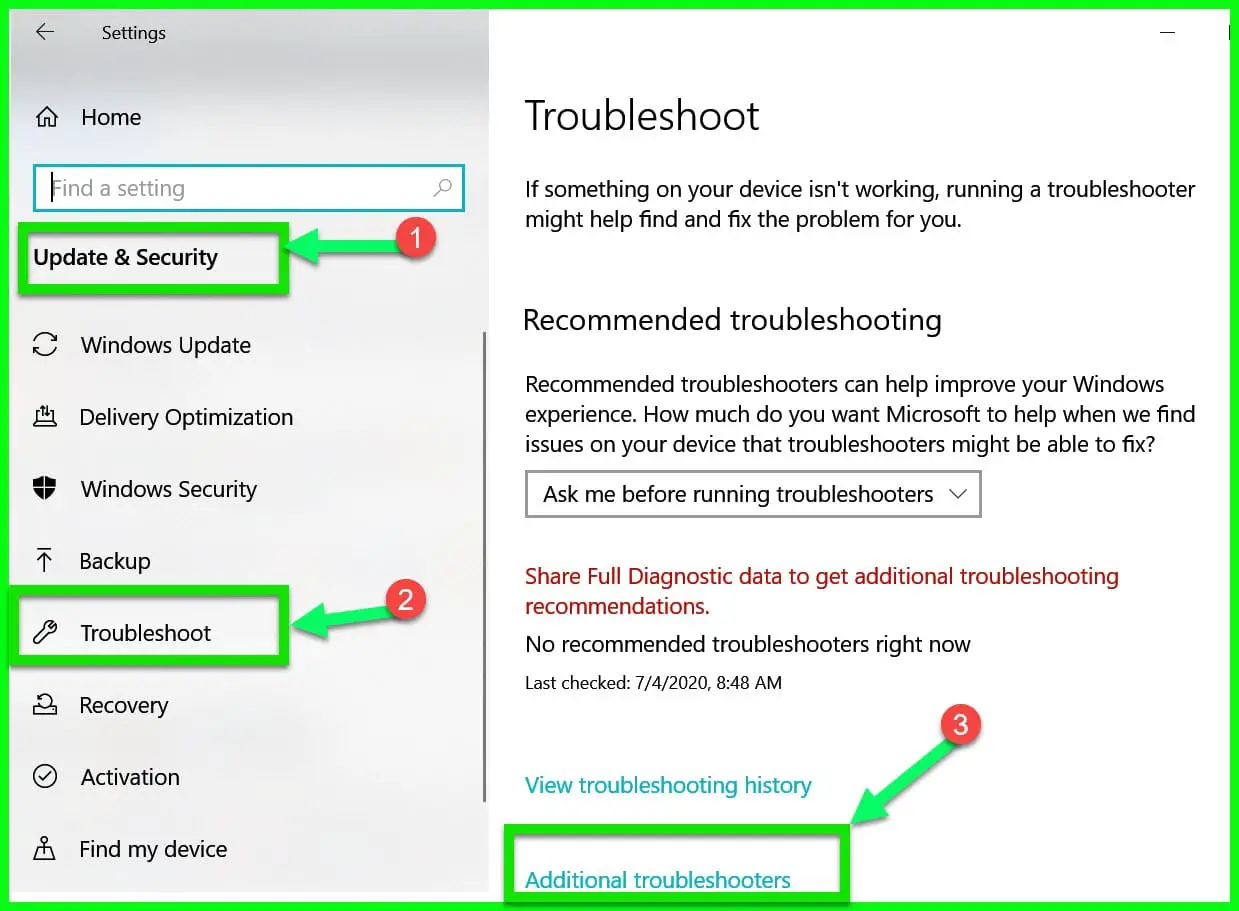
To access this troubleshooter, Right-click on the Start menu and select the Settings or Press the “Windows Key + X” on your keyword.
Click on the “Update and Security” option and click on the troubleshoot tab under it. Under troubleshoot, option, click on the “Additional Troubleshooters” option.
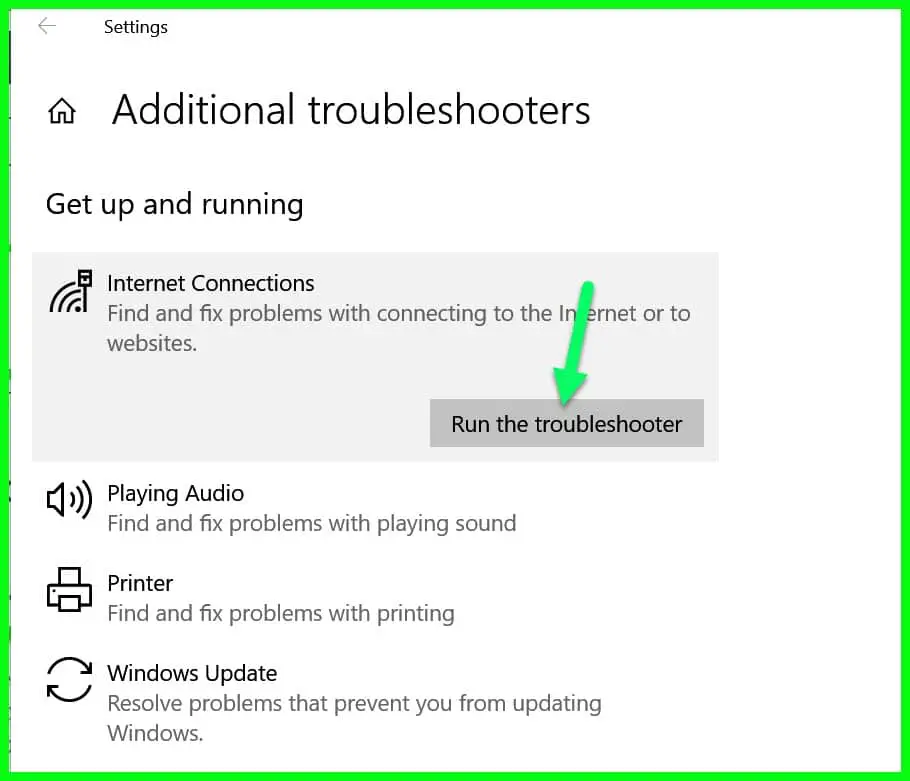
here click on the “Internet Connections” and select the “Run the Troubleshooter” to start the troubleshooting your Ethernet doesn’t have a valid IP configuration issue.
9. Use Windows Repair Utility
Don’t be confused with the name windows repair utility, it’s not an in-build window program it’s a third-party repair utility that is coming with lots of options to fix your common PC issues like Ethernet doesn’t have a valid IP configuration.
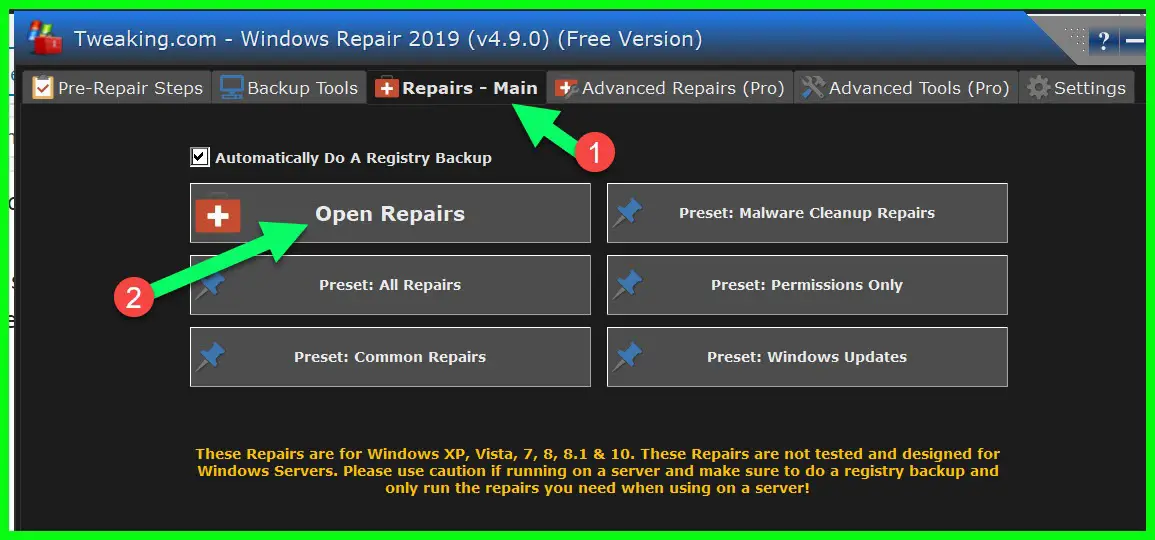
First, download the Windows Repair utility in your PC and install it, it’s coming in both free and paid versions but in our troubleshooting free version is more than enough.
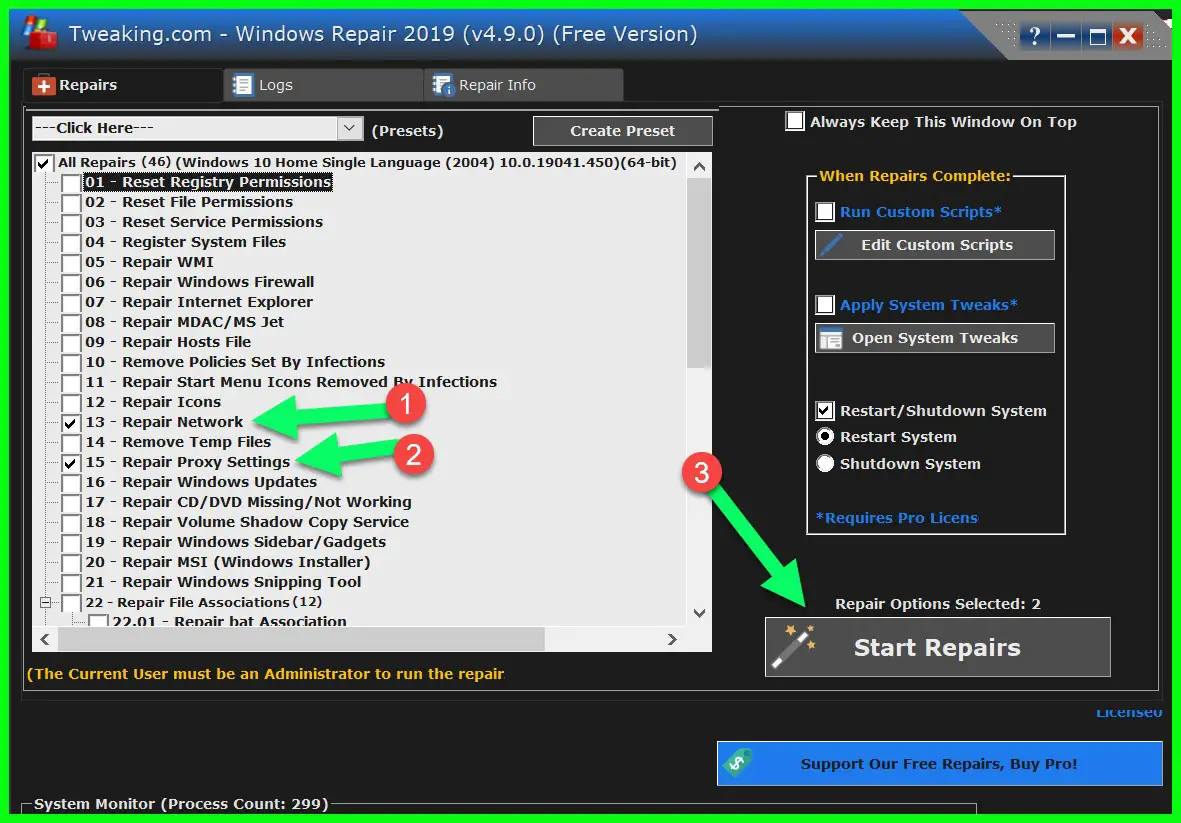
After installation opens the tool and clicks on the “Repairs – Main” option and click on the Open Repairs option.
it will prompt you warning to run this tool in safe mode but it’s ok, just click on the I understand the risk option.
Here by-default all repairs option is selected, Just uncheck all the options and only select the “Repair Network” and “Repair Proxy Settings” and click on the “Start Repairs” option to start your network card and proxy configuration repair.
it will take a little bit of time and most probably it will fix your problem.
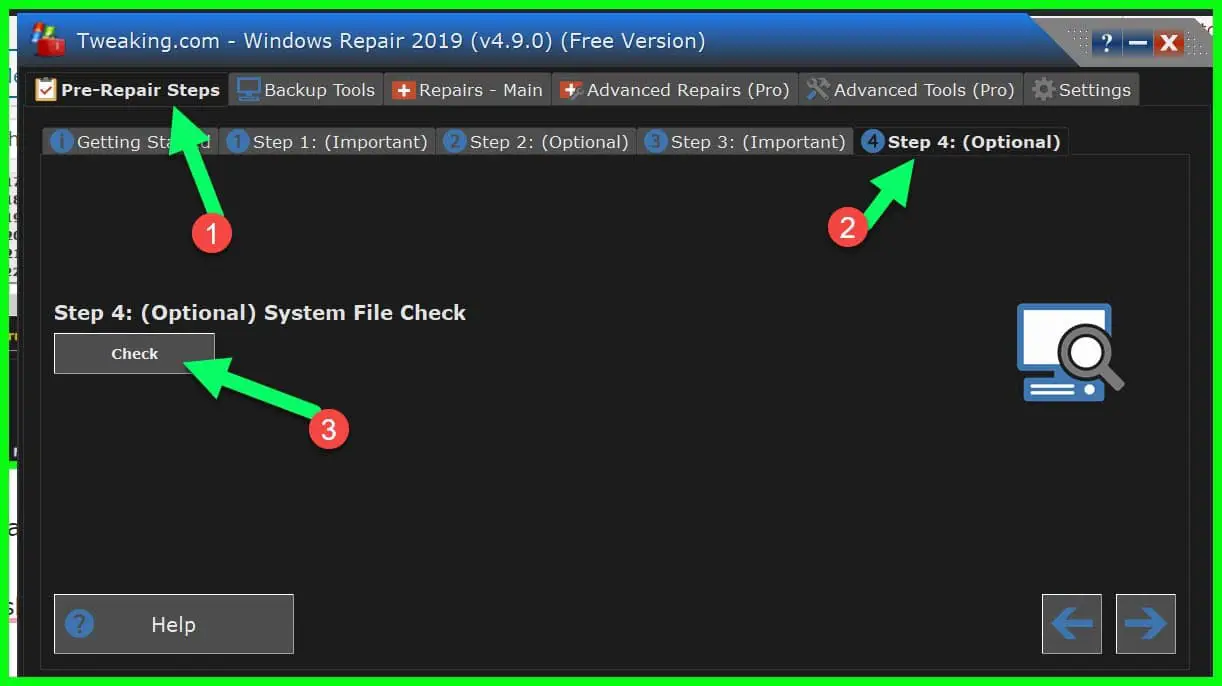
I will also recommend you to run the “System File Check” option under the Pre-Repair steps.
it will start the system file scan that is much effective to fix any system-related issues.
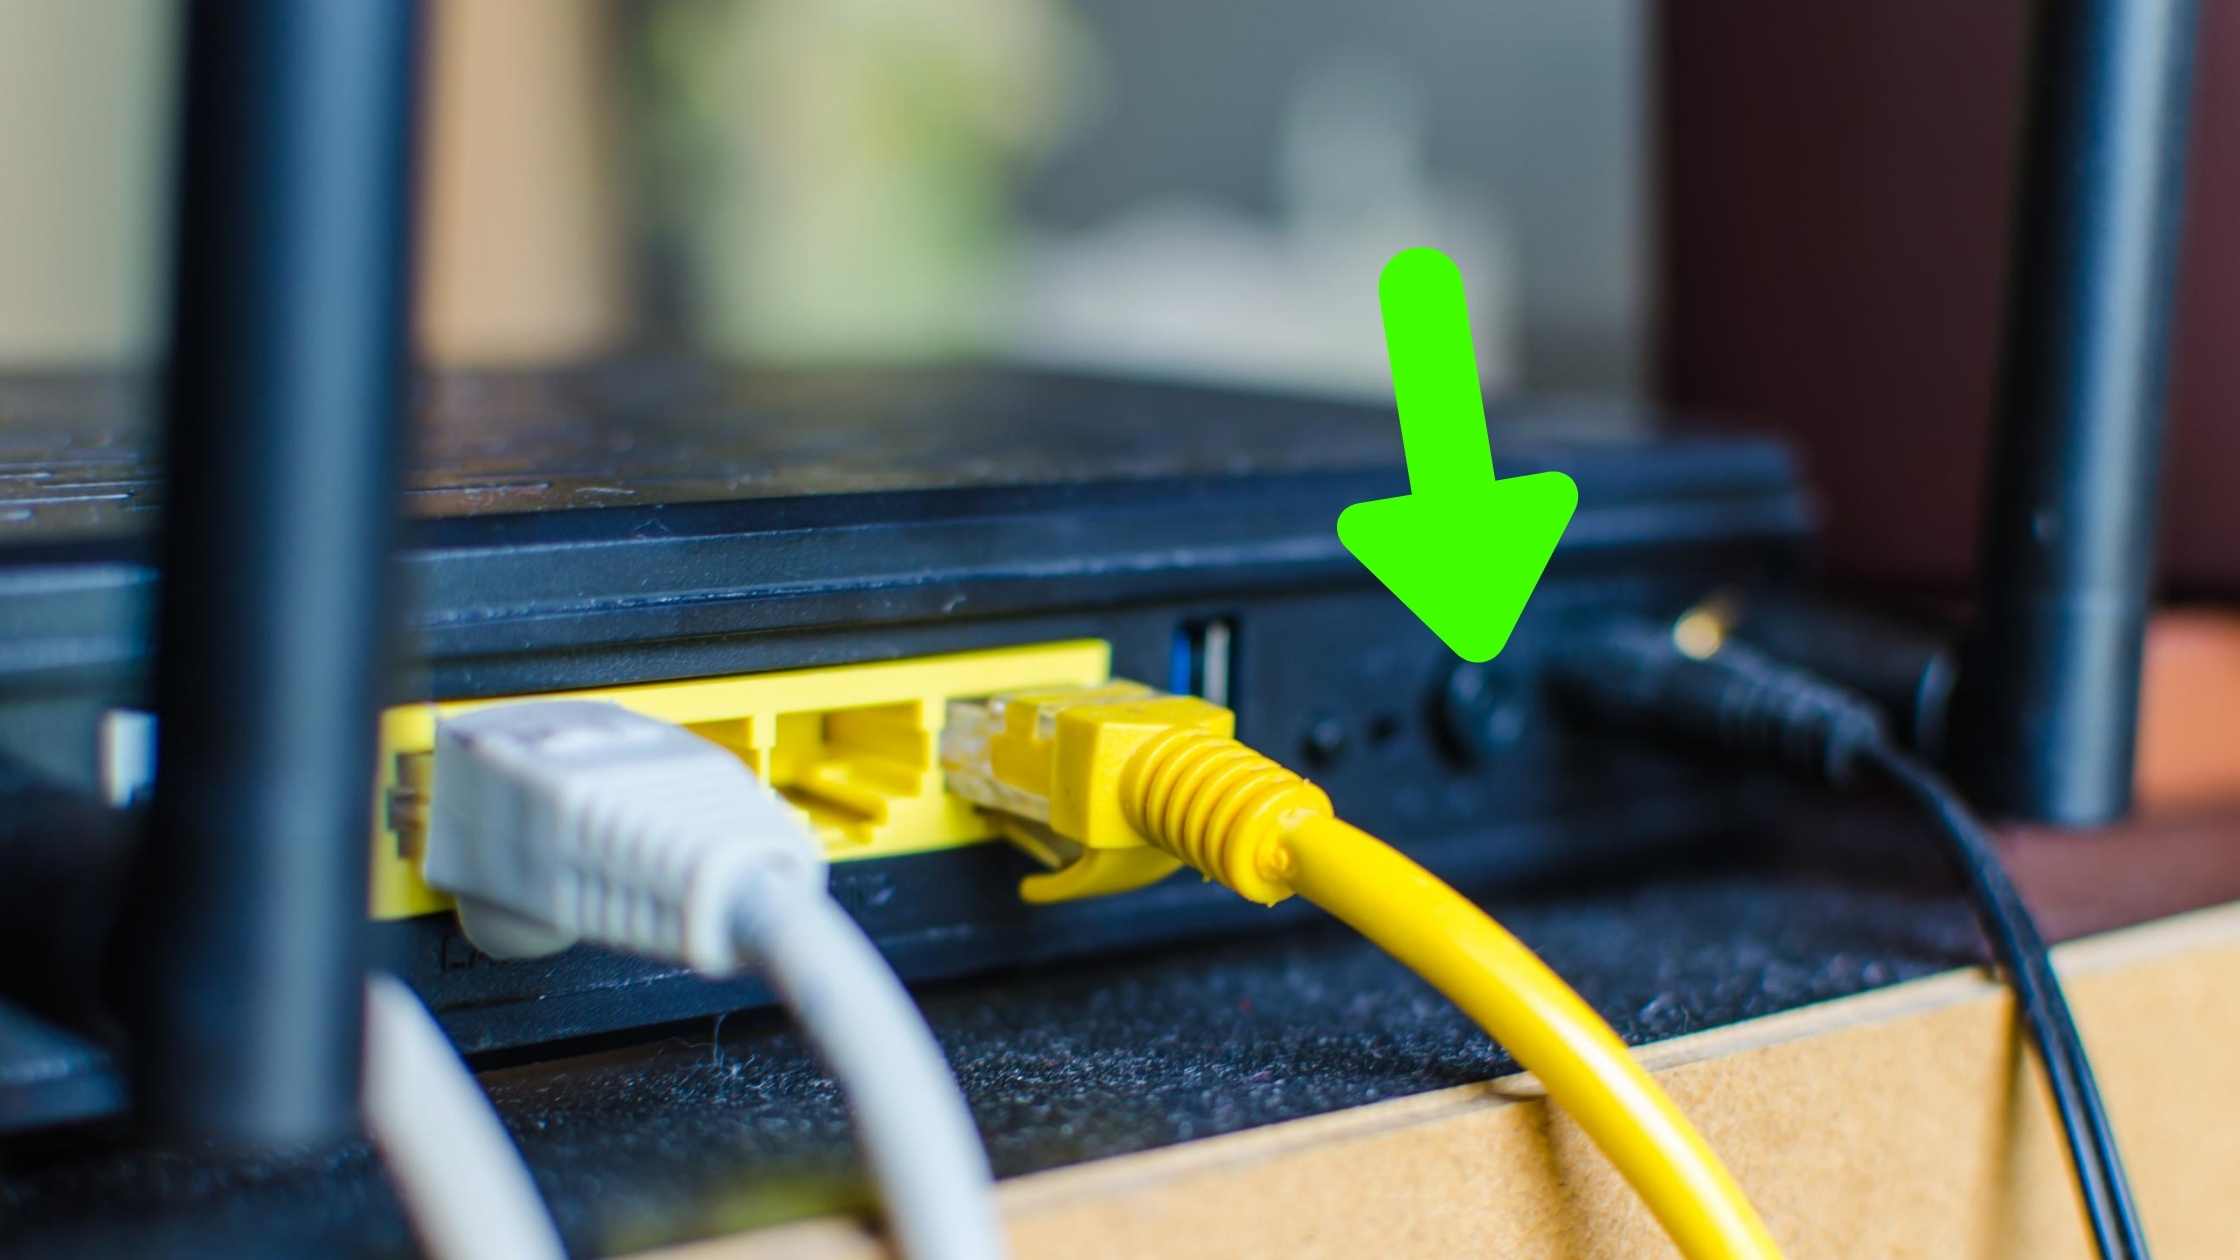
10. Restart Router or Modem
If you have done everything and still your computer is showing Ethernet doesn’t have a valid IP configuration” error. Then you should try restarting your Router or/and modem.
And if it still fails to work then it may mean that your Router is not working properly and it is the time that you make a call to its manufacturer.
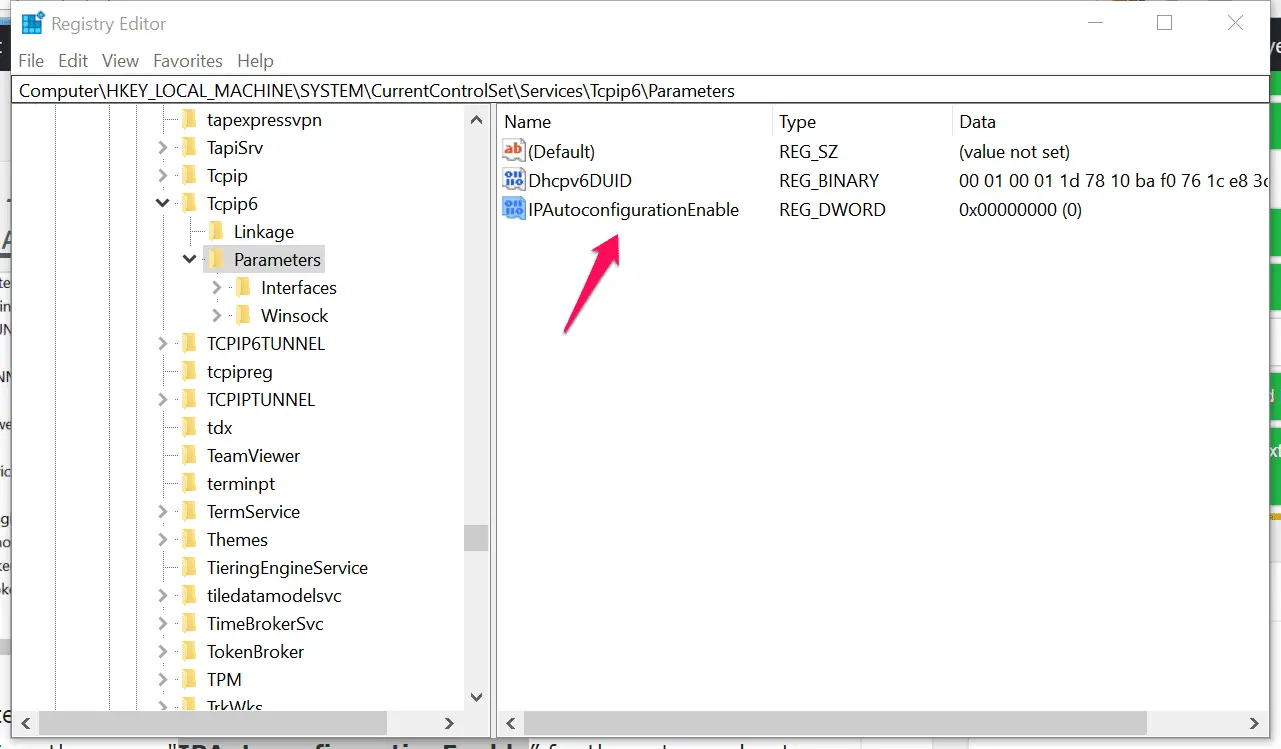
11. Enable IPAutoconfigurationEnable In Registry
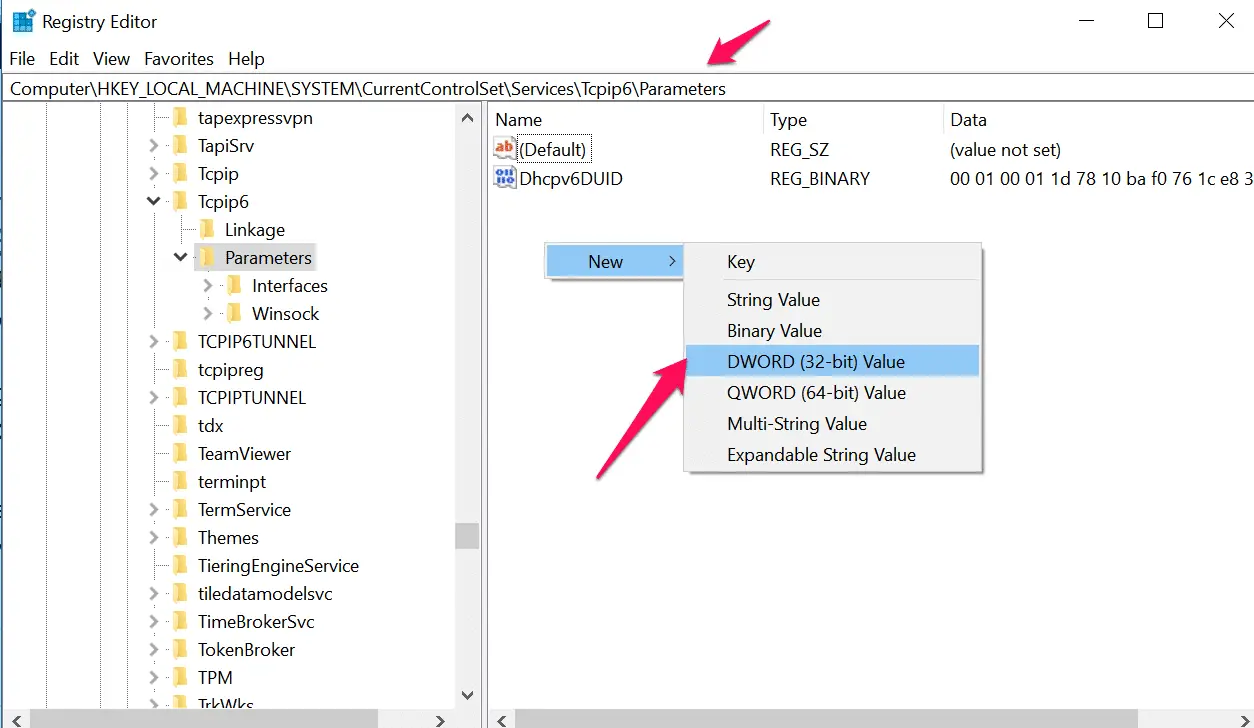
If restarting the PC and router does not help, open the “Run” window and type “regedit”.
In the registry, navigate to the folder “Parameters” via “HKEY_LOCAL_MACHINE| SYSTEM| CurrentControlSet Services | TCPIP”.
Here, you can create a new “DWORD value (32 Bit)” via the context command “New” after a right-click on it. Type the name “IPAutoconfigurationEnable” for the entry and enter the value “0” after double-clicking on it in the “Edit” window.
After restarting the computer, the LAN or Internet connection should start working properly again.
Summary:-
- The “Ethernet doesn’t have a valid IP configuration” error occurs because DHCP didn’t get the valid IP address from the Network Interface Card(NIC).
- In Windows dynamic configuration enabled by default
- It can be due to many different methods like malfunction of EthernetCable, or disabled Network Adapter, enabled fast startup, disabled IPv6, Malufuntioning of Router Modern
- It can be solved by correcting the above faults or by the command prompt(netsh winsock reset, netsh int IP reset), Reinstalling IP/TCP and Network adapter.
Note: Read the full article to get the full knowledge.


