


Application processes can sometimes render our system frozen. This is a really annoying error that usually takes time to resolve. This is where Windows 10 safe mode comes in.
It is a vital troubleshooting tool that can help restore a system back to its normal functionalities and it can also help you sort out other issues like finding out what is stopping your system from booting properly.
What Does Windows 10 Safe Mode Mean
Windows 10 Safe mode is a troubleshooting tool (as previously explained) that helps you start up your system with minimal functions working and a limited number of applications and app processes.
This is very important especially when we face systems that become really leggy or systems that don’t even boot at all. These errors are usually caused by malicious processes or files and they inhibit the performance of your system.
With Safe mode, you can boot your computer system without booting up these malicious processes too, and then sort the problem out with antivirus or maybe deleting the app if you already know what is responsible.
Safe mode cannot be turned on forever, even though that would be really nice. It should only be used when issues arise because there are certain functions like Networking that may not work when your system is in safe mode unless specified.
How To Boot Your System Into Windows 10 Safe Mode
Some signs you should watch out for are “starting up our system and it is taking more than a few minutes to get to the sign-in page”. This can be an early indicator that something is wrong with an app or a process and it is messing up with your system.
Other signs include a frozen screen and lagging. When any one of these situations occurs, it might be time to use Windows 10 safe mode to fix the problem and “make your system great again“”. 😎
Choosing the method you will use depends on what is happening to your system. Some methods work only if the screen is on and logged in. Some work even when it isn’t on, others work while the system is still in the booting process.
So choosing a safe mood booting process will depend on the problem your system is facing.
Here is a list of ways to boot your system into Safe Mode
Interrupting The Windows 10 Normal Boot Process 3 Times In A Row
Now, this method does not need you to be logged in. You can access safe mode straight from the booting process. There is a feature in Windows 10 called the Automatic Repair Mode. Your system will automatically open up this mode whenever your booting process is interrupted three times in a row.
From this mode, following our step-by-step guide, you can access safe mode. If you’re wondering how to interrupt your booting process, here’s how.
Press the Power button for at least 4 seconds every time your system starts booting.
Do it consecutively 3 times and when your system is booting for the fourth time, it will go into Automatic Repair Mode.
How You Know Your System Is In Automatic Repair Mode
When you’ve interrupted the booting process 3 times, on the fourth time, a message will be displayed beneath the Windows logo that your system is Preparing Automatic Repair.
Continuing The Booting Into Safe Mode Process
If you are asked to sign in, sign in with an account with admin privileges. After signing in, your system will go into Diagnostic mode.
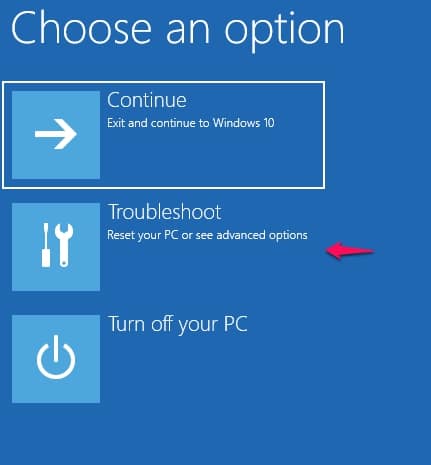
A message will appear that reads Diagnosing Your PC. When that’s done, the next screen that should appear is Automatic Repair. There will be two options available to you

- Restart/Shutdown
- Advanced Options.

Choose Advanced Options and then from the menu that appears, choose Troubleshoot.
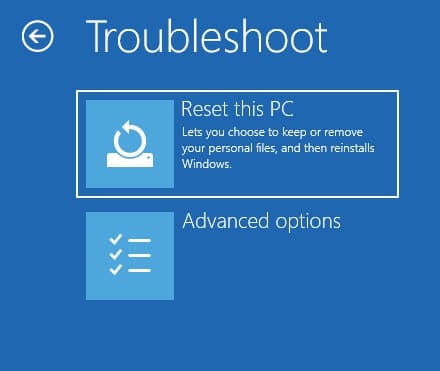
In the Troubleshoot menu, search for and click on Advanced Options. Next, search for Startup Settings.
This feature might not be fairly obvious in some systems. You might have to click on See More Recovery Options if you don’t see Startup Settings when you open up Advanced Options.
Clicking on See More Recovery Options will open up a list of other options available to you.
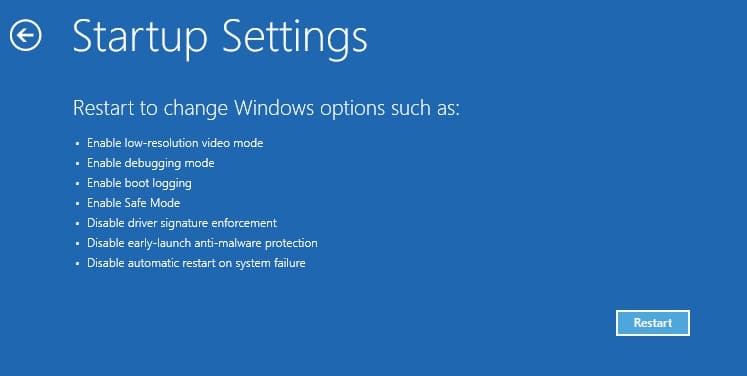
Find and click on Startup settings to gain access to a list of booting options available to you.
Press the Restart button at the bottom right-hand side of your screen and then enable safe mode by pressing the F4 key or the numerical 4.
You will find other safe modes options there. Safe Mode With Networking Safe Mode With Command Prompt. But what we’re solely interested in for now is just Safe Mode and this is one of the ways you can access it.
When you enable Safe Mode, your system will boot and you will have to log in normally with an account that enjoys administrative privileges to make any changes to apps or processes that might be slowing down your system.
Using The Shift, Power, And Restart Keys On The Windows Sign-in Screen
This process works well especially for situations where you cannot for some reason or the other log into your Windows 10 system. This method will help you boot your system only if you can at least get to the sign-in screen.
Here’s how to go about it:
Press and hold the Shift key and press the Power key, assuming you’re already on the sign-in screen.
A menu will open up, click Restart in that menu. Your Windows 10 will restart and ask you to choose from a list of options.
Search for and select Troubleshoot. From the Troubleshoot menu, click on Advanced Options.
Next, search for Startup Settings. This feature might not be easily detected in your system so you might have to click on See More Recovery Options if you don’t see Startup Settings.
Clicking on See More Recovery Options will open up a list of other options available to you.
Locate and click on Startup settings to gain access to a list of booting options available to you.
Press the Restart button at the bottom right-hand side of your screen and then enable safe mode by pressing the F4 key or the numerical key 4.
Remember that like the former method, you will also find other different Safe Mode options on the list. If you want other Safe Mode options like Safe Mode Networking, choose the corresponding function key to boot your system into that type of safe mode.
Remember to log in with an admin account to be able to fix the processes that are disturbing your system easily.
Using A Windows 10 Flash USB Recovery Drive To Boot Your System
Windows 10 allows a really important feature that makes it possible for users to create a recovery drive (probably from another Windows 10 user) and use that drive to boot their own state in scenarios when it won’t boot.
If you created a USB recovery drive before your system went belly up, then that’s perfect. Use the drive.
You can also just create a recovery drive from another user by copying the system. Navigate to Recovery Drive and copy to the flash USB you already inserted to the system.
Once you’re done with that, insert that flash USB into your own system and use it to boot your system.
Load the content of the drive when the option to do so pops up. The first screen that appears is the Choose your keyboard layout.
The first option (US) is usually the choice of readers that will read this article (unless you’re partial to Azeri Latin).
Choose the first option if that’s what you want or click on See More Keyboard Layout if you’re not satisfied with the options presented.
When you’re done choosing a keyboard layout, the next screen will ask you to Choose An Option.
This should be familiar to you already if you have gone through the first two methods in this article.
Select Troubleshoot and from the Troubleshoot menu, click on Advanced Options. Next, search for Startup Settings.
This feature might not be easily be detected in your system so you might have to click on See More Recovery Options if you don’t see Startup Settings. Clicking on See More Recovery Options will open up a list of other options available to you.
Find and now click on Startup settings to gain access to a list of booting options available to you.
Press the Restart button at the bottom right-hand side of your screen and then enable safe mode by pressing the F4 key or the numerical key 4. When your system boots into safe mode, fix up the issues hurting your system.
Enabling Safe Mode By Using The System Configuration Tool
This is perhaps the easiest method of all but it requires that your system is logged into Windows 10. Assuming the problem disturbing your system isn’t hindering you from logging in, then this method is one of the best bets for you to access Windows 10 safe mode with.
Here’s how to go about it.
Use the search field in the taskbar to search for System Configuration. When it appears, click on the icon or shortcut.
On the top of the System Configuration screen, there is a taskbar filled with options. Search for and click on the Boot option.
When the Boot menu appears, select Safe Boot and apply the settings by clicking on OK. To enter safe mode, Windows will inform you that you have to restart your computer. Two options will appear.
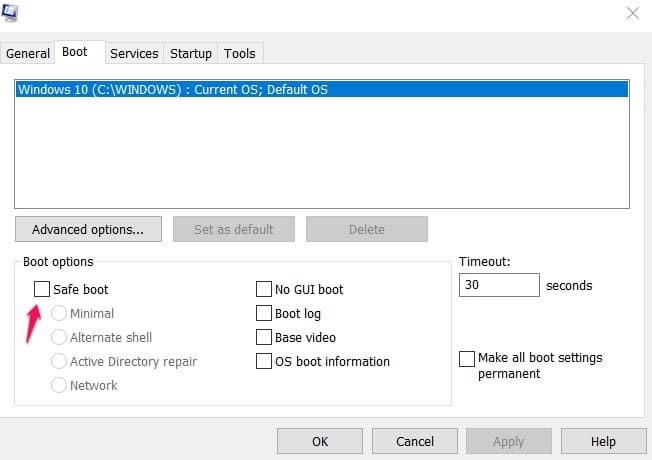
- Restart – Press this if you immediately want to enter safe mode.
- Exit Without Restart – Use this option if there are a few loose ends you want to tie up.
After you’re done, just restart your computer to enter into safe mode. This method is really straightforward and helps you deal with any malicious application or process easily.
Access The Recovery Options And Enable Safe Mode
Here is another method that hinges on the fact that you can log into Windows 10. If you can do that, this is another option to use if you want to boot your system into Windows 10 safe mode.
Use the shortcut (Windows + I) or just navigate to Settings. Whichever you prefer.
Use the search bar to find the Update and Security menu in Settings. Expand the menu and search for Recovery on the left-hand side of the menu.
Press Recovery when you find it and then navigate to the right-hand side of the Recovery menu that will come up on your screen to search for and click on Restart Now.
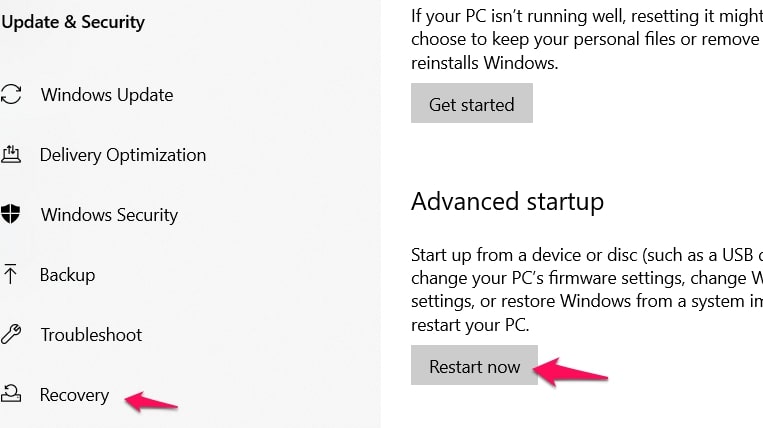
Your system will immediately restart but not as usual. You will be directed to a very familiar (at least to readers who have been following this article) option that we have used quite a lot in the other methods.
When your Windows restarts, the first screen that appears is the Choose An Option screen.
This is where you choose the Troubleshoot option and like the other methods click on Advanced Options.
The next step to take is to search for Startup Settings.
This feature may not always easily be found in your system so you might have to click on See More Recovery Options if you don’t see Startup Settings immediately you click on Advanced Options. Clicking on See More Recovery Options will open up a list of other options available to you.
Find and now click on Startup Settings to gain access to a list of booting options available to you.
Press the Restart button at the bottom right-hand side of your screen and then enable safe mode by pressing the F4 key or the numerical key 4. You’ve just easily navigated your system to windows 10 safe mode.
This method is like the previous one but a little bit lengthier. If users know their way around a computer really well though, it shouldn’t take a few minutes for you to boot your computer into safe mode and deal with the malicious apps and processes easily using this method.
The next two methods work well enough but they have one or two drawbacks that users must be aware of before trying them out. The drawbacks of the methods will be explained under each method.

Using A Combo Of A Windows 10 Installation Drive And The Command Prompt
This method uses one feature that a previous method used before. Using a (Flash USB Recovery drive) or a Windows 10 setup DVD and tinkering a bit through the Command Prompt, you can boot your system into safe mode.
This method is preferred if the problem with your system is that its Windows 10 is broken. Insert whatever form (Flash USB Recovery drive or a Windows 10 setup DVD) you have available and use it to boot your system.
Choose the normal settings you prefer, like languages, time and currency formats, and keyboard layout preferences.
Apply the changes made by clicking on Next. On the next screen that appears, look for an option that reads Repair Your Computer.
This option should be at the bottom left-hand side of your screen. Click on the option and a familiar screen will appear.
The Choose An Options menu. Choose Troubleshoot just like we did in previous methods and in the Troubleshoot menu, choose Advanced Options.
Here is where it gets a lot different from other methods.
In the Advanced Options menu, click on Command Prompt. When the Command Prompt window pops up, type in the following command carefully.
bcdedit / set {default} safeboot minimal
Enter in the command (press the enter key) and then afterward you will get a message informing you that The Operation was Completed Successfully.
Exit the command prompt and click on Continue to reboot your system.
After the reboot, your system will enter safe mode and now you can perform any changes you want using admin login details.
The Major Drawback
The issue is that with this method, you’ve just basically told your system to boot with safe mode every time you turn on your system. This drawback is what makes the method unappealing to most users.
You can disable it though. You can do it by running the same procedure that got you into the Command Prompt and inputting this command
bcdedit / deletevalue {default} safeboot
This should ensure your system boots properly without going into safe mode again.
Using (Shift + F8)
In previous Windows Operating Systems like Windows 7, you could easily access the Advanced Boot Options window by pressing the F8 button just before your Windows finished booting.
You could then maneuver from the Advanced Boot options to booting your system to safe mode. It was a good method that worked well and there is also a similar method with a few tweaks that can work with Windows 10.
There are a few caveats though. Windows 8 upwards have a fast booting system that literally nothing can disrupt. Not even shortcut keys are supported by the Operating System.
Microsoft, in creating the fastest booting process has managed to block a loophole in accessing safe mode in all but some devices. The devices that the method might still work on are PCs with classic BIOS and no Solid-State Drive (SSD).
Modern systems with SSDs and UEFI BIOS can not utilize this tip. This is the main drawback. If your system is not modern and you don’t use SSDs, then continue reading on. If you have a modern system, this method won’t work for you.
Here’s how to go about it.
Boot your system and interrupt the booting process with the combo (Shift + F8).
This will open the Advanced Boot Options window where you can then choose to start your Windows 10 in safe mode.
Because most users are likely to use modern PCs with superfast booting processes, this method is the least advised method on our list of how to start your computer in safe mode.

How To Perform A System Restore In Windows 10 Safe Mode
We have explained ways to get your system into safe mode to deal with malicious processes and faulty applications. This guide is more centered on how to solve the problem after getting your system into safe mode using the System Restore feature.
This feature is a time machine of some sort that can only go back in time to when your system worked perfectly well and restore that same perfection.
The first step is using any of the methods above (use the methods based on which fits the problem of the system best) to boot your system into safe mode.
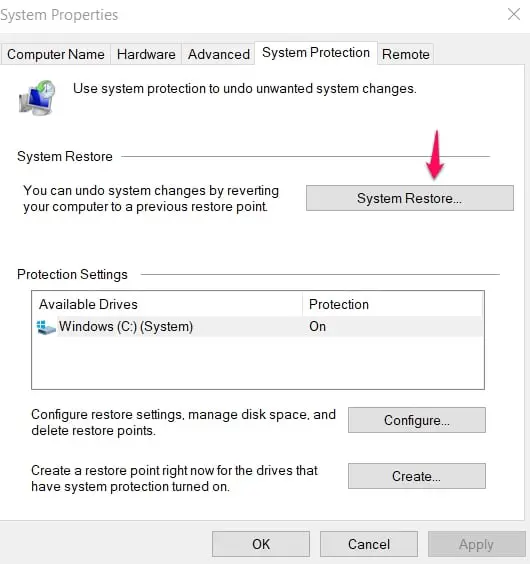
Once you’re done logging in with admin credentials and your system comes to life, search for System Restore using the taskbar search space. Out of the search answers, click on Create A Restore Point.
This opens up a menu called System Properties. In the System Properties menu, search for and click on System Restore.
In the System Restore window, you will have to click on Next. Before you click though, read through the page, it will warn you that while your pictures, documents, and other personal data won’t be affected, recently installed drivers and programs may be affected by this System Restore.
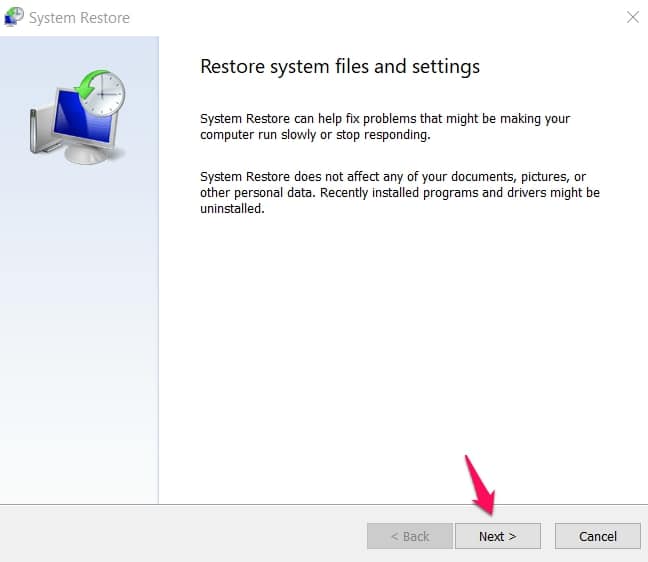
The good part about this is if you perform the System Restore, you will most likely clear the faulty app and process.
The not so good part is that you might also clear apps that are working well too. If this is a loss you’re willing to bear, continue with the System Restore.
There are two options.
- A manual System Restore point you created
- System generated System Restore points.
Choose a Restore Point you find appealing and select it. Click on Next, confirm the Restore point again, and then click on Finish.
Your system will automatically go back in time to that point where the faulty process didn’t exist. You may lose some data but at least you’ll have your system back to normal.
How to Exit Safe Mode on Windows 10
The normal way to exit from the safe mode is, just restart your PC from the Start menu or if you want to use command prompt then use the command shutdown /r that will prompt you for restart.
If you don’t want to restart the PC without any prompt then open the run menu with “Windows key + R” and enter ‘msconfig” and tap on the “Boot” tab.
Uncheck the “Safe mode” option in the Boot options.

Safe Mode Launcher
Safe Mode launcher (Download Here) is a light version of Windows that only loads the bare minimum of drivers and services that are essential for the operating system to run.
If Windows won’t start, or there’s a problem that’s stopping it from running normally, Safe Mode can help you troubleshoot the cause.
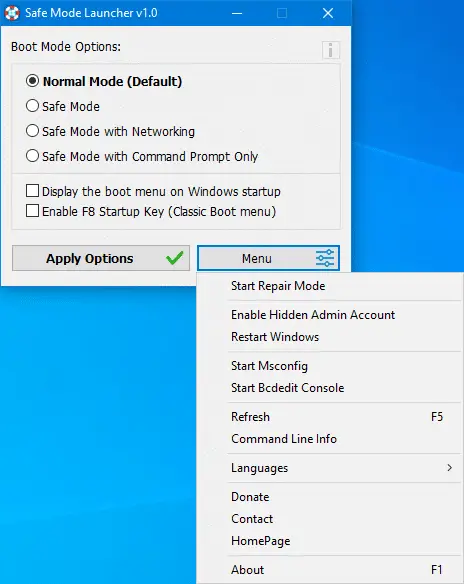
The process for getting into Safe Mode varies depending on the version of Windows you’re running. This small tool provides a front end for the boot-mode options and can restore the traditional F8 startup option that was removed from Windows 10. It also links to the main Windows troubleshooting tools.
Conclusion
Windows 10 Safe Mode is an important troubleshooting tool that helps us figure out how to keep our systems in good condition. It saves the time of always complaining on Microsoft’s Windows Support.
Have you ever tried any of the tips above?
Share your experiences about using Windows 10 Safe Mode with us in the comment section.

