The best way to improve your video viewing experience is to opt for an HDMI. HDMI stands for High Definition Multimedia Interface and it is often used by the game streamers in order to have an excellent gaming experience.
But, if you have a live gaming session coming up and suddenly your HDMI port is not working. This can very frustrating for you and can affect your career as well. In this article, we are going to fix the HDMI Port not working problem.
Why is my HDMI Port not working? 🤔
HDMI Port not working can be because of many different reasons such as the failure of your graphic card or some wrongful setting twitches. Sometimes, HDMI Port is not even the problem, the cable can malfunction as well.
A user can suffer from different HDMI related problem, such as a complete breakdown of HDMI and it’s not working at all, Either the voice or the display has some error, and/or the video is not up to the mark.
Therefore, in this article, we present to you the solutions for all the mentioned problems.
HDMI Port not working: Possible 9 Fixes
All the different fixes for HDMI Port not working is listed below.
1. Fix your Hardware
One of the most obvious reasons behind your HDMI Port not working is the failure of the hardware. This Hardware can either be malfunctioned or corrupted which return is causing problems. Therefore, before going further to the software part of the things it is better to check the hardware first.
Here are a few things that you need to do.
- Fix the HDMI Cable: Your HDMI can be malfunctioned because of aging or some external unwanted force. Another, thing you should note is that when you are buying a cable you should see whether it is compatible with your operating system or not, as there are different cables for different Operating Systems.
- Fix the HDMI Port: HDMI port not working is a more obvious reason to cause an error as compared to HDMI Cables, as there are more vulnerable to moisture and are more exposed to force. It can either be malfunctioned or corrupted.
So, check the mix and see whether there is a problem or not.
2. Reboot and Re-plug your devices
The easiest fix for any electronics-related problem is to restart it. But this case, this fix is even more useful as the HDMI Port not working problem is often caused due to a wrong a booting process.
In this scenario, you need to do both, reboot your device, and reconnect the cables. We have tried to simplify the process so that you can do it in a more efficient manner.
Step 1: Switch ON the HDMI Device and then start your computer.
Step 2: Now, you need to switch the HDMI Device off, at the same time, make sure that your computer is ON.
Step 3: Finally, re-plug the devices connected via HDMI cable.
Hopefully, this will help you to solve the HDMI port not working problem.
3. Your Default device should be the one connected via HDMI
This should only be done after the failure of the first two steps. In this case, we are going to solve the HDMI port not working problem by making sure that, the default device is the one connected via HDMI. To do that, you need to follow the prescribed steps:-
Step 1: Right-click on the volume icon placed at the bottom left side of the screen( on the taskbar) and then select “Open Sound Settings”.
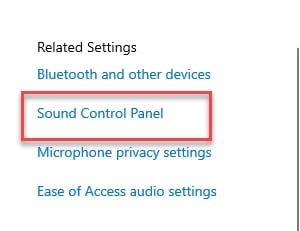
Step 2: You will be redirected to the Sounds Settings window, from there you need to click on the Sound Control Panel button, from the related settings panel.
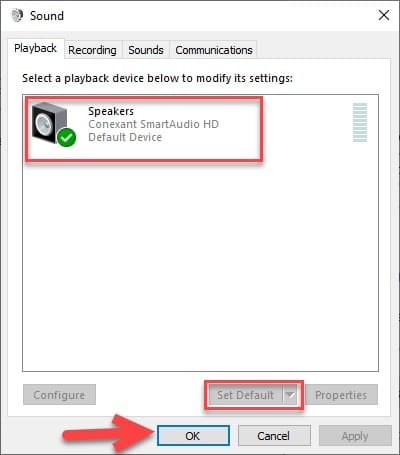
Step 3: This will redirect you to the Sounds properties, there you need to select the HDMI device, then select Set Default and then click OK.
This will make your HDMI device as default. After the completion of the process you need to restart your computer and hopefully, your HDMI Port not working problem is solved.
4. Uninstall the most recent software
Even though, this is the rarest scenario but worth a look. There are instances, as per user experiences, that some software interrupts your HDMI port and hence cause HDMI Port not working problem.
To uninstall the most recent software, you need to follow the prescribed steps:-
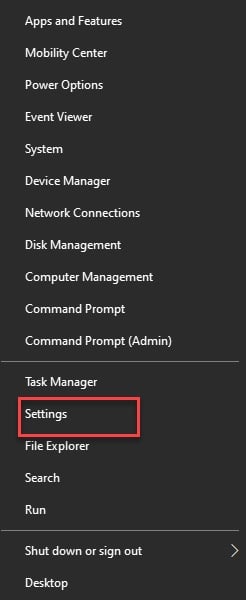
Step 1: Launch the Settings by either searching it out from the start menu or by right-clicking on the start menu and then select Settings from the appeared list.
Step 2: From the appeared screen you need to select the Apps button.
Step 3: Now, you need to make sure that you are on the Apps & Feature tab and then Apps & Feature option, select the App that you want to delete, click it and then click Uninstall.
Note: You can check the date of the application’s installation date, in order to select the most recent application.
After the deletion, you should restart the device and hopefully, your HDMI Port not working problem is solved.
5. Configure your Graphics Driver
This is one of the most obvious reasons behind any Graphic related problem. Your Graphic Driver can either be outdated or can be corrupted. But this problem has a very easy fix that is mentioned below:-
Update the driver:-
To update the Graphics Drivers you need to follow the prescribed steps:-
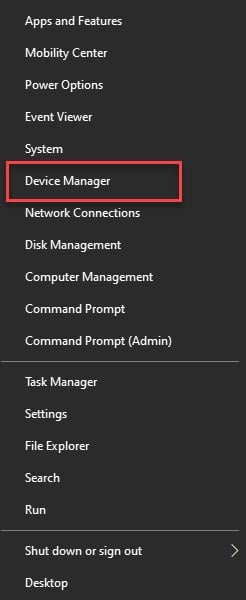
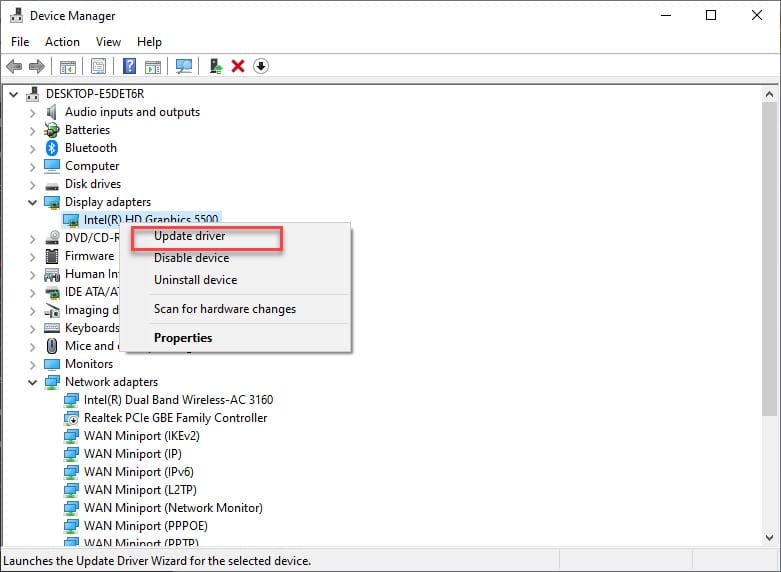
Step 1: Launch the Device Manager by either searching it out from the start menu or by right-clicking on the start menu and then select Device Manager from the appeared list.
Step 2: Now, from the appeared Device Manager window, you need to expand the Device Adapter option, right-click on the Intel Graphic Driver, and select Update Driver.
This will update your driver. Afterward, you need to restart your computer and hopefully, your HDMI Port not working problem will be solved.
Reinstall the driver:-
To reinstall the Graphics Driver, you need to follow the prescribed steps:-
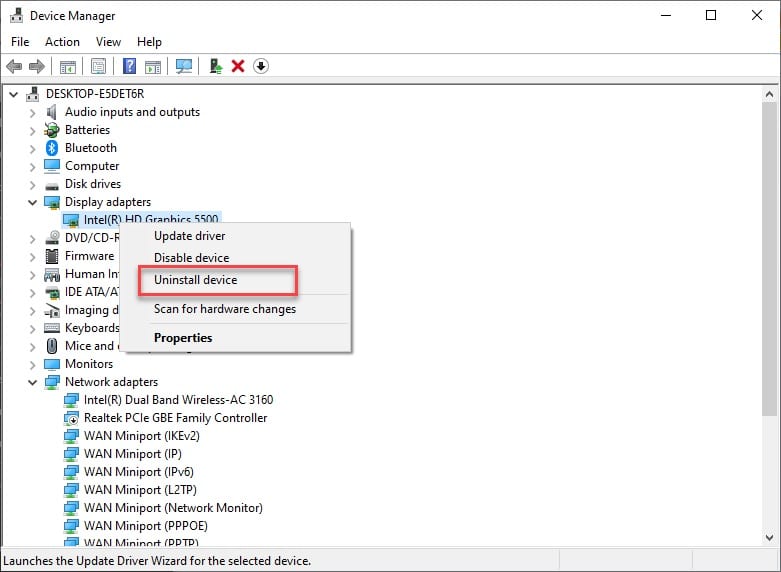
Step 1: Launch the Device Manager by either searching it out from the start menu or by right-clicking on the start menu and then select Device Manager from the appeared list.
Step 2: Now, from the appeared Device Manager window, you need to expand the Device Adapter option, right-click on the Intel Graphic Driver, and select Uninstall Device.
After the completion of the uninstallation process, we need to reinstall it.
To reinstall the driver follow the following steps:-
Step 3: Right-click on the Device Adapter and then select Scan for hardware changes.
This will reinstall the driver and hopefully, your HDMI Port not working problem will be solved.
6. Update your Operating System
If after updating the network driver, you are still facing the HDMI Port not working problem then this can also mean that your Operating System is not compatible with your HDMI setting.
Therefore, in this section, we are going to update your Windows 10. To do that, you need to follow the prescribed steps:-
Step 1: Launch the Settings by either searching it out from the start menu or by right-clicking on the start menu and then select Settings from the appeared list.
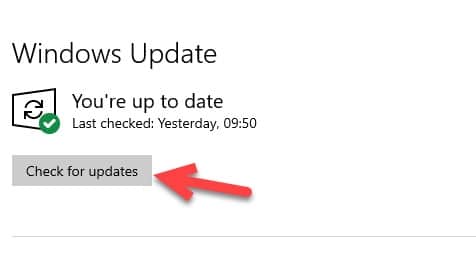
Step 2: From the appeared screen you need to select the Update & Security button.
Step 3: Now, from the appeared window, you need to make sure that you are on the Windows Update tab and then click on Check for updates.
This will update your system and then after a restart hopeful, your HDMI Port not working problem will be eliminated.
7. Clean Temporary files
Temporary files can cause a lot of trouble for you and malfunctioning of the HDMI Port is one of them. Therefore, in this section, we are going to clean the temporary files.
To do that you need to follow the prescribed steps:-
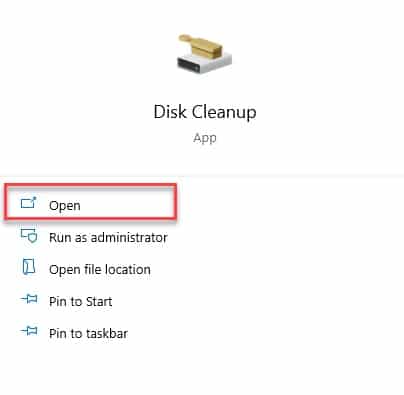
Step 1: Launch the Disk Cleanup application by searching it out from the start menu.
Step 2: Now, you need to choose the disk that you need to clean and then click on the “OK” button.
Note: This will ask administrator permission.
8. Fix your Registry
As mentioned earlier, the HDMI Port not working can be due to wrong setting twitches and the registry is one of them. In this section, we are going to fix the registry by the following steps:-
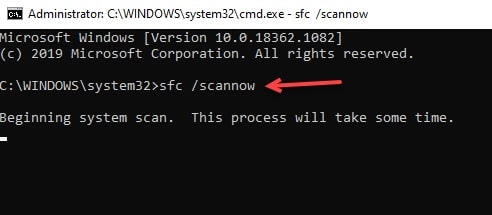
Step 1: Launch the Command Prompt as an administrator either by searching it out from the start menu or by RUN(Win + R), type “cmd” and hit Ctrl + Shift + enter.
Step 2: Type the following command and hit enter.
sfc /scannow
This will scan your registry, afterwards, you need to restart the system and hopefully, your HDMI Port not working problem will be resolved.
9. Scan for Virus and Malware
Viruses and Malware are one of those unwanted gifts that you don’t want. They can cause dozens of problems and the HDMI port not working is one of them.
You can use different anti-viruses such as Avast and anti-malware such as Malwarebytes, but we are going to use the in-built defense system of Windows OS.
To use the Windows Defender, you need to follow the prescribed steps:-
Step 1: Launch the Windows Security by searching it out from the start menu.
Step 2: Click on the Virus & Threat Protection(the shield icon) from the list placed on the left side of the window.
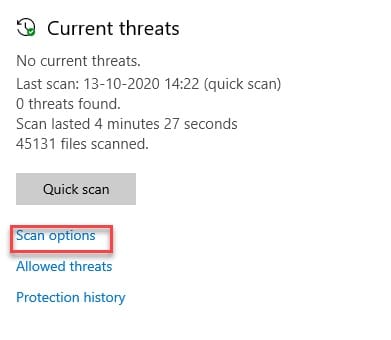
Step 3: From the appeared screen, you need to click on the “Scan Option” and then select Full Scan> Scan Now.
This will scan your computer for viruses and malware and then will fix the issue. As a result, your HDMI Port not working problem will be eradicated.
Summary
In this article, we have seen different fixes of the “HDMI Port not working” problem. This problem is can be caused due to many different reasons such as malfunctioned hardware, virus, etc. We have tried to cover fixes for all the mentioned problems.
Hopefully, this will solve your problem.


